Wednesday, February 29, 2012

Coconut Soup with Kelp Noodles & Shrimp


(4-5 servings)


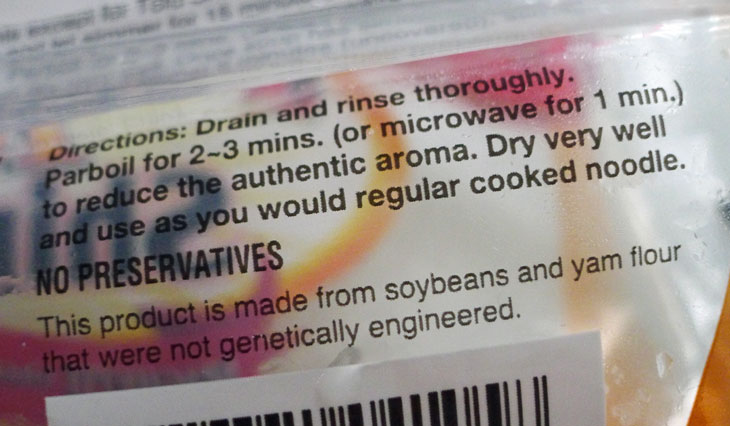
When I was looking for Shirataki noodles, I also noticed kelp noodles which I had never heard of. I grabbed a package of those to try out. They're made with seaweed and when used as a raw food, they have a wonderful crunchy texture similar to those Japanese seaweed salads. I dropped them into this coconut soup which softened them a great deal, yet they didn't become mushy or anything like that. They held up when I reheated the leftover soup the next day! I couldn't discern much of a smell or taste, and came away mostly loving their texture both raw and cooked.

These noodles are high in minerals and very low in carbs. The entire package (of 3 servings) only has 18 calories (3g carbs)! Plus they are gluten free!


2 cups chicken broth
3-4 tbsp fish sauce
3-4 tbsp freshly squeezed lemon or lime juice
1 tbsp minced ginger, about 1 1/2 inch piece
1 tsp garlic paste or a finely minced small clove
2-3 tsp honey or brown sugar
1 1/2 - 3 tsp Harissa or chili sauce, to taste
1/4 tsp ground coriander
1/4 tsp red pepper flakes

1 bell pepper, red or green or a combination, sliced
12oz package kelp noodles, rinsed
13.5oz can coconut milk

1 cup *cooked salad shrimp at room temperature, or raw, cleaned
small handful cilantro, chopped
1 green onion, sliced

1-2 tsp hot sesame oil (optional)

Combine the chicken broth, fish sauce, lemon or lime juice, ginger, garlic, honey or brown sugar, Harissa or chili sauce, ground corianger and red pepper flakes in a pot. Use the lower measurements, saving the rest for later when it's time to check to see if you need to adjust anything. Bring the mixture to a gentle simmer.

Stir in the **bell pepper, kelp noodles and coconut soup. Heat up to just where it begins to boil. Check and adjust the seasoning if necessary; salty, sour, sweet, hot (the extra amounts you reserved). Remove from heat.


Stir in the *shrimp, cilantro and green onion.

Divide among bowls, Drizzle with a small amount of "hot" sesame oil, if desired. Serve immediately.

*I'm working my way through a large amount of frozen cooked shrimp I purchased impulsively. If you prefer to use raw, then add the raw, cleaned shrimp to the soup just before you remove it from heat and cook a minute or two until they turn pink. Don't over cook as they might become rubbery.

** The bell pepper added at this point will be somewhat crunchy when the soup begins to boil. If you prefer a softer texture then add it sooner.

Sunday, February 26, 2012

Savory Cheese Popovers; Daring Bakers Challenge, February 2012


  (6 popovers)


The Daring Bakers’ February 2012 host was – Lis! Lisa stepped in last minute and challenged us to create a quick bread we could call our own. She supplied us with a base recipe and shared some recipes she loves from various websites and encouraged us to build upon them and create new flavor profiles.


My mum used to make popovers fairly frequently. She liked to experiment and made some interesting tall ones, using empty tin cans. I've never made them, so now was the perfect time for me to give these a try. 

My popovers didn't rise as much as my mum's and the holes were more evenly distributed. Hers used to have one large hole in the middle, making any leftovers perfect for stuffing with tuna or egg salad the next day.


Savory Cheese Popovers

Basic Popovers recipe adapted from All Recipes
2 tbsp *canola oil
2 eggs
1 cup all-purpose flour
1 cup milk
1/8-1/4 tsp salt, to taste
freshly ground black pepper, to taste
1/2 cup shredded sharp cheddar cheese
1 tbsp green onion, sliced or jalapeno, finely diced


Preheat oven to 425°F.

Divide the oil evenly between the cups of a standard 6 cup muffin tin; 1 tsp per cup. Place muffin tin into oven to heat; 5-10 minutes. It doesn't matter if the maximum temperature has been reached yet, you just want to get the cups and oil smoking hot.(My mum used to say heating the tins first made the popovers rise more.)


In a bowl whisk the eggs, then add the flour, milk, salt and pepper and whisk only until the mixture is evenly combined and smooth. Whisk in the cheese and onion or **jalapeno.

**I served my popovers with chili and thought later that jalapeno might have been more interesting than green onion.

Carefully remove the hot muffin tin from the oven and ladle enough batter to bring it up to about 1/4 inch from the top.


Return to the oven and bake for about 25-35 minutes or until the popovers are a nice even brown. My baking time is shorter because I use a convection oven. The popovers will begin to collapse once you remove them from the oven. If you prefer them a bit dryer (and stiffer), then turn off the heat and leave them in the oven an additional 5 minutes or so. I remember my mum doing this.

*Despite the amount of oil I used, two popovers still managed to stick to the tin and I had to pry them out with chopsticks.

Friday, February 24, 2012

Radishes with Fromager d'Affinois

Pin It


I'm so excited! My radishes are ready! This year I planted French breakfast radishes (Raphanus sativus) mid January. We had cool wet days, perfect weather for radishes in Texas.


The squirrels have had a field day this year. They dug up half my garden which I planted with spinach, kale, beets, potatoes and various types of lettuce. They even rearranged my spring bulbs. There's a daffodil in the middle of my parsley!

crackers or bread
*Fromager d' Affinois or brie
radishes, sliced
green onions, sliced
salt and freshly ground pepper, to taste


Spread the cheese on the bread or crackers. Top with a layer of sliced radishes. Sprinkle with sliced green onion and dust with salt and pepper, to taste.


*Fromager d'Affinois is a very creamy, brie-like cheese with a soft delicate tasting rind. 

Saturday, February 18, 2012

Tofu Noodles (Shirataki) with Peppers and Shrimp

Pin It
(2 servings)


Tofu noodles, OMG! They are absolutely delightful! I've read complaints on the Internet about them smelling "fishy" and having an odd texture.  Even the package doesn't inspire a great deal of confidence, "Parboil for 2-3 min. to reduce the authentic aroma", lol.. what does that mean exactly? Who's going to purchase this except someone desperate for noodles while on a low-carb diet?


I love noodles and eat a higher proportion than I should, so I wanted to explore alternatives. I didn't think the Shirataki tasted bad at all, if anything I couldn't discern a flavour at all. I liked their texture which struck me as noodle-like. If this product wasn't so darn pricey, I would probably use these exclusively except for those times I felt like hauling out my pasta machine.

These tofu noodles only have 3g of carbs, 2g of fiber and 20 calories per serving and they are filling!

1 tbsp olive or canola oil
1 large clove garlic, finely chopped
1 tbsp *minced ginger paste
1/2 large yellow onion. chopped
2 tbsp rice wine
1-2 tbsp tamari or soy sauce, to taste
2 tsp oyster sauce (gluten free)
1 tsp "hot" sesame oil, or regular sesame oil with a bit of chili
3 tbsp water
1 1/2 tsp cornstarch
1 red or green bell pepper (or a combination), cleaned and cut into matchstick pieces
1 cup defrosted cooked salad shrimp, **see note if using raw

1 8oz pkg Tofu Shirataki noodles, prepared according to directions

sliced green onion,  for garnish

Heat the oil in a wok and add the garlic. Cook for a minute then add the ginger and onion. Stir to combine everything, adjust the heat if necessary and cook until the onion becomes translucent.


While the onion mixture is cooking, prepare the sauce by combining the rice wine, soy sauce, oyster sauce, sesame oil, water and cornstarch. Stir, then set aside.

Add the cut up bell pepper to the onion mixture,  and cook for 1-3 minutes depending on how crisp or done you like them.


Stir in the sauce and cook until it begins to thicken; about 1-2 minutes. Add the shrimp and cook just long enough to warm them, but not cook them further.

**I am working my way through a ton of frozen pre-cooked salad shrimp I impulsively purchased. If you are using raw shrimp, cook them for a couple of minutes until they turn pink, taking care not to cook them for too long, lest they become rubbery. You might need to adjust the cooking time for the bell peppers.

Serve immediately with the tofu noodles. Garnish with the green onion.

*I have been using prepared ginger paste for several months now. There's a fresher product sold in a tube from Australia with a 1-2 month expiration date; can't recall it's name atm.  I ran out and decided to try the paste in a jar from The Ginger People which I quite liked. If you are using fresh ginger root, then a 1 1/2-2 inch piece (peeled and minced) should be enough.

Komteß-Kuchen; Orange Cake with Chocolate

Pin It
(one 4x8 cake)


Contrary to my usual approach to baking a cake, I increased both the amounts of sugar and butter!  My warped sense of logic decided it would be ok to increase those amounts if the actual cake size was smaller than usual, lol. However, l didn't use as much sugar as some bakers who use a ratio of 1 cup of sugar for every cup of flour in a recipe. The resulting pound cake was moist and buttery which I sectioned and brushed with a mixture of orange juice and Grand Marnier before enveloping it with a semi-sweet chocolate ganache.

This delicious German cake presents really well.  Its ganache filled layers are vertical instead of horizontal.

Pound cake
3/4 cup butter (1 1/2 sticks)
1 cup sugar
3/4 cup whole wheat pastry flour
1/2 cup unbleached flour
1/4 cup cornstarch
1/2 tsp baking powder
1/2 tsp baking soda
zest from 1 navel orange, minced
2 eggs
1/2 cup sour cream


To finish
1/4 cup freshly squeezed orange juice
1/4 cup Grand Marnier, or another orange liqueur
1/2 cup heavy cream
1 1/2 cups semi-sweet chocolate chips


Place the butter into the bowl of a stand mixer and beat for a minute or two on medium speed. Gradually add the sugar and continue beating until light and fluffy; about 8 minutes.

Combine the flour, cornstarch, baking powder, baking soda and zest in another bowl. Set aside.

Preheat oven to 350°F. Butter and flour a 4 x 8 inch loaf pan and set aside.

Slowly beat the eggs, one at a time into the butter and sugar mixture, scraping down the sides of the bowl between additions; about 15 seconds per egg. Beat in the sour cream; another 15 seconds.

Scrape down the sides and add the flour mixture. Beat very slowly until you have a nice thick batter; about 45-60 seconds.


Spoon the batter into your prepared loaf pan and bake for about 50-65 minutes, or until a toothpick inserted into the centre comes out clean. 

Remove from oven and cool in the pan for a few minutes, then remove it and allow it to cool completely on a cake rack. My cake slid out nicely, but if it's sticking, run a knife around the edges and try again.

Combine the orange juice and Grand Marnier in a small bowl or glass. Set aside.

Cut the cake in half along it's length from the top, then cut each half in half again, see photo.


Brush one side of each slice of cake with the orange mixture. Try to divide the juice mixture evenly among the pieces and use all of it up. Leave the slices for about an hour to allow the liquid to soak into the cake.

Heat the cream  until bubbles begin to form along it's edges. Remove from heat and stir in the chocolate chips. Continue to stir until smooth. If the chips don't melt completely you might have to heat the mixture a touch. The microwave oven works great for this, just power the oven for 5 seconds or so at a time, stirring the chocolate until it's completely melted.


Starting with one of the outer slices (a side), spread a layer of chocolate (evenly) over the (cut) surface and top with it with a slice of cake. Brush that slice with chocolate, and top it with the third slice. Brush that slice with chocolate and top it with the last (outer) slice, thus reassembling the cake in the process. I didn't illustrate it very well in my photo, but I brought the chocolate to the very edge for each layer.


Brush the remainder of the ganache over the top and sides of the cake. You can see I brushed the chocolate on as it was cooling and getting thicker, leaving ridges across the cake instead of a smooth surface. I could have warmed the ganache by heating it a touch, but I don't like working with runny ganache/glazes where a good portion often ends up on the counter.

Allow the chocolate to set completely before attempting to slice into it. I found it easier to cut into the cake the next day.


Thursday, February 16, 2012

Quinoa Pudding with Fresh Blueberries


(4 servings)


I have been experimenting a bit with quinoa lately as it's still relatively new to me. I love its texture and the fact it cooks so quickly. I know it can be used in place of rice, so I thought I'd try it in a pudding this time.

Cooking the quinoa in milk required me to babysit it a bit, something I haven't had to do, but there was the danger of the milk burning. I could have used water, but I prefer using milk when I make rice pudding, so I used it here as well.

1/2 cup quinoa
2 1/2 cups milk
1/2 tsp cardamom
a pinch or two of nutmeg
2 eggs
2-3 tbsp maple syrup, to taste
2 tbsp ground flaxseed, (optional)
2 tbsp heavy cream, (optional)
2 tsp vanilla extract

1/4 cup sliced almonds
1 pint fresh blueberries, rinsed and picked over
additional milk**

Rinse the quinoa in water, then drain it before adding it to a small pot. Add 1 1/2 cups of milk reserving 1 cup. Stir in the cardamom and nutmeg and cook for about 20 minutes or until most of the milk has absorbed into the quinoa. You might have to lower the heat a touch and you will definitely have to stir it to keep the milk from burning.

Whisk together the eggs, remaining 1 cup of milk, maple syrup and flaxseed in a small bowl.


Stir the egg mixture into the quinoa and continue stirring it until it thickens, but don't allow the mixture to boil as the eggs might curdle. Remove from heat.

Stir in the cream and vanilla extract. Cool to room temperature. **If the pudding seems too thick then stir in a few tablespoons of milk to thin it out to your liking.


Divide between four bowls or plates and sprinkle with almonds and blueberries.

------------------------------------------------------------------------

Thanks very much to Sunday Morning Banana Pancakes for nominating me for the Liebster Award! I'm absolutely thrilled!


"Liebster" is a German word meaning "favourite", and this honor is given to bloggers with less than 200 followers by fellow bloggers.

The award has the following stipulations:

1. Thank the giver and provide a link to their site.
2. Copy and paste the tag on your blog.
3. Pick 5 bloggers and let them know by leaving a comment on their blogs.
4. Hope the people you have chosen will continue the tradition.


These are my picks in no particular order:

My Little Expat Kitchen This blogger has relocated to The Netherlands from Greece. She has covers a range of international recipes in addition to Greek, takes beautiful photos of her food and weaves it all together with her engaging dialogue.

Chili und Ciabata  A nice collection of recipes from this German blogger who also has an additional site just for her bread recipes! (in German)

Thyme in Our Kitchen This dad (of 6 boys!) shares his nicely photographed, tasty recipes.

Scandi Foodi This Finnish blogger has settled in Australia. She's a prop-stylist who takes amazing photos of wonderfully styled (healthy) food. I have no idea if she fits within the category of less than 200 followers, but I love visiting her blog.

Life is Great I have just begun to follow this blog recently. This delightful blog out of Singapore, is well written, has an interesting mix of recipes and great photography.

Thinly Sliced Cucumber I have also just recently come across this bright and cheerful blog, full of great photos and recipes. The author of this blog hails from beautiful Vermont.


Friday, February 10, 2012

Citrusy Bread Pudding with Bourbon Sauce

Pin It
(8-10 servings)


The last time I made a bread pudding, it was a bit of a disaster. It stuck in the pan and when I tried to invert it, the pudding came out in pieces. This time I checked online and found a recipe I liked enough to try, on Simply Recipes.

I had a large loaf of challah I wasn't crazy about, but I was determined to use it up. I usually shop for groceries at the same place where I'm able to purchase 1/2 a loaf of an amazing challah which is moist and tender and still tastes great a few days later (no preservatives!). This week I ended up with an entire loaf of a dry, though not stale challah made at a different bakery. I was surprised because this particular bakery turns out some of the best European style loaves of bread in the city.

I made a few adjustments to the recipe. I decreased the amount of sugar substantially; from 2 cups to half a cup. The bread pudding was plenty sweet, especially with the bourbon sauce which also contained sugar. I swapped out half the bourbon with fresh orange juice because I wanted a less boozy version; the bourbon was still quite pronounced.

The orange I used was so fragrant, I decided to use it's zest as well. The citrusy flavour complimented the bourbon quite well. I used currants, because that's all I had. Oh, and before I forget, I used 25% less milk (the challah might have been less dense than the french bread called for in the original recipe); the resulting bread pudding was very moist and custardy.

adapted from Simply Recipes
Bread Pudding
day old challah, cut into 1 inch squares (about 7 cups)
3 cups milk
zest from an orange, about 1 generous tablespoon
2 eggs, lightly beaten
1/2 cup brown sugar
1 tbsp vanilla extract
1/2 tsp cardamom
pinch or two of nutmeg
1/2 cup currants (soaked overnight in 1/3 cup bourbon)
2 tbsp butter, melted

Pour the milk over the bread cubes and set aside.


In another bowl whisk together the orange zest, eggs, brown sugar, vanilla extract, cardamom and nutmeg.

Preheat oven to 350°F.

Coat the bottom and sides of a 9 inch cake pan with the melted butter. Set aside.


Pour the egg and sugar mixture over the bread and milk. Add the currants, reserving the bourbon for the sauce. Combine everything until it's evenly mixed.

Pat the bread mixture evenly into the prepared cake pan (adding all of the liquid, if the mixture is especially wet) and bake for about 35-45 minutes or until the edges brown and pull away from the sides of the pan. Remove from oven.


Bourbon Sauce
1/4 cup butter, melted (1/2 stick)
1/2 cup brown sugar
1 small egg
1/3 cup orange juice
1/3 cup bourbon (top up the reserved bourbon from the currants)


In a small saucepan, melt the butter, then whisk in the sugar and egg. Cook over low heat, whisking the mixture constantly until it thickens. Whisk in the orange juice and bourbon and heat the mixture until bubbles begin forming. Do not bring to a boil as it might curdle. Remove from heat.


Spoon the bourbon sauce over the warm bread pudding and serve.


Sunday, February 5, 2012

Fried Oysters

Pin It
(3 servings)


I love oysters on the half shell, but in all honesty I love fried oysters even more. If they are fried quickly, they can be crispy on the outside and tender and juicy on the inside. I try to stay away from fried foods, but I have been thinking about these oysters for several weeks now, and took the plunge this weekend when I saw some nice plump ones at the seafood counter.

I served these with tartar sauce, I made.

tartar sauce
1/4 cup cornichons, finely diced
1 tbsp small capers
1 tbsp fresh parsley, finely chopped
1 tbsp shallot, finely chopped
1 tsp mustard
1/2 tsp anchovy paste
1/4 tsp paprika
freshly ground black pepper
1 tbsp mayonnaise
1 tbsp sour cream
1 tbsp plain yogurt


Combine all of the ingredients in a bowl until well mixed and set aside.


fried oysters
1/4 cup flour
1/4-1/2 tsp cayenne
1/4-1/2 tsp fine sea salt
1/4-1/2 tsp freshly ground pepper
1 egg
2 tbsp milk
about 1 1/2 cups Panko
16 shucked oysters, about 9-10 oz.

oil for frying
lemon wedges for garish

Combine the flour, cayenne, salt and pepper on one plate.

Whisk the egg and milk with a fork in a shallow soup dish.

Place the panko on a third plate.

Heat the oil to ***about 360°F.


Shake the excess liquid off an oyster and dredge it in the flour. Coat it with the egg wash, then  roll it in the Panko. ***I like to test one oyster first for a couple of reasons. To see if I need to adjust the seasoning for the flour mixture, and to check the heat of the oil so that I can fry the oyster fast enough to brown the outside and keep the inside tender and juicy. If the oysters fry for too long, they can become rubbery. (I ended up increasing the heat a bit.)

When I'm happy with my test oyster, I coat the remaining oysters in the flour/egg/Panko mixtures and fry them in small batches. Drain on paper towels.

Serve with the tartar sauce and garnish with lemon wedges.

Saturday, February 4, 2012

Moroccan Quinoa Salad

Pin It
(about 4 servings)


This flavourful and exotic salad is a great choice for potlucks as it travels really well. I used to make this with couscous and added olive oil. The quinoa makes a great substitute and I don't miss the oil at all in this version.

I love this combination of spices; cumin, ginger, cardamom and cinnamon with a pleasant kick from the Harissa.

2 cups chicken broth or vegetable broth
1 tsp cumin
1/2 tsp ground ginger
1/2 tsp cardamom
1/4 tsp cinnamon
1 cup quinoa
juice from 1/2 lemon, or more to taste
2 tsp honey
1/2 tsp (or more to taste) Harissa
1 large carrot, shredded
1/4 cup dried currants
1 green onion, thinly sliced
2 tbsp cilantro, chopped
salt, if needed

Heat the chicken broth in a saucepan and add the cumin, ginger, cardamom and cinnamon. Stir in the quinoa (check the package to see if it needs to be rinsed in water first). Simmer gently for about 15-20 minutes. Remove from heat when most of the liquid has been absorbed into the quinoa. Allow to cool.


Combine the lemon juice, honey and Harissa in a bowl. Stir in the cooled quinoa, shredded, carrot, currants, green onion and cilantro.

Check and adjust the seasoning, if necessary.