Cooking Weekends
Showing posts with label budget. Show all posts

Saturday, June 13, 2015

Spaghetti with Fresh Tomato and Anchovy Butter Sauce

(3-4 servings)


I came across this terrific recipe a few weeks ago at Epicurious and have made it several times since then. This simple and flavorful dish comes together very quickly and is great for a quick weeknight meal.

adapted from Epicurious
1/2 lb whole wheat spaghetti
2 tbsp butter 
6 - 8 anchovy fillets 
4 - 5 sliced garlic cloves
a pinch or 2 crushed red pepper flakes
2 lbs quartered medium tomatoes or sliced (in half) cherry tomatoes
a splash of dry white wine (optional)
freshly ground pepper and salt, if needed
4-5 leaves fresh basil, sliced 

Cook the spaghetti in lightly salted water; drain and reserve 2/3 cup cooking liquid.

Meanwhile, heat the butter in a large skillet over medium heat. Add the anchovy, garlic and red pepper flakes, stirring often, until anchovies are broken down and garlic is soft; about 4 minutes.


m

Stir in the tomatoes and continue to cook until they begin to fall apart; about 10 minutes.

Toss in the pasta as well as 1/2 cup of the reserved cooking liquid. Add the rest of the cooking liquid if needed. Add the splash of wine, if using. Cook until the sauce coats the pasta. Taste and season with salt and pepper, if needed.

Divide between plates and sprinkle with the basil. Serve

Posted by Gerlinde in Washington at 4:02 PM 0 comments
Email This BlogThis! Share to X Share to Facebook
Labels: budget, comfort food, cooking with wine, pasta, quick

Sunday, January 18, 2015

Aneta's Minty Egg and Lemon Soup

(3-4 servings)

This simple soup is absolutely wonderful on a cool winter evening. I think it's especially good for those who feel a bit under the weather. The fragrant mint and tangy lemon are very soothing. The chicken broth gains a bit of substance from the rice without becoming heavy. 

Aneta, a friend in Toronto, showed me how to make this delicious soup many years ago. To this day it remains one of my favorites, which I make frequently during the cooler months.

4 cups chicken broth
1/4 cup uncooked long grain white rice
3 tbsp fresh mint, chopped or 1 1/2 tsp dried mint
2 large eggs
2-3 tbsp fresh squeezed lemon juice
salt and pepper, if needed

Heat the broth in a saucepan. Add the rice and mint, cover and simmer gently over low heat about 15 minutes or until the rice is tender.


Whisk together the eggs and 2 tablespoons lemon juice.  Stir in about 1/3 cup of the hot broth (to temper the egg mixture), then pour back into the saucepan. Cook for about a minute over low heat only to heat through. Don't allow the soup to come to a boil or it will curdle. It should look smooth and creamy.

Taste and adjust the seasoning with salt and pepper, if needed. Add the remaining tablespoon of lemon juice at this point if you prefer a tangier soup.
Posted by Gerlinde in Washington at 3:10 PM 4 comments
Email This BlogThis! Share to X Share to Facebook
Labels: budget, paleo friendly, quick, soup or stew

Sunday, January 11, 2015

Paprikás Csirke; Chicken Paprikash

(4 -5 servings)

There are those who insist lard is necessary when preparing chicken paprikash. My paternal grandmother who was Hungarian used lard exclusively in her kitchen. She would have used it in this dish.

Whenever I make chicken paprikash, I use skinless and boneless chicken thighs. I don't even bother frying them. I just lay the chicken over the vegetable mixture which has been sauteed in butter or olive oil. This time I used regular bone-in chicken pieces and I wanted to fry them over high heat in order to crisp up the skin. I used lard, curious if it would make a difference in terms of flavor. I only used a small amount; about two teaspoons or so because the skin rendered plenty of additional fat.

When the paprikash was finished I couldn't tell the chicken had been fried with lard, the flavor also didn't come through the following day when I reheated the leftovers. Perhaps I needed to use more lard, but I didn't see the point. I prefer using the least amount of fat or oil and chicken paprikash is often finished with sour cream which renders this dish plenty rich.

Whether you use lard or oil, chicken paprikash is easy to prepare and very delicious. It's often served with tiny dumplings called spätzle or noodles. I like it with rice.

6-8 chicken thighs, (about 3 lbs)
salt and pepper
up to 1 tbsp lard or coconut oil
1 very large yellow onion, chopped (about 1 lb)
3 cloves garlic, minced
1 green or red bell pepper, chopped (seeds removed)
1 tbsp double concentrated tomato paste
3 tbsp sweet Hungarian paprika
1 tsp hot Hungarian paprika
2/3 cup chicken broth

1/2 tsp *tapioca flour (optional)
1/2 cup sour cream

Rinse and pat dry the chicken thighs. Trim off any excess fat or skin. Sprinkle both sides with salt and pepper.

Heat the lard in a large pot (with lid) over medium-high heat. Carefully add the chicken thighs, skin side down in a single layer (you might have to do this in batches although mine all fit nice and snug) and fry until the skin is crispy and golden; about 4-8 minutes. Flip them over and fry another two minutes. Remove the chicken to a platter and set aside.

Drain off all but a teaspoon or two of fat from the pot.  Reduce the heat to medium-low and add the onion and garlic.  Saute until the onion softens; about 5 minutes. Add the chopped bell pepper and cook another 5 minutes or until that has softened.


Stir in the tomato paste, paprika and chicken broth. The mixture will be very thick. Don't be tempted to add more broth, the sauce will thin out once the chicken has braised for a while. When the vegetable mixture begins to simmer, reduce the heat to its lowest setting. Place the reserved chicken on top, skin side up and cover the pot tightly with a lid and cook for about 1 to 1 1 /2 hours or until the chicken is very tender. I like to cook it until the meat is ready to fall off the bones.

Remove the chicken to a serving bowl and cover loosely with foil.

Combine the tapioca flour (if using) with the sour cream. * I like to add a small amount of starch because it keeps the sour cream from curdling if the temperature gets too high. If you decide to omit it, then take care to only heat the sauce through after stirring in the sour cream. Do not allow the sauce to simmer.

Temper the sour cream mixture by stirring in a few large spoonfuls of the hot sauce before adding the sour cream to the pot.

Cook over low heat while stirring until the sauce thickens slightly; about 3 minutes. Taste the sauce and adjust the seasoning, if needed

Serve.

Posted by Gerlinde in Washington at 9:54 AM 1 comments
Email This BlogThis! Share to X Share to Facebook
Labels: braised, budget, gluten free, hungarian, poultry

Sunday, December 21, 2014

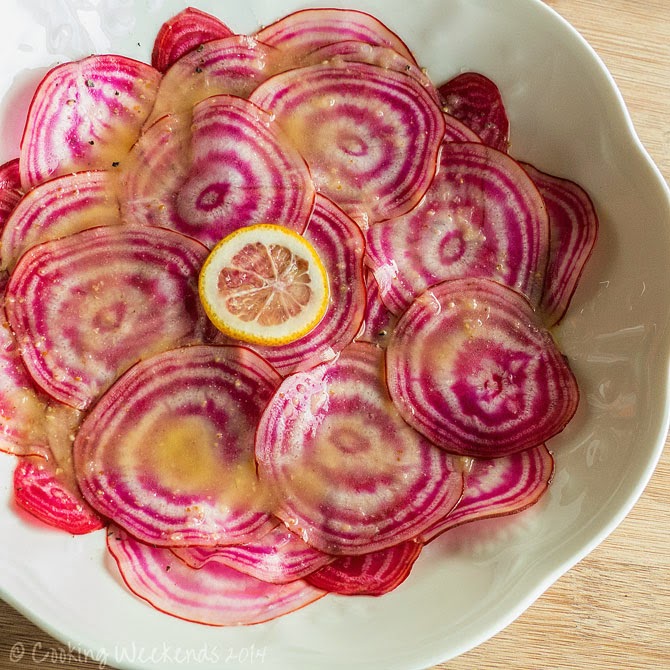
Raw Chioggia Beet Salad with Meyer Lemon


This festive looking salad is made with Chioggia beets. They are an Italian heirloom variety, known for their beautiful rings or stripes depending on which direction you cut them. A few years ago I tried growing these little beauties in my garden, but they didn't do very well in the heat.

Chioggia beets are a little sweeter than the regular fuchsia colored ones. They don't appear to stain your hands, at least not when prepared raw. I haven't tried cooking them yet as I was told they tend to lose their lovely stripes when heated.


for every 2 servings:
2-3 Chioggia beets, depending on their size
salt and freshly cracked pepper
juice from 1 small Meyer lemon, about 2-3 tbsp
2 tsp olive oil
1/4 tsp mustard

Scrub the beets really well. Slice off the tops and trim the roots.


Slice the beets as thin as possible. This is easiest if you use a mandoline. Arrange the slices into a serving bowl, lightly seasoning them with salt and pepper as you go along.

Combine the lemon juice, oil and mustard in a small jar with lid and shake well. Drizzle over the beet slices and serve.
Posted by Gerlinde in Washington at 3:41 PM 1 comments
Email This BlogThis! Share to X Share to Facebook
Labels: appetizer, budget, paleo friendly, salad, vegan, vegetarian

Saturday, December 13, 2014

Turmeric & Ginger Pickled Eggs


One thing I noticed soon after I began purchasing my eggs directly from the farmer, was how difficult it was to peel them after I boiled them. The egg white would stubbornly cling to the shell I was trying to remove. After doing a bit of research I learned it was preferable to drop farm fresh eggs directly into hot water, rather than cold water. This made timing the eggs difficult for me. So, I picked up one of those egg timers that you place directly into the pot with the eggs. It changes color as the eggs cook. Regardless of how many eggs, or their size, this little gizmo appears to time them perfectly. I have used it a few times now, and my eggs have turned out perfect each time.

Another thing I learned about fresh eggs is that hens lay far fewer of them when the days get shorter. After coming home empty handed several times, I grabbed several dozen eggs when I finally made it to the farm really early, before the sun was up.

These pickled eggs are very easy to make. The seasoning is quite nice and the eggs take on a lovely yellow hue from the turmeric.


a dozen or more hard boiled eggs


Place the eggs into a sterilized jar (with lid), taking care not to squeeze them in too tightly.  Add cold water to cover the eggs, then carefully pour the water into a measuring cup to determine the amount of pickling marinade you will require.

For approximately every cup of marinade needed, combine:
1/2 cup apple cider vinegar
1/2 cup water
2-3 thin slices fresh ginger
1 tbsp sucanat or brown sugar
1 tsp turmeric
1 tsp yellow mustard seeds
1/2 tsp ground cardamom
1/2 tsp salt
1 pinch red pepper flakes

Combine all of the marinade ingredients into a saucepan with a lid. Bring the mixture to a simmer, lower the heat, cover the pot and cook for about 8-10 minutes.


Pour the hot marinade over the eggs. Add a small amount of water if the liquid doesn't cover the eggs completely. Cover the jar with a sterilized lid and allow to cool.

Refrigerate. Give the jar a gentle shake every day. The eggs will be ready to eat in 4-5 days. They will keep up to a month refrigerated. 

Posted by Gerlinde in Washington at 1:10 PM 8 comments
Email This BlogThis! Share to X Share to Facebook
Labels: appetizer, budget, canning and preserving, egg, snack

Friday, January 10, 2014

Red Cabbage Coleslaw

(about 4 servings)


Cabbage and carrots are in season in Texas at the moment. Both these vegetables found their way into this delicious coleslaw.

1 tbsp onion, grated
2 tbsp mayonnaise
2 tbsp sour cream
2 tbsp milk
1 tbsp apple cider vinegar
2 tsp honey
1/2 head red cabbage, finely shredded
1 carrot, grated
salt and freshly grated pepper, to taste

Combine the onion, mayonnaise, sour cream, milk, vinegar and honey in a large bowl.


Add the red cabbage and carrots. Toss. Add salt and pepper, to taste. Toss again and serve.
Posted by Gerlinde in Washington at 10:54 PM 1 comments
Email This BlogThis! Share to X Share to Facebook
Labels: budget, paleo, quick, salad, side dish, vegetables, vegetarian

Saturday, November 16, 2013

Honey Garlic Chicken Thighs

(about 4-5 servings)


Things don't get any easier than this delicious and juicy honey garlic chicken. I used thighs for this dish (my favorite part) which happened to be on sale this week.

sauce
2-3 cloves garlic, pressed or minced
2 tbsp tamari or soy sauce
1 tbsp honey
1/4 tsp hot pepper flakes

2 1/4 lb bone-in chicken thighs


Preheat oven to 350°F.

Combine the garlic, tamari, honey and pepper flakes in a small bowl. Set aside.

Rinse and pat dry the chicken thighs. Trim off any excess fat, but leave the skin on top. Place the chicken, skin side up into a baking dish large enough to hold them snugly in a single layer.

Brush the sauce onto the chicken, then pour the remainder into the dish.


Bake the chicken for 40 - 50 minutes or until the juices run clear when you pierce a thigh in the thickest part with a sharp knife. About halfway through the baking time brush the chicken with sauce from the pan.

Remove from oven. Skim as much fat from the sauce as you can and serve with the chicken.
Posted by Gerlinde in Washington at 11:42 AM 1 comments
Email This BlogThis! Share to X Share to Facebook
Labels: budget, poultry

Saturday, August 24, 2013

Vegetable Fried Rice

(4 servings)


The last time I spoke with my sister, she mentioned she likes to make fried rice. What she described sounded delicious and I realized I couldn't remember the last time I made any. Fried rice is terrific when you think about it. It's economical, easy to make and a great way to use up leftovers for a really tasty meal.

There are a few things which come to mind when making fried rice. Vegetables are best cut into similar sizes for even cooking. Leftover rice from a day or two ago is ideal because it's drier, however you can use rice made on the same day. Just fry it a bit longer until most of the extra moisture has evaporated.

2 tbsp oil (I used coconut oil)
1 tbsp fresh ginger, finely minced
3-4 cloves garlic, pressed or finely minced
1 red bell pepper, cut into small dice
1/2 cup frozen corn
1/2 cup frozen peas
2 cups bean sprouts
2 - 2 1/2 cups cooked (and cooled) rice
1 tsp or more, hot chili sauce (optional)
2 eggs, beaten
2 tbsp soy sauce, or to taste
2-3 green onions, sliced

Heat half of the oil in a large non-stick skillet or wok over medium-low heat. Stir in the ginger and garlic and fry for 30 seconds or so. Stir in the red pepper and saute for about 30 seconds. Stir in the corn and peas and cook for about 1 minute. Stir in the bean sprouts.

When the sprouts just begin to wilt, remove from heat and place the vegetables into a large bowl. The vegetables will be under-cooked and crunchy.  They will continue to cook in the bowl as they steam and when the rice is fried you will return them to the skillet or wok where they will cook further. At this point you just want to heat them up.


Wipe out the skillet and add the remaining tablespoon of oil. Set the flame to medium and when the oil is hot add the rice. Saute the rice until it begins to dry out a bit. This will happen quickly of the rice is a day or two old. If you cooked the rice earlier in the day it will be moister. You might have to lower the flame somewhat to keep it from burning. Cook and stir the rice until it stops steaming and most of the moisture has evaporated.

If you are using a hot sauce, stir it into the rice now. When it's evenly combined, make a well in the center and pour the beaten eggs there. Using a wooden spoon scramble them and mix them evenly into the fried rice. Stir in the reserved vegetables. Sprinkle the soy sauce over the vegetables and rice. Increase the flame and continue to cook while stirring, until the mixture is hot and the vegetables are done to your liking.

Remove from heat and fold in the green onions. Serve.

Posted by Gerlinde in Washington at 12:47 PM 1 comments
Email This BlogThis! Share to X Share to Facebook
Labels: asian, budget, chinese, rice, vegetables, vegetarian

Saturday, July 13, 2013

Potato and Egg Salad

(about 4 servings)


Potato salads usually keep well for a couple of days in the refrigerator. If anything they seem to get better. They are great to have around when days are hot and you lose interest in cooking. They also travel well if you need something for a pot luck dinner. It's no wonder potato salads are so popular.

This creamy salad is dressed with a combination of buttermilk, mayonnaise and sour cream which I seasoned as I would deviled eggs. The buttermilk provides a pleasant tang and lightens up the dressing considerably. I debated whether or not to omit the mayonnaise entirely, but I love its lemony flavor and didn't want to lose that regardless how subtle.

salad
1 1/2 lb Yukon Gold potatoes, boiled in lightly salted water
5 large eggs, hard-boiled, shells removed
1 stalk celery, diced small
1/4 red onion, diced small
dressing
1/2 cup buttermilk
2 tbsp mayonnaise
2 tbsp sour cream
1 1/2 tsp Dijon mustard
1/2 tsp sweet paprika
1/4 tsp freshly ground pepper
1/4 tsp salt, or to taste

Cool the potatoes until they can be handled, then cut them into bite-sized pieces. Place them into a large bowl. Cut up the eggs and add those to the bowl as well. Add the celery and red onions. Do not toss at this point, just set aside.


Combine the buttermilk, mayonnaise, sour cream, mustard, paprika, pepper and salt in a small bowl. Whisk until thoroughly combined.


Pour the mixture over the potato and egg mixture.

Gently toss until everything is evenly combined. Refrigerate for at least 2 hours to give the flavors the opportunity to meld. Servecold or at room temperature.

Posted by Gerlinde in Washington at 11:39 AM 1 comments
Email This BlogThis! Share to X Share to Facebook
Labels: budget, egg, salad, vegetables

Saturday, June 22, 2013

Roasted Garlic Hummus

(about 1 1/4 cups)


Hummus is one of those dishes I really ought to make more often. It's relatively inexpensive, nutritious and comes together quickly if you happen to have a food processor.

I came across a recipe recently where the author suggested the secret to a smooth and creamy hummus was the order in which you added your ingredients to the food processor. She began with the tahini and lemon juice and ended with the chickpeas and water. I decided to give this a try and I have to agree, my hummus was indeed smoother than usual.

2 heads garlic
1/4 cup tahini
2 tbsp freshly squeezed lemon juice
1 tbsp olive oil
1/2 tsp cumin
1/2 tsp salt, or to taste
15oz can chickpeas, drained and rinsed
2-3 tbsp water
olive oil for serving
a few pinches of cumin, paprika or sesame seeds for garnish (optional)

Roast the garlic following these instructions. Set aside to cool.

Place the tahini and lemon juice into the bowl of a food processor. Let the motor run for a minute or two until the mixture is light and creamy.

Scrape down the sides and add the olive oil, cumin and salt. Process for about 30 seconds.

Add half of the chickpeas and process for another minute.


Scrape down the sides and add the remaining chickpeas. Squeeze out all of the roasted garlic from both heads and add to the bowl of the food processor. Run the motor for about 2 minutes or until smooth and creamy.

The hummus will probably be quite thick (mine was). Slowly add the water a tablespoon at a time and process in between until you have the desired consistency.

Place the hummus on a plate. Drizzle a small amount of olive oil over the surface.  Sprinkle with cumin, paprika or sesame seeds if desired.
Posted by Gerlinde in Washington at 12:27 PM 5 comments
Email This BlogThis! Share to X Share to Facebook
Labels: appetizer, budget, middle eastern, quick, snack, vegan, vegetarian

Sunday, February 3, 2013

Veggie Shepard's Pie from BBC Good Food

(4-6 servings)


This is a recipe I have wanted to try ever since I first came across it. I love that it contains sweet potatoes without loads of butter or marshmallows or sugar, cinnamon and nutmeg. It's a savory dish, packed with flavour.

Veggie Shepard's Pie turned out so much better than my expectations. I will be making this again soon, perhaps with mushrooms!

adapted from BBC Good Food
2 tsp olive oil
1 large clove garlic, minced
1 large onion halved and sliced
1 stalk celery, diced
2-3 large carrots (about 1 lb), cut into sugar-cube size pieces
1 1/2 tsp dried thyme
1 cup red wine
1/4 cup water
14.5 oz can diced tomatoes
2 tsp Better than Bouillon Vegetable or 2 vegetable stock cubes
salt and freshly grated black pepper
1 3/4 cups frozen small green peas
2 lbs sweet potatoes, baked and cooled
1 cup shredded sharp cheddar cheese, about 1/4 lb

Heat the olive oil in a large non-stick skillet over medium low and add the garlic. When it becomes fragrant, add the onion and fry until golden. Adjust the heat if necessary to keep the garlic and onion mixture from burning.


Add the celery, carrots, thyme (reserve a pinch for later), wine, water, diced tomatoes and the concentrated vegetable stock paste or cubes. Simmer for about 10-15 minutes or until the carrots are almost done but still have a bit of a "bite" to them and the liquid has reduced to about 1/2 (give or take). Check and adjust the seasoning with salt and pepper, if needed.

Stir in the frozen peas, and remove from the heat.

Preheat oven to 375°F.

Spoon the carrot mixture into an oiled 2 quart casserole.

Remove the skin from the baked potatoes and mash them with a fork. Stir in the cheddar cheese (reserve a a pinch or two to sprinkle over the top of the assembled casserole). Season with salt and pepper, if needed.


Spread the mashed sweet potato and cheese evenly over the carrot mixture in the baking dish. Sprinkle the top with a pinch of the reserved thyme and a small amount of shredded cheese.

Bake for about 40-50 minutes or until the top is golden and it's bubbling hot.

Posted by Gerlinde in Washington at 10:36 AM 3 comments
Email This BlogThis! Share to X Share to Facebook
Labels: budget, cheese, vegetables, vegetarian

Saturday, December 29, 2012

Smoked Sardine Spread

(about 1/2 cup)


It's been years since I've eaten sardines. They were too much of a good thing while I was in college, I suppose. Back then they were incredibly cheap and very convenient to have around for snacking.

The last time I encountered them was almost two decades ago on a trip to Portugal to visit my mum. She had rented an apartment for the winter in Albufeira, I think it was. It had a tiny white kitchenette where my mum had filled one huge drawer with fresh oranges and another with sardines. It looked to me like she had at least 50 or 60 tins of the stuff. I couldn't help but chuckle as she excitedly explained how she had an orange or two for breakfast, then sardines for lunch and dinner with perhaps another orange, and how healthy it all was!

Recently I found myself in an isle at the grocery store checking out various tins of seafood and fish. I was surprised by how many varieties of canned sardines were available. Skinless and boneless, smoked, packed in water, in tomato sauce, in mustard, olive oil, or Mediterranean style with black olives. The selection had grown considerably since I was a student. Curious, I brought home several tins. A couple of lightly smoked sardines packed in olive oil, as well as a tin of skinless and boneless sardines.

This recipe is adapted from Dorie Greenspan's Sardine Rillettes, from Around My French Table: More Than 300 Recipes from My Home to Yours (Houghton Mifflin Harcourt Publishers, 2010). This relatively inexpensive and delicious sardine spread is great as an appetizer or a snack!

The following can be easily doubled or tripled, if desired.

1x  3 3/4oz tin of lightly smoked sardines packed in olive oil
2 oz Neufchatel or cream cheese, at room temperature
1 tbsp chopped fresh dill
1-2 tbsp fresh lemon juice, to taste
1 pinch of cayenne pepper
salt and freshly ground pepper, to taste
1 green onion, finely sliced
1 tsp drained capers

Remove the sardines from the tin and drain. Carefully remove any bones, if desired. They are quite soft and will break up easily when mashed.  Set aside.


In a small bowl or the bowl of a food processor combine the Neufchatel cheese with the dill, half of the lemon juice, cayenne and a bit of salt and pepper. When the mixture is smooth, add the sardines, onions and capers. Mix them in until they are well combined with the cheese mixture, or pulse a few times if using a food processor. Add more lemon juice if needed. Season with more salt and pepper, if needed.

Serve with crackers or cut up vegetables.

Posted by Gerlinde in Washington at 1:09 PM 3 comments
Email This BlogThis! Share to X Share to Facebook
Labels: appetizer, budget, fish, paleo, quick, snack

Saturday, December 1, 2012

Buttermilk Dill Cucumber Salad

(4 servings)


I never tire of cucumber salads. They are light and refreshing, something I very much welcome this time of year.

2/3 cup buttermilk
2 tbsp sour cream
2 tbsp fresh dill, chopped (or 1 tbsp dried dill)
1 tbsp chives, finely sliced
freshly cracked pepper and salt, to taste
2 cucumbers

Combine the buttermilk, sour cream, dill, and chives in a small bowl or jar. Lately I have been using jars with lids, so I can combine the dressings easily by shaking the jars.

Add the pepper and salt to taste. Set aside.


Wash, then slice the cucumbers into thin rounds. I love using a mandoline for this, but a knife works well too.

Pour the buttermilk dressing over the cucumbers and toss well to coat evenly. Check and add more salt and pepper, if needed.

Serve.


Posted by Gerlinde in Washington at 10:46 AM 4 comments
Email This BlogThis! Share to X Share to Facebook
Labels: budget, quick, salad

Sunday, August 19, 2012

Spiced Carrot Soup

(about 4 servings)


I can't wait for the cool weather to arrive. The sunshine is wonderful, but I love crisp autumn days. I have been munching mostly on sandwiches and salads, anything I can toss together in about 3 minutes. This heat just seems to sap my energy in terms of both cooking and appetite.

Carrots are in season in Texas at the moment, and when I saw them at the market I immediately thought of soup and cooler weather. I got up very early this morning while it was still relatively cool and made this delicious soup. It's slightly hot, slightly tart and slightly sweet. The flavour is quite amazing considering very little work goes into making it. This soup reheats really well, so if you are cooking for a crowd, you can easily double or triple this recipe.

2 tsp olive oil
1 large clove garlic, minced
1 medium sweet or yellow onion, chopped
1 tsp harissa, or more to taste
1 tsp sweet paprika
1/2 tsp ground coriander
1/2 tsp ground cumin
1/4 tsp ground cinnamon
1 lb carrots, cleaned and cut up
3 cups water
1 1/2 tsp Better than Bouillon, Vegetable
1 cup plain yogurt
1-2 tbsp freshly squeezed lemon juice, to taste
1-2 tsp honey, to taste
salt, if needed
small handful fresh cilantro, chopped

Heat the oil in a soup pot (one with a well fitting lid) and add the garlic. Stir until the garlic is fragrant; about 30 seconds, then add the onion. Adjust the heat to keep it from burning and saute the garlic and onion mixture until the onion is translucent; about 8 minutes.

Stir in the harissa, paprika, coriander, cumin and cinnamon. Stir until the spices are fragrant. Add the carrots, water and Better than Bouillon paste. Cover the pot and simmer the vegetables gently over low heat for 30-40 minutes or until the carrots pierce easily with a knife.


Puree the soup using a hand held immersion blender or transfer the soup in batches into the bowl of a food processor or blender and process until smooth. It doesn't have to be perfect. A few remaining chunky pieces can be nice. Return to the soup pot.

Whisk in the yogurt, 1 tablespoon of lemon juice and 1 teaspoon of honey. Taste and add more lemon juice or honey, if desired. Add salt, if needed (Better than Bouillon already contains salt).

Heat the soup through. Ladle into bowls and top with the chopped cilantro. Serve.


Posted by Gerlinde in Washington at 2:06 PM 1 comments
Email This BlogThis! Share to X Share to Facebook
Labels: budget, soup or stew, vegetables, vegetarian

Saturday, June 2, 2012

Carrot Risotto with Peas


(about 4 servings)


This is probably the best risotto I have made yet. It was so good! Beautiful colours and bursting with flavour!

I used mostly carrot juice, some wine and a small amount tangerine juice. I planned on adding both lemon juice and cumin for Moroccan flavours, but changed my mind at the last minute. I'm glad I did, the tangerine juice was interesting, giving this dish an unexpected dimension. I still added a small amount of Harissa for a touch of heat which offset some of the sweetness nicely.

The peas were added primarily for their colour. They were quite tasty here.

1 tbsp butter
1 clove garlic, minced
1 large sweet onion, chopped
1 1/2 cups Arborio rice
1/2 cup dry white wine
4 - 4 1/2 cups carrot juice, heated
1/3 cup tangerine or orange juice
salt and freshly ground pepper to taste
1/2 tsp Harissa, or hot sauce
1/2 cup freshly grated Parmesan Cheese (reserve a teaspoon or so)
1 1/2 cups frozen baby peas (no need to defrost first)
2 tbsp heavy cream

Melt the butter in a large wok (or skillet) over medium-low heat. Add the garlic and saute for a minute or until it becomes fragrant. Stir in the onions and stirring frequently cook them until they begin to caramelize; about 10-15 minutes.


Stir in the rice and cook for another 2 minutes or so, then stir in the wine. When most of the wine has been absorbed into the rice, begin to add the warmed carrot juice, about 1/2 cup at a time. Cook and stir the mixture until most of the liquid has been absorbed by the rice. Continue to add the carrot juice until the rice is almost ready. It should still have some bite to it. This will probably take 25-30 minutes,

Stir in the tangerine juice. Add salt and pepper to taste, as well as the Harissa. Stir in the cheese and peas. Cook the risotto for another 3-4 minutes or until the peas have heated through and the rice is al dente.

Stir in the cream and serve. Sprinkle with the reserved cheese and dust with cracked pepper if desired.

Posted by Gerlinde in Washington at 4:29 PM 2 comments
Email This BlogThis! Share to X Share to Facebook
Labels: budget, cooking with wine, italian, paleo, rice, vegetarian

Sunday, May 27, 2012

Spaghetti al Limone; Spaghetti with Lemon


(4 servings)


When the weather gets hotter, I'm inclined to spend less time in the kitchen. It's a combination of the heat, loss of appetite and wanting to get things done so I can sit and relax. For the most part I like to focus on dishes that don't require a great deal of fuss, (although I do have a few things planned at the moment that will take me the better portion of a day to cook).

Spaghetti with lemon is one of those simple dishes that can be made quickly and easily. Prepare the sauce while cooking the spaghetti so that everything can be tossed together immediately when the pasta is ready. I have made one major change to the more traditional version of this recipe by scaling back the amount of olive oil (there's also heavy cream in this dish). Typically about 1/2 a cup of olive oil will find it's way into the sauce for four servings; that's 2 tablespoons per portion or about 238 calories. I have reduced that amount to about 1 1/2 tsp per serving and replaced the remaining olive oil with dry white wine for a delicious twist on this Italian classic.

2 tbsp extra virgin olive oil
1 tsp garlic paste
1/4 cup freshly squeezed lemon juice
1/4 cup dry white wine
2 tbsp heavy cream
1 tbsp fresh lemon zest, finely minced
1/4 cup Parmesan cheese, finely grated
2-3 tbsp fresh parsley, chopped
salt and freshly ground pepper to taste

10-12 oz dry spaghetti cooked al dente, according to the directions on the package

additional Parmesan cheese for garnish

With a fork or small whisk, combine the olive oil and garlic in a bowl large enough to hold the spaghetti. Slowly beat in the lemon juice, then wine.

Stir in the cream, lemon zest, cheese and parsley until everything is well combined. Season with salt and pepper, to taste.


When the spaghetti is cooked, drain it very well, then quickly add it to the lemon dressing and toss until every strand is evenly coated.

Serve immediately. Sprinkle with extra Parmesan cheese, if desired.
Posted by Gerlinde in Washington at 11:40 PM 2 comments
Email This BlogThis! Share to X Share to Facebook
Labels: budget, cooking with wine, italian, pasta, vegetarian

Sunday, January 29, 2012

Spaghetti with Savory Breadcrumbs

Pin It
(2 servings)


This simple and delicious spaghetti uses very few ingredients, yet it's bursting with flavour.  I usually prepare this dish with no cheese so I'll sometimes pair it up with a nice tomato and mozzarella salad.

This recipe is pretty flexible. On occasion I'll had add red pepper flakes, minced lemon zest, chopped olives or even a bit of grated Parmesan. If you really dislike anchovies in any form then just leave those out and use salt instead.

I have loved anchovies ever since my grandfather introduced me to them when I was 6 years old. My long love affair began when he opened up a tin of anchovy rolled capers; I couldn't get enough of them.

5 oz dried spaghetti
2 tsp butter
1 tbps olive oil
1 large clove garlic, minced
2 tsp anchovy paste
1/2 cup breadcrumbs

1 tbsp fresh parsley, chopped
freshly ground black pepper

Bring a large pot of lightly salted water to boil. Add the spaghetti and cook according to the directions on the package; about 5-8 minutes.

In the mean time heat the butter and olive oil in a large skillet. Add the minced garlic and saute for about a minute or until it just begins to brown lightly. Stir in the anchovy paste, and when that's well combined, stir in the breadcrumbs. Lower the heat if necessary, and stirring from time to time saute them until they are an even brown.


Drain the pasta when it's done and add that to the breadcrumbs. Toss until the spaghetti is evenly coated with the breadcrumb mixture.

Divide between two plates. Sprinkle with the parsley and dust with freshly ground black pepper.

Serve.
Posted by Gerlinde in Washington at 11:31 AM 1 comments
Email This BlogThis! Share to X Share to Facebook
Labels: budget, pasta, quick

Sunday, January 8, 2012

Flädlesuppe; Soup with Crepes

Pin It
(4 servings)


This simple German soup is a great way to use up leftover crepes from breakfast. I love recipes like this because more and more I'm reluctant to toss out food.

Read more »
Posted by Gerlinde in Washington at 11:02 AM 0 comments
Email This BlogThis! Share to X Share to Facebook
Labels: budget, german, quick, soup or stew

Friday, December 23, 2011

Swedish Meatballs

Pin It
(6-8 servings)


I haven't felt much like cooking lately. I've made mostly green salads and whenever I got bored of those, I'd head over to a local salad bar and load up on veggies and various prepared salads. I love beets and this bar often has red beets in a balsamic vinaigrette and golden beets with ginger.. I can't get enough of either of those. I also like to sample some of  their other offerings, such as Mediterranean tuna salad,  Moroccan couscous salad, spicy lentils or herbed peas. These salads change daily and I never tire of the selection. Considering this is December with so many temptations everywhere, this has worked out well for me.


One of the things very much on my mind this week were Swedish Meatballs. I remembered a friend once mentioning she made her meatballs using a stand mixer which surprised me. I've always imagined tougher meatballs if you "over-worked" the meat. I couldn't have been more wrong, these meatballs were both lighter and smoother, making me curious how a meatloaf might turn out using this method.

Swedish meatballs are usually served on their own with the gravy on the side, but I usually end up reheating them at some point so I just combine them with the gravy when I prepare them. I didn't have any Lingonberry sauce on hand, so I picked up a bag of cranberries instead. Cranberries are altogether different, but they taste fine alongside these meatballs. When I prepare the cranberry sauce (I follow the directions on the bag), I add less sugar keeping the sauce nice and tart for these.

HAPPY HOLIDAYS!

Read more »
Posted by Gerlinde in Washington at 9:16 AM 2 comments
Email This BlogThis! Share to X Share to Facebook
Labels: beef, budget, comfort food, pork, swedish

Friday, December 2, 2011

Cabbage Rolls

Pin It
(4-5 servings)


Cabbage rolls reheat really well. If anything, they seem to get better a day or two later which is why I like to make them ahead of time.

One of my favourite versions were those made by a friend's Ukrainian grandmother. They were tiny, about the third of the size of a conventional cabbage roll. The filling was mainly rice which had been fried with onion, bacon, and grease, then slowly cooked in tomato juice.

Mine turn out a little different each time I make them, which isn't very frequently. I shy away from what I perceive as a lot of work, but the truth is once I get started it really isn't all that bad. I have made them with various types of cabbages, white or brown rice, beef, pork, sausage or some combination of meat. I've cooked them on the stove top, in the slow cooker or in the oven. They have been delicious every time. It's difficult to imagine them not turning out, they just do.

Read more »
Posted by Gerlinde in Washington at 11:13 AM 13 comments
Email This BlogThis! Share to X Share to Facebook
Labels: beef, budget, comfort food, pork
Older Posts Home
Subscribe to: Posts (Atom)
  • Most Recent Post

Search This Blog

My photo
Gerlinde in Washington
After a long holiday from the kitchen, I have decided to return; at least on the weekends. I've organized my pantry and dusted off my camera.
View my complete profile

Most Viewed Recipes

  • Heringsalat, German Herring Salad
  • Deviled Eggs with Smoked Paprika
  • Wild Mexican Plum Jam
  • Tomato & Cucumber Salad
  • Savory Pan Fried Pork Tenderloin

Index

appetizer asian austrian balkan beef belgian berries beverage braised brazilian bread breakfast british brunch budget cake canadian candy canning and preserving caribbean casserole cheese chinese chocolate comfort food condiment cookies cookies and bars cooking with wine crackers cupcakes danish Daring Baker Challenge Daring Cooks Challenge dessert dim sum dumpling egg fish french frozen dessert fruit german gluten free greek grilling hungarian indian italian korean lamb latin Lisa mediterranean mexican middle eastern Most Viewed Recipes muffins norwegian paleo paleo friendly pasta persian photos pie or tart polish pork poultry quick quick bread quinoa rice romanian salad sandwiches sauce shellfish side dish slow cooker snack soup or stew southern spanish swedish tex mex thai turkish ukrainian veal vegan vegetables vegetarian vietnamese

Follow

Creative Commons License
Cooking Weekends is licensed under a Creative Commons Attribution-NonCommercial-NoDerivs 3.0 Unported License.
Powered by Blogger.