Showing posts with label appetizer. Show all posts

Thursday, July 28, 2016

Deviled Eggs with Smoked Paprika


The weather here has finally begun to warm up and it's actually beginning to feel a bit more like summer. Last month the heater popped on once or twice which had me wondering if it was going to feel like March forever.

When it does heat up outside, I'm less inclined to get up in the morning to cook, preferring instead "prepared" food. This morning this took the form of deviled eggs which I put together last night. They were incredibly easy to make and a delicious start to the day.

6 hard boiled eggs, shells removed
2-3 tbsp mayonnaise
1 tbsp sliced chives
1 tsp smoked paprika
1 tsp anchovy paste
1/2 tsp prepared mustard
1/4 tsp lemon pepper
salt, to taste, if needed

extra sliced chives and smoked paprika, for garnish

Cut the eggs in half lengthwise. Remove the yolks and place them into a small bowl.

To the yolks add two tablespoons of mayonnaise (to start), chives, paprika, anchovy paste, mustard and lemon pepper. Mash everything together with a fork until well blended.

If the mixture seems too dry, then add more mayonnaise until you get a consistency you like.


Taste and add salt if necessary. The anchovy paste usually provides enough salt.

Divide the deviled yolk mixture evenly between the egg whites by dropping it into the cavities left by the egg yolks.

Garnish with chopped chives and a small sprinkling of smoked paprika, if desired.

Monday, February 22, 2016

Oven Roasted Zucchini Salad


I used to make this as a topping for bruschetta or as a side for grilled chicken. These days I just serve it as a salad. Terrific flavors!

2 tbsp olive oil
2 - 3 cloves garlic, finely chopped
1/2 tsp salt free Italian seasoning (marjoram, thyme, rosemary, savory, sage, oregano, basil)
3/4 tsp salt
3/4 tsp freshly cracked black pepper
2 lb zucchini
1 large red bell pepper
3 green onions, sliced
3 tbsp Pecorino Romano cut into very small dice
1 tbsp parsley, chopped
1 tbsp dried currants
pinch red pepper flakes
2 tbsp white balsamic vinegar

Preheat oven to 375°F.

Combine the olive oil, garlic, Italian seasoning, salt and pepper in a large bowl. Set aside.

Wash and dry the zucchini. Cut into small dice; about 1/2 an inch or slightly smaller. Add to the olive oil mixture and toss until coated.

Spread evenly over a parchment lined cookie sheet. Bake for about 45 minutes.

Remove from oven, cool and add to mixing bowl.

Wash and seed the red bell pepper. Cut into 1/4 inch dice and add to bowl. Add the sliced green onions, Pecorino Romanoparsley, currants and red pepper flakes.

Drizzle the white balsamic vinegar over everything and toss. Taste and adjust the seasonings with salt, pepper and red pepper flakes as needed. Serve


Sunday, December 27, 2015

Smoky Sun-Dried Tomato Cheese Spread

(about 1 1/2 cups)


If you have a food processor handy, then this flavorful cheese spread can be prepared in just minutes.

Happy Holidays!

8 oz Neufchâtel or cream cheese
2 tbsp sour cream
2 oz smoked Gouda
1/3 cup sun-dried tomatoes (packed in olive oil), drained
1 clove garlic, roughly chopped
1/4 tsp lemon pepper
1/4 tsp smoked paprika
2 pinches cayenne
salt, to taste
2 green onion, sliced (reserve some for garnish)

Place everything except for the salt and green onion into the bowl of a food processor. Pulse until the mixture is smooth.


Remove the top and scrape down the sides. Taste and add salt as needed; adjust the seasoning if necessary. Sprinkle the sliced green onion evenly over the top. Replace the top and pulse just until the onion is combined.

Garnish with the reserved green onion and serve with crackers, bread or vegetable sticks.


Sunday, August 9, 2015

Sweet and Spicy Pecans


Recently a friend introduced me to Trader Joe's, Sweet and Spicy Pecans. They were delicious. I had planned on adding those pecans to my salads, but I managed to polish them off within two days by snacking on them instead.

This week I made several batches of sweet and salty pecans. I tried out various combinations of oils and butter, sugar and honey, cayenne and paprika. The following was my favorite version. Butter, honey, Sucanat, cayenne and a very aromatic sweet Hungarian paprika which my landlord brought back for me from Budapest, a few weeks ago.

If you are looking for a Trader Joe's copycat recipe, then look elsewhere. These pecans are more subtle. They aren't as sugary nor do they pack quite the same punch in the heat department, but I really like how they turned out. This is a good thing because there isn't any pressure for me to return to Silverdale, just to grab another bag or two.

2 tbsp. honey
2 tbsp. butter
2 tbsp Sucanat
1 tsp sweet Hungarian paprika
1/2 tsp. salt
a "generous" 1/4 tsp cayenne
1/4 tsp. freshly ground black pepper
8-9 oz shelled pecans

Place the honey and butter into a small saucepan over low heat.

Preheat oven to 275°F.

While the honey and butter are heating up, combine the Sucanat, paprika, salt, cayenne and black pepper in a small bowl and set aside.

When the honey and butter mixture is hot and smooth, remove from heat and stir in the pecans.

Sprinkle the spiced Sucanat mixture over the pecans and toss until they are evenly coated.

Spread the pecans onto a cookie sheet (lined with parchment paper or a silicone mat) in a single layer. Bake for about 35-45 minutes or until they are evenly toasted.

Remove from oven and cool on the cookie sheet. Store in a sealed container.

Sunday, February 15, 2015

Mediterranean Green Beans Braised in Tomatoes

( 4 servings)


There's something very satisfying about braised green beans. For me in some respects they are close to the ultimate comfort food. Served with a bit of rice, is all I need.

Cooking the beans in an aromatic sauce of tomatoes and onions creates a dish that tastes rich and flavorful. The richest element here is the olive oil which you could easily reduce by half if using a non-stick pot.

Braised green beans are delicious served hot or at room temperature. I usually make this dish with dill and mint, however this time I swapped those out for fennel seeds, cardamom and coriander. Those flavors did not disappoint; they were an interesting and pleasing change.

1 tbsp olive oil
2-3 cloves garlic, minced
1 tsp crushed fennel seeds
1/2 tsp ground cardamom
1/4 tsp ground coriander
1 medium onion, chopped
14oz can diced tomatoes
1 lb green beans, trimmed (if using frozen, defrost first)
salt and freshly ground black pepper, to taste

Heat the olive oil over medium heat in a pot fitted with a lid.

Stir in the garlic, fennel seeds, cardamom and coriander. When the mixture becomes fragrant after 30 seconds or so, quickly stir in the onions. Cook until the onions become soft and translucent; about 5 minutes.

Stir in the diced tomatoes and their liquid. Cook for a minute or two, then stir in the green beans.


Cover the pot with a lid and reduce the heat to low. Cook for about 25-40 minutes, depending on how soft you like your green beans. Check halfway through and add a small amount of water if the beans appear too dry.

Taste and add salt and pepper, if needed.

Serve hot or at room temperature. These beans reheat really well, in case you decide to double the recipe.

Saturday, December 27, 2014

Sun-Dried Tomato & Smoked Mozzarella Cheese Spread

(about 1 1/2 cups)


If you have a food processor handy, then this cheese spread will come together in practically no time at all. The sun-dried tomato and smoked mozzarella are absolutely terrific together.

8 oz cream cheese, cut up
4 oz *smoked mozzarella (see note below)
1/4 cup sun dried tomatoes packed in olive oil and drained
1/4 cup grated pecorino romano cheese
1/2 tsp finely chopped fresh garlic, or to taste
2 pinches cayenne pepper
salt, to taste

Place all of the ingredients, except the salt into the bowl of a food processor.


Run the motor until everything is well combined. You might have to stop and scrape down the sides once or twice. *I used a very soft, smoked mozzarella cheese from Trader Joe's. If you use a firmer type mozzarella, you might want to add a small amount of olive oil (from the sun-dried tomatoes), sour cream, plain yogurt, white wine or milk, if the processed spread seems too thick. Anything you have on hand to thin it out a bit.

Taste, and add salt and more garlic if needed. Pulse a few more times to combine thoroughly.

This spread tastes best if allowed to sit for an hour or two before serving. It will keep refrigerated for about a week or so.

Sunday, December 21, 2014

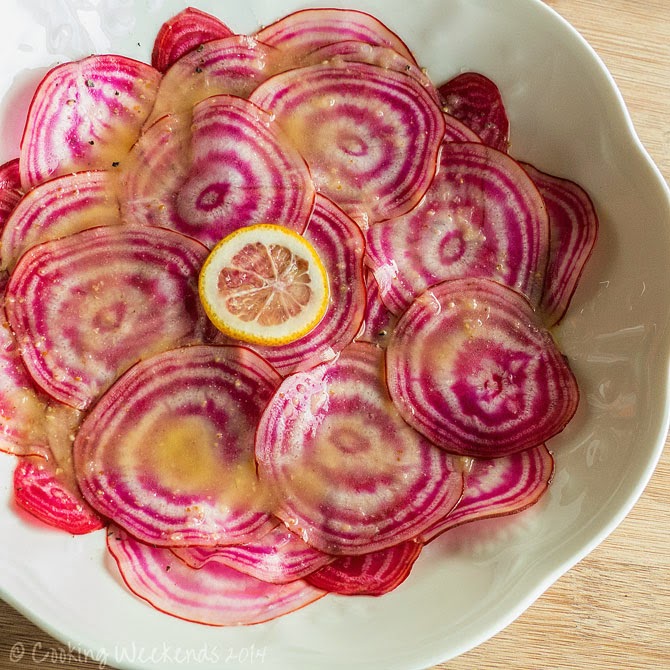
Raw Chioggia Beet Salad with Meyer Lemon


This festive looking salad is made with Chioggia beets. They are an Italian heirloom variety, known for their beautiful rings or stripes depending on which direction you cut them. A few years ago I tried growing these little beauties in my garden, but they didn't do very well in the heat.

Chioggia beets are a little sweeter than the regular fuchsia colored ones. They don't appear to stain your hands, at least not when prepared raw. I haven't tried cooking them yet as I was told they tend to lose their lovely stripes when heated.


for every 2 servings:
2-3 Chioggia beets, depending on their size
salt and freshly cracked pepper
juice from 1 small Meyer lemon, about 2-3 tbsp
2 tsp olive oil
1/4 tsp mustard

Scrub the beets really well. Slice off the tops and trim the roots.


Slice the beets as thin as possible. This is easiest if you use a mandoline. Arrange the slices into a serving bowl, lightly seasoning them with salt and pepper as you go along.

Combine the lemon juice, oil and mustard in a small jar with lid and shake well. Drizzle over the beet slices and serve.

Saturday, December 13, 2014

Turmeric & Ginger Pickled Eggs


One thing I noticed soon after I began purchasing my eggs directly from the farmer, was how difficult it was to peel them after I boiled them. The egg white would stubbornly cling to the shell I was trying to remove. After doing a bit of research I learned it was preferable to drop farm fresh eggs directly into hot water, rather than cold water. This made timing the eggs difficult for me. So, I picked up one of those egg timers that you place directly into the pot with the eggs. It changes color as the eggs cook. Regardless of how many eggs, or their size, this little gizmo appears to time them perfectly. I have used it a few times now, and my eggs have turned out perfect each time.

Another thing I learned about fresh eggs is that hens lay far fewer of them when the days get shorter. After coming home empty handed several times, I grabbed several dozen eggs when I finally made it to the farm really early, before the sun was up.

These pickled eggs are very easy to make. The seasoning is quite nice and the eggs take on a lovely yellow hue from the turmeric.


a dozen or more hard boiled eggs


Place the eggs into a sterilized jar (with lid), taking care not to squeeze them in too tightly.  Add cold water to cover the eggs, then carefully pour the water into a measuring cup to determine the amount of pickling marinade you will require.

For approximately every cup of marinade needed, combine:
1/2 cup apple cider vinegar
1/2 cup water
2-3 thin slices fresh ginger
1 tbsp sucanat or brown sugar
1 tsp turmeric
1 tsp yellow mustard seeds
1/2 tsp ground cardamom
1/2 tsp salt
1 pinch red pepper flakes

Combine all of the marinade ingredients into a saucepan with a lid. Bring the mixture to a simmer, lower the heat, cover the pot and cook for about 8-10 minutes.


Pour the hot marinade over the eggs. Add a small amount of water if the liquid doesn't cover the eggs completely. Cover the jar with a sterilized lid and allow to cool.

Refrigerate. Give the jar a gentle shake every day. The eggs will be ready to eat in 4-5 days. They will keep up to a month refrigerated. 

Sunday, November 30, 2014

Salad with Pear, Walnuts & Blue Cheese

(2-4 servings)


This delicious salad comes together in about 15 minutes. I often make a light meal out of it.

1 large Bartlett pear
2 tsp butter
2 tsp honey
2 tbsp cider vinegar
3 tbsp juice
1/2 tsp mustard
salt, to taste
1 tbsp olive oil
6 cups mixed greens such as baby spinach, baby chard and baby kale
1/4 cup chopped walnuts, lightly toasted
3-4 oz blue cheese crumbled
freshly cracked pepper, to taste

Wash the pear and cut into 1/2 inch dice.

Heat the butter in a non stick skillet over medium heat and gently saute the diced pear for a few minutes. Drizzle the honey over the pear and remove from heat. Set aside.


Combine the vinegar, juice (apple might be nice, I only had black currant juice on hand) and mustard. Add salt to taste and stir well, then stir in the olive oil. Set aside.

Divide the greens, walnuts, blue cheese and pear between four salad plates. Drizzle with the vinaigrette, dust with freshly cracked pepper and serve.

Sunday, September 14, 2014

Smoked Salmon Spread


(about 1 1/2 - 2 cups)


For my first batch, I tried one part smoked salmon to two parts neufchâtel. The spread was quite tasty, however I much preferred this beefed up version which used equal amounts of smoked salmon and cheese.

This spread tasted better the next day after the flavors had the chance to meld a bit. It will keep refrigerated for about one week.

8 oz neufchâtel or cream cheese
2 tsp freshly squeezed lemon juice
1-2 tsp hot creamed horseradish, or to taste
2 tsp fresh dill, minced or 1/2 tsp dried dill
2 tbsp plain yogurt or sour cream
1-2 tbsp milk
8 oz hot smoked salmon
1 green onion, sliced
salt and pepper to taste

Place the neufchâtel or cream cheese into the bowl of a food processor along with the lemon juice, horseradish, dill yogurt and 1 tablespoon milk. Run the processor until everything is thoroughly combined. Add the second tablespoon of milk if the mixture seems too stiff.


Scrape down the sides and add the hot smoked salmon. Pulse a few times and taste. Add the green onion as well as salt and freshly ground pepper if needed. Pulse until just combined.

The salmon spread tastes better if allowed to sit for at least 3-4 hours. Can be kept refrigerated for about one week.

Saturday, August 30, 2014

Alder Smoked Sockeye Salmon

(about 3 lbs)


I've wanted to try smoking salmon the moment my mum mentioned she had a smoker in her garage. I finally got around to it this week. This was my first attempt at smoking anything and boy was I ever thrilled with the results! The salmon was amazing! I'm having a hard time keeping out of it. It's like having a box of chocolates in the house.

This recipe came together after I looked at several sources both online and at the local library, as well as tidbits gleaned here and there from chatting with people in and around Sequim. I used alder chips because that appears to be the preferred wood for smoking salmon here on the Olympic Peninsula.

I used less salt than some of the recipes suggested because I was fearful my salmon would turn out too salty, especially if it sat in a brine for close to a day. That length of time appealed to me, although I can't really rationalize that sentiment. In any case, the amount of salt I did use appears to have been plenty. Despite the 17 hours or so the salmon soaked in the brine, the finished fish turned out fine.

brine
3 cups water (1 cup hot, 2 cups cold)
1/4 cup kosher or non-iodized salt
1/2 cup sucanat or brown sugar
2 tsp crushed black peppercorns

Combine the salt with one cup of hot water (in a non-reactive bowl or dish large enough to hold the brine as well as the salmon) and stir until the salt has dissolved. Add the sucanat and stir until that has dissolved. Stir in the crushed peppercorns. Set aside until the mixture has cooled down.

Add the remaining two cups of cold water to the brine.

3 1/2 lbs fresh wild caught sockeye salmon fillets, skin left on

Rinse the salmon in cold water and cut into large pieces. I had two large fillets. I cut each into 3 pieces, each piece about 5-6 inches in length.


Place the salmon into the brine skin side down making sure it's submerged in the liquid. (Skin side down makes it easier to remove the pieces the next day). Cover with plastic wrap and refrigerate. Use a small plate to weigh down the fish if necessary.

Allow the fish to soak for about 15 - 24 hours. The longer the fish is in the brine, the saltier it will become. I soaked mine for about 17 1/2 hours which seemed just about right for me.

coarsely cracked black pepper (optional)

Remove the fish and pat dry. Sprinkle with freshly cracked black pepper, if desired. Arrange on a rack, skin side down (I used the rack from the smoker) and let it dry for about 3-4  hours in a cool place. Ideally this should happen underneath a fan or in a breezy location. My mum's back deck was perfect for this; cool and windy. The surface of the salmon will become smooth and shiny. This is called the pellicle. Once the pellicle has formed, you can store your salmon in the refrigerator for a few hours if you plan on delaying the smoking for a bit.


alder wood chips soaked in water for about 30-45 minutes (amount of chips determined by the smoker you are using)

Remove the fish from the rack. Clean the rack and lightly oil it. Place the salmon on the oiled rack, skin side down, not touching.


Prepare your smoker.

The smoker I'm using has a thermostat which I set to roughly about **100°F. I smoked the fish for about 1 hour at this temperature before brushing it with the glaze I made, below.

glaze
honey
fresh lime juice
fresh lime zest

Combine the honey with the lime juice until you have a glaze thin enough to brush. The amount of juice will depend on how thick/stiff your honey is. Stir in the zest and brush some of this mixture over the salmon. (Brush the salmon with the glaze every hour or so). After the glaze was applied I smoked the fish for another 1 1/2 hours at around 100°F.

Then I increased the temperature to about 150°F and smoked the salmon for about 3 hours (for half this time I left the vent on the hood of the smoker open and then closed it for the remaining time). All together the salmon was in the smoker for about ***5-6 hours. The internal temperature of the fish should reach about 130°F to 140°F when it's done.

The thicker pieces turned out perfect and the thinner pieces were a bit on the dry side, although they weren't any dryer than the hot smoked salmon I've picked up at the market. I didn't have an instant read thermometer which might have helped determine how much time the salmon needed to remain in the smoker.

** Several people mentioned it's best to begin with a low temperature and increase that slightly over time. The reason for this is that if the temperature is too high, especially at the beginning, the salmon will "bleed" a large amount of a white substance which means the fish will likely be dryer than it should be. A small amount of this stuff is normal.

***This time will vary depending on the thickness of your salmon and the temperature and type of smoker.

I'm told the smoked salmon will keep for about a week or so, well wrapped in the refrigerator. I also froze several pieces.

Sunday, March 9, 2014

Chicken Potstickers

(about 60 potstickers)


I have to admit I'm pretty inept when it comes to forming potstickers. I can't seem to get the folds right and trying to put them together correctly takes me way too long. I usually give up after a few tries and end up folding them into simple half moon shapes similar to pierogies. It's much faster that way and they still taste the same, so ultimately it doesn't matter. I'm still in awe of my dim sum teacher in Toronto, who could fold dumplings into various shapes in mere seconds while holding a conversation with you and maintaining eye contact!

These delicious dumplings freeze really well, so if you are inclined, double this recipe to enjoy more of them at a later date.

potstickers
4-5 dried shitaki mushroom caps
1 cup hot water
1 lb napa cabbage
3/4 lb ground chicken
2 green onions, sliced
2 tbsp fresh cilantro, chopped
2-3 tsp fresh ginger, minced
1 tbsp tamari or soy sauce
2 tsp toasted sesame oil
2-3 cloves garlic, minced or pressed
1/2 tsp salt
1-2 pinches red pepper flakes
60 potsticker wrappers
sesame oil for frying
water

Soak the mushrooms in hot water for about 15-20 minutes. Set aside.

Meanwhile shred the cabbage into a microwave-proof bowl. Cover with wrap and microwave at one minute intervals until the cabbage has softened. Remove and cool.

Remove the mushrooms from the water and gently squeeze. Discard any hard stems and slice the caps into thin strips. Place them into a large mixing bowl.


Gently squeeze the cooled cabbage to release some of its excess moisture. You do not need to squeeze it completely dry. Add the cabbage, chicken, green onions, cilantro, ginger, tamari, sesame oil, garlic, salt and red pepper flakes to the mushrooms.

Mix thoroughly until everything is well combined. The filling will be on the wet side. At this point you can fry a small amount to adjust the seasoning, if you like.

To form the potstickers, place a generous teaspoonful into the center of each wrapper; make sure to leave the edges clear otherwise the dumplings will be difficult to seal. Lightly moisten the edges with water and then fold them together in half, pressing the edges together firmly. If you wish to pleat them, then have a look here. Smooth half moon shapes are fine if you find the pleating process as difficult as I do.

To freeze your finished potstickers, place them onto a cookie sheet lined with parchment paper in a single layer and not touching each other. Place the sheet into your freezer for about one hour, then remove and place the frozen potstickers into freezer bags for further freezing.

To cook the potstickers, heat a small amount of sesame oil in a heavy non-stick skillet with a tight fitting lid over a medium-high flame.


Place the potstickers into the skillet in a single layer, then add about 3-4 tbsp of water. Cover the skillet and reduce the flame to about medium or a touch lower. Steam the dumplings for about  5-7 minutes if they are fresh; 8-11 minutes if they are frozen (do not thaw them out first). Adjust the flame as needed to keep the bottoms from burning; the bottoms should just be nicely browned and slightly crispy.

If there's still a bit of water in the skillet when you remove the lid, then just cook another minute or two until the liquid has evaporated.

Serve with the dipping sauce, (see below).

potsticker dipping sauce
1/3 cup tamari or soy sauce
1/4 cup mirin or rice wine
3-4 tbsp rice vinegar
1 green onion, sliced
2 tsp toasted sesame oil
1/2 tsp chili paste, or to taste

Combine all of the sauce ingredients in a small bowl.

Serve with the potstickers.

Saturday, December 28, 2013

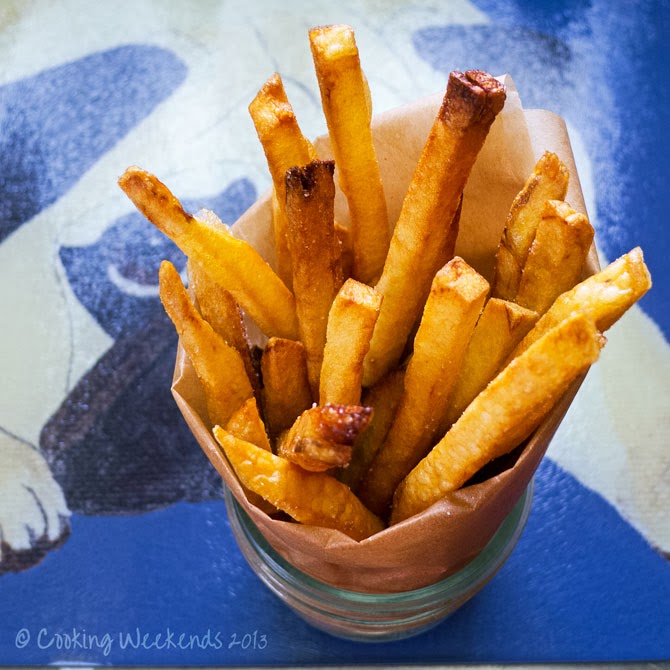
Crispy French Fries


I have never made proper french fries. The closest I have come are the oven baked sweet potato fries which I love and make frequently. This year at our company white elephant gift exchange I received a lovely cutting board with a picture of a dog on it (it looks like a pug), a five pound bag of russet potatoes and a french fry cutting tool. To both my surprise and relief, not one person tried to "steal" my gift!

The french fry cutter turned out to be an amazing tool. It cut the potatoes into perfect pieces; not too thin, not too thick. A couple of recipes were included and they all suggested frying the potatoes twice for extra crispiness.

water
cider vinegar
about 1  russet potato per serving
peanut oil
salt

Combine about 1 tbsp of vinegar per quart of cold water and set aside.

Wash and peel the potatoes, then cut them into the desired thickness for french fries (see photo). Drop the potatoes into the vinegar water and leave for a minute or two. Give them a good stir then drain the potatoes.

Fill up a heavy pot with oil leaving at least 3 inches free on the sides (in case the hot oil bubbles up). Heat the oil to 350°F.


Using a towel dry the potatoes, then carefully drop them into the hot oil. Fry them for a minute or two, just until they begin to lightly brown. Remove them from the oil and place them onto a plate lined with paper towels to drain. At this point you can leave them until you are ready to serve them or wait about 5 minutes, then fry them again.

Fry them a second time at 350°F. until they are nicely browned. Remove them and place onto a plate lined with a paper towel to drain. Sprinkle with a bit of salt and serve immediately.


Saturday, November 30, 2013

Chile con Queso, Made with Real Cheese (gluten free)

(about 6 servings)


If you are a huge fan of Velveeta, this recipe might not be for you. This Chili con Queso is different from the stuff you might find in a restaurant. I used a sharp cheddar cheese which I thought was quite good in this, however I did get one complaint, lol. Everyone else dug right in!

1 1/2 tbsp butter
1/2 a large yellow onion finely diced
2 cloves garlic pressed
1-2 jalapeno peppers, seeded and diced (or something hotter, if you prefer)
2 tbsp rice flour
one 14.5oz can diced tomatoes
1/2 cup vegetable broth
3-4 cups shredded cheese, about 3/4-1 lb; use cheddar or a combination of cheddar and Monterey Jack
salt, to taste
1/4 cup cilantro, chopped

Melt the butter in a saucepan over a medium flame and add the onion, garlic and jalapeno pepper. Saute for about 5 minutes or until the vegetables are soft.

Sprinkle the rice flour evenly over the vegetables and then quickly stir in. Add the canned tomatoes and stir, then add the vegetable broth. Cook for about 2-3 minutes or until the sauce has thickened.


Lower the flame to medium-low and add the cheese by the handful, each time stirring until it's completely melted (you might not need to add all of the cheese; taste as you go along). Check and add salt, if needed.

Remove from heat and stir in the cilantro. Serve.

Sunday, November 24, 2013

Smoked Oyster Spread

(about 1/2 cup)


A fellow I met in high school introduced me to this delicious spread. He used to serve it on hot buttered toast. It's also great with crackers.

1 3.7oz tin smoked oysters
1/2 cup extra sharp cheddar cheese, grated
1 tbsp red onion, finely diced
1 or 2 pinches cayenne (optional)
1-2 tsp sour cream or plain greek yogurt (if needed)

fine onion slices for garnish

crackers for serving

Drain the oysters and place into a small bowl. Add the cheese, diced onion and cayenne, if using.


Mash everything together with a fork. Add a small amount of sour cream or yogurt if the mixture seems dry.

Serve with crackers.

Sunday, October 20, 2013

Susan Feniger's Street Food's Romanian Sweet and Sour Eggplant

(4-6 servings)


For the past few months I have been posting a recipe or two every week at Carole's Chatter. She hosts "Food on Friday", and this week the theme was "Eggplant". One of the recipes that caught my eye was, Romanian Sweet and Sour Eggplant.

I couldn't wait to give it a try and I wasn't disappointed! This flavorful dish might not appeal to the faint of heart. It's quite robust; the garlic very prominent in the tangy and slightly hot, sweet and sour sauce.

As is often the case, I made a few changes here and there. I measured out the salt beforehand and sprinkled it over the slices. When all of them were evenly covered, I still had about a tablespoon left over. I didn't bother to add another 1/2 teaspoonful to the "pesto", thinking if this dish needed any more salt, I could add that at the very end. It didn't need any. I also reduced the amount of oil. A friend used to say you could have too much of a good thing sometimes, and that definitely is the case here. Olive oil might be a "good" oil, yet it still contains a lot of calories. I used a large non-stick skillet, to which I added tiny amounts of oil from time to time as needed; never more than one quarter of a teaspoonful each time. This dish was fine without the extra oil when it was finished. I didn't have any brown sugar in the house, so I used sucanat and honey instead.

I also left out the parsley because the recipe posted at Farmersgirl Kitchen accidentally omitted that from the ingredient list. By the time I realized that, it was too late. Oh, and I happened to have some olives on hand, which I tossed in as an afterthought. You can always follow another link for this recipe which does contain the parsley and appears to be the original one from the book, Susan Feniger's Street Food.
.

Adapted from the recipe posted at Farmersgirl Kitchen
2 large eggplants, about 2 lb
2-3 tbsp kosher salt
1/3 cup extra virgin olive oil
8-10 cloves of garlic, about 1 small head
2 bunches of green onions, white and green parts, roughly chopped
(1/2 bunch parsley; this is missing from the recipe at Farmersgirl Kitchen, but the original recipe includes it)
1/2 tsp cayenne pepper
olive oil for frying
1 14oz can whole peeled tomatoes, drained and roughly chopped
10 pitted green olives, sliced (optional)
3/4 cup cider vinegar
1/3 cup  sucanat or brown sugar
1 tbsp honey

Cut off and discard the ends from each eggplant. Cut them lengthwise into 1/4-inch-thick slices. Lay the slices out on a platter, and sprinkle both sides with salt. Set aside for 20 minutes so that the salt will draw out some of the water from the eggplant. Then pat the eggplant dry with a dish towel.

Put the olive oil, garlic, green onions, (parsley) and cayenne in a food processor, and puree until a smooth paste forms (it will resemble pesto). Spread liberally all over both sides of the eggplant slices.

In a large non- stick skillet set over a medium flame, heat a tiny amount of olive oil. Add enough eggplant slices to cover the bottom of the pan, and cook until they are browned on both sides and cooked through; 2 - 3 minutes per side. Transfer the eggplant to a platter or plate. Repeat this process with the remaining eggplant slices, adding  small amounts of oil as needed for each batch. Cut the cooked eggplant into 1-inch-wide strips.

In a pot (large enough to hold everything) set over a medium flame, combine the tomatoes, olives (if using), vinegar, sucanat and honey. Cook for 12 minutes. Add the eggplant strips and stir together. Reduce the heat to low and simmer for 8 to 10 minutes, until most of the liquid has been cooked off. 

Remove from the heat and serve, or chill. This dish may be served warm or cold.

Saturday, August 10, 2013

Extra Sharp Cheddar Spread

(about 1 1/2 cups)


I used to envy my sister who lives in California and has easy access to Trader Joe's. They seemed to be all over the place and I loved to accompany her there whenever I was in town for a visit. Well, they finally arrived in Texas, and yesterday I went to the grand opening of one in my neighborhood. It probably wasn't the best day to go as it was extremely crowded, although I must say I was very impressed by how quickly and smoothly they managed to check everyone out.

Despite this being their first day, some of the produce at Trader Joe's was pretty disappointing. The lemons looked old, most of the jalapenos had some kind of fungus developing on the stems and the corn was way past its prime. The cheese department on the other hand was terrific. They had a good selection of cheeses. I walked away with four different varieties of "extra sharp" cheddar I wasn't familiar with to try out at home.

Hopefully their produce will be in better shape the next time I'm there.

8 oz extra sharp cheddar cheese, I used a white one
3-4 tbsp white wine such as Sauvignon Blanc
2-3 tbsp sour cream
1 tsp Dijon mustard
1 tsp Worcestershire sauce
1/2 clove garlic, minced
a few pinches cayenne pepper

Cut the cheese into one inch or smaller chunks and place into the bowl of a food processor along with 1 tablespoon of wine (to start), 2 tablespoons of sour cream, mustard, Worcestershire sauce, garlic and cayenne. Start by pulsing the mixture until the cheese breaks up. Scrape down the sides, if needed.

With the motor running add more wine and/or sour cream until you have a nice smooth consistency for spreading. Taste and adjust the seasoning, if necessary.

Friday, July 5, 2013

Blackened Shrimp Wraps & Mango Salsa

(2 servings)


This is another recipe I came across online I couldn't wait to try. There's something about a blackened dish that seems to hit the spot when it's incredibly hot outside. The spicy shrimp with the mango salsa were amazing!

This recipe called for large leaves of lettuce to use as wraps, but in all honesty I found them difficult to eat this way. The salsa kept falling out which was messy for sure. The next time I will simply spoon a mound of salsa over some torn up lettuce and place the shrimp on top of that. 

This shrimp dish is adapted from a recipe posted at The Charlotte Observer. 

mango salsa
1 roma tomato, finely diced
1 small mango, peeled, stone removed and finely diced
1/2 jalapeno pepper,  finely diced
1 green onion, sliced thin
1 tablespoon cilantro, chopped
salt, to taste
1 lime, juice half; other half cut into wedges


Combine the tomatoes, mango, jalapeno, green onions and cilantro in a small non-reactive bowl. Add a small amount of salt and gradually add the lime juice. Toss and taste, adding more salt and lime juice as needed. Set aside.

blackened shrimp
1 large clove garlic, pressed
1 tbsp butter, melted
8 large raw shrimp, cleaned (about 3/4 lb)
1 1/2 tsp sweet paprika
1  tsp cumin
3/4 tsp freshly ground black pepper
1/2 tsp salt
1/4-1/2 tsp cayenne, to taste


Combine the garlic and butter in a small bowl. Brush the mixture onto both sides of each shrimp.

Combine the paprika, cumin, black pepper, salt and cayenne until evenly mixed on a plate. Dredge both sides of the shrimp through the spice mixture.


Heat a non stick skillet over a medium-high flame. Fry the shrimp for about 2 minutes on each side or until fully cooked. Remove from heat.

to assemble
4 bib or red lettuce leaves, washed and dried or *see note below

Place about 2-3 tbsp salsa on each leaf and top with 2 cooked blackened shrimp.

*Note: My wraps weren't very easy to eat. The next time I will tear up the lettuce and split that between two plates, spoon the salsa over the lettuce in a small mound on each plate and divide the shrimp between the two plates. It will just be much easier to eat this way.

Garnish with the lime wedges. Serve.

Read more here: http://www.charlotteobserver.com/2012/01/27/2964134/blackened-shrimp-lettuce-wraps.html#storylink=cpy

Saturday, June 22, 2013

Roasted Garlic Hummus

(about 1 1/4 cups)


Hummus is one of those dishes I really ought to make more often. It's relatively inexpensive, nutritious and comes together quickly if you happen to have a food processor.

I came across a recipe recently where the author suggested the secret to a smooth and creamy hummus was the order in which you added your ingredients to the food processor. She began with the tahini and lemon juice and ended with the chickpeas and water. I decided to give this a try and I have to agree, my hummus was indeed smoother than usual.

2 heads garlic
1/4 cup tahini
2 tbsp freshly squeezed lemon juice
1 tbsp olive oil
1/2 tsp cumin
1/2 tsp salt, or to taste
15oz can chickpeas, drained and rinsed
2-3 tbsp water
olive oil for serving
a few pinches of cumin, paprika or sesame seeds for garnish (optional)

Roast the garlic following these instructions. Set aside to cool.

Place the tahini and lemon juice into the bowl of a food processor. Let the motor run for a minute or two until the mixture is light and creamy.

Scrape down the sides and add the olive oil, cumin and salt. Process for about 30 seconds.

Add half of the chickpeas and process for another minute.


Scrape down the sides and add the remaining chickpeas. Squeeze out all of the roasted garlic from both heads and add to the bowl of the food processor. Run the motor for about 2 minutes or until smooth and creamy.

The hummus will probably be quite thick (mine was). Slowly add the water a tablespoon at a time and process in between until you have the desired consistency.

Place the hummus on a plate. Drizzle a small amount of olive oil over the surface.  Sprinkle with cumin, paprika or sesame seeds if desired.

Saturday, June 15, 2013

Pickled Eggs & Beets

(12 pickled eggs)


Just this week we saw the temperature hit 99°F (37°C) in Dallas. I actually didn't mind it, the air was relatively dry, there was a slight breeze and it just felt like a nice summer day. If  this trend continued for the next three or four months, I'd be delighted, however in another week or two the breeze will vanish and the temperature will climb and (more or less) remain in the triple digits. Hot enough to break into a sweat walking to your car, hot enough to burn your hands on the steering wheel.

Despite the air conditioned house, I pretty much lose interest in cooking and eating, which trust me in my case isn't a bad thing, lol. I prefer snacking on cold dishes and whenever I'm inclined I'll prepare something along those lines. This week it's pickled eggs and beets. They were considered bar food (sans beets) where I grew up in Alberta. Frequently you'd find a huge jar filled with dozens of eggs next to the cash register. They were often quite rubbery, the result (I suspect) of the ratio of vinegar to water and perhaps the amount of time they had spent up on the bar.

I used medium sized eggs for this, which are more difficult to find (at least here in Dallas) than you might imagine. I would have preferred using small eggs, but I haven't seen those in years. I'm planning on checking out the Dallas Farmer's Market for small eggs next week. I might be pleasantly surprised.

1 3/4 cups water
3 medium raw beets, trimmed, peeled and cut into wedges
1/4 large sweet onion, sliced
12 hard boiled medium eggs, shells removed
1 cup apple cider vinegar
2-3 tbsp sucanat, honey or brown sugar, to taste
1 tbsp whole mustard seeds
9-12 whole peppercorns
1/2 tsp salt, or to taste
a pinch or two ground ginger
a pinch or two allspice
a pinch or two cinnamon
a pinch or two cayenne pepper

Sterilize a large glass jar and lid (about 46oz). Set aside.

Place the water, beets and onion into a saucepan and bring to a simmer. Cook the beets until tender; about 10-15 minutes.

Scoop out the beets and onions with a slotted spoon (reserving the cooking liquid). Place them into the sterilized jar alternating them with the eggs.


Add the vinegar, sucanat, mustard seeds, peppercorns, salt, ginger, allspice, cinnamon and cayenne to the saucepan. Bring the mixture to a boil then reduce the heat and simmer for about 4-5 minutes.

Pour the hot liquid over the eggs, beets and onion. Add a small amount of water if the liquid doesn't cover the eggs and beets completely. Cover the jar with the sterilized lid and allow to cool.

Refrigerate. Give the jar a gentle shake every day. The eggs and beets will be ready to eat in 4-5 days. They will keep up to a month refrigerated. These eggs are great as a snack or cut up in a salad.