Showing posts with label fish. Show all posts

Sunday, August 23, 2015

Honey Miso Glazed Salmon

(4 servings)


One of the nice things about living in the Pacific Northwest is the availability of fresh wild salmon. It's frequently on sale and I'll often pick up a few pounds to portion and freeze.

Earlier this summer I came across some wild coho salmon steaks which I defrosted this weekend and marinated in a tasty Asian inspired honey miso dressing. The result is pretty amazing when you consider how easy this dish is to prepare.

2 tbsp honey
2 tbsp red miso 
1 tbsp rice vinegar
1 tbsp water
1 tsp reduced sodium tamari or soy sauce
1 tsp sesame chili oil
1/2 tsp grated fresh ginger
4 x 6oz salmon steaks, about 1 inch thick
1 green onion, sliced, for garnish

The night before you plan on serving this, whisk together the honey, miso, rice vinegar, water, tamari or soy sauce, sesame chili oil and ginger in a small bowl.

Liberally brush the honey miso mixture onto both sides of the salmon steaks, (reserve about 2 tablespoons for later). Place these onto a plate and cover with plastic wrap, smoothing the wrap across the surface to remove as many air bubbles as possible. Refrigerate overnight or up to one day.


When you are ready to serve, position the rack in the middle of the oven and turn on the broiler. If you have a Hi/Lo function, set it to Hi.

Place the steaks onto a foil lined cookie sheet. Brush the tops with the reserved honey miso mixture.

Broil the steaks for about 8-9 minutes and then watch closely. They will be done when the center of the steaks have just begun to turn opaque; about 10-12 minutes total. Take care not to overcook, otherwise they might be on the dry side.

Sprinkle with the sliced green onion and serve.

If you have any left over, it's great cold and flaked over a green salad with a citrusy sesame type dressing.

Thursday, June 18, 2015

Trout with Lemon Caper Sauce

(2 servings)


Here's another quick dish that's suitable for a weeknight dinner. On occasion I'll change up the sauce a bit by adding any combination of chopped parsley, red pepper flakes, minced garlic or chopped chives.

It's essential to have everything prepped and ready to go, otherwise the trout might cool down too much while you make the sauce.

3/4 lb trout fillets
salt and pepper
1 tbsp butter
1/4 cup dry white wine
1-2 tbsp freshly squeezed lemon juice, to  taste
1 tbsp capers

Rinse the fillets with cold water and pat dry. Season both sides with salt and pepper.

Warm a serving plate and keep warm while you cook the trout.

Heat a skillet over medium heat and add the butter. When the butter has melted and begins to froth, add the trout skin side down and cook for about 3-5 minutes until the skin is crispy and the fish begins to looks opaque along the edges of the fillets. The time will vary depending on the size and thickness of your fish.


Gently turn the fillets over and cook another 3-5 minutes or until the fish flakes easily. Remove to the warmed plate.

Add the wine, lemon juice and capers to the skillet. Increase the heat to medium high and cook, scraping up the browned bits until the sauce has reduced by almost half; about 3-4 minutes.

Pour the lemon caper sauce over the trout and serve immediately.

Sunday, February 1, 2015

Pan Fried Cod with Aïoli

(4 servings)


Pan fried fish is always pretty easy to prepare and I make it frequently. This week I made some aïoli to go with it. This intensely flavored garlic mayonnaise was delicious with the cod. I made a small amount; about 1 tablespoon per serving. If you end up with a bit more or have any leftover, it should keep refrigerated up to about two weeks. Try adding a spoon or two aïoli to potato salad or mix some into a ranch type salad dressing or use it in place of regular mayo in a sandwich.

aïoli
1 *egg yolk, at room temperature
1/4 tsp prepared mustard
1/4 tsp salt
1/4 cup pure or extra light olive oil
1-2 cloves garlic, to taste
2 tsp freshly squeezed lemon juice
a few grinds pepper, (optional)

You can prepare the aïoli a day or more ahead of time, if you like.

Place the egg yolk into a small bowl which should also be at room temperature. This is important because the aïoli might not emulsify if the temperatures of your ingredients/tools differ. * If you can't get fresh eggs from a reliable source, then look for "pasteurized" eggs.

Using an egg beater, beat the yolk until it begins to thicken and lighten in color; about 2 minutes. Add the mustard and salt and beat for another minute.


Very slowly beat in the oil, a drop at a time at the beginning. If it looks like the oil is emulsifying with the yolk, then you can increase the the amount of oil to a tiny drizzle. Continue beating until all of the oil has been used up. The aïoli at this point should be quite thick; like mayonnaise in a jar.

Beat in the garlic and lemon juice. Add the pepper, if using. Refrigerate until you are ready to use it.

If your aïoli curdles or fails to emulsify, don't throw it out. You can rescue it if you have another (room temperature) egg yolk handy. Start again with a fresh bowl and clean beaters. Some people add a teaspoon of (room temperature) water to the egg yolk (I don't, but that might be worth trying). Beat the egg yolk (and water, if using) until it begins to thicken and lighten in color. Slowly beat in a few drops of oil. When the oil and egg yolk have emulsified, then beat in a teaspoon at a time of the curdled or separated mixture until you have used it all up. Beat in up to an additional 1/3 cup olive oil if you like, just add it very slowly.

cod
1/4 cup all purpose flour
1 tsp smoked paprika
1/2 tsp salt
1/2 tsp lemon pepper
a pinch or 2 cayenne
1 1/2 lbs cod fillets, cut into 6oz portions
1 tbsp olive oil

Combine the flour, smoked paprika, salt, lemon pepper and cayenne. Sprinkle the mixture evenly over a small plate.

Lightly dredge the cod with the flour mixture and tap off the excess.


Heat the olive oil in a non stick skillet over medium heat. Fry the cod for about 3-5 minutes on each side. You might have to lower the heat a touch if your cod fillets are thick, so they can cook through and not burn. Mine were about 3/4 inch thick and took about 7 minutes total time to cook through. They are done when the cod flakes easily.

Serve immediately with a spoon of aïoli for each portion.

Sunday, September 14, 2014

Smoked Salmon Spread


(about 1 1/2 - 2 cups)


For my first batch, I tried one part smoked salmon to two parts neufchâtel. The spread was quite tasty, however I much preferred this beefed up version which used equal amounts of smoked salmon and cheese.

This spread tasted better the next day after the flavors had the chance to meld a bit. It will keep refrigerated for about one week.

8 oz neufchâtel or cream cheese
2 tsp freshly squeezed lemon juice
1-2 tsp hot creamed horseradish, or to taste
2 tsp fresh dill, minced or 1/2 tsp dried dill
2 tbsp plain yogurt or sour cream
1-2 tbsp milk
8 oz hot smoked salmon
1 green onion, sliced
salt and pepper to taste

Place the neufchâtel or cream cheese into the bowl of a food processor along with the lemon juice, horseradish, dill yogurt and 1 tablespoon milk. Run the processor until everything is thoroughly combined. Add the second tablespoon of milk if the mixture seems too stiff.


Scrape down the sides and add the hot smoked salmon. Pulse a few times and taste. Add the green onion as well as salt and freshly ground pepper if needed. Pulse until just combined.

The salmon spread tastes better if allowed to sit for at least 3-4 hours. Can be kept refrigerated for about one week.

Saturday, August 30, 2014

Alder Smoked Sockeye Salmon

(about 3 lbs)


I've wanted to try smoking salmon the moment my mum mentioned she had a smoker in her garage. I finally got around to it this week. This was my first attempt at smoking anything and boy was I ever thrilled with the results! The salmon was amazing! I'm having a hard time keeping out of it. It's like having a box of chocolates in the house.

This recipe came together after I looked at several sources both online and at the local library, as well as tidbits gleaned here and there from chatting with people in and around Sequim. I used alder chips because that appears to be the preferred wood for smoking salmon here on the Olympic Peninsula.

I used less salt than some of the recipes suggested because I was fearful my salmon would turn out too salty, especially if it sat in a brine for close to a day. That length of time appealed to me, although I can't really rationalize that sentiment. In any case, the amount of salt I did use appears to have been plenty. Despite the 17 hours or so the salmon soaked in the brine, the finished fish turned out fine.

brine
3 cups water (1 cup hot, 2 cups cold)
1/4 cup kosher or non-iodized salt
1/2 cup sucanat or brown sugar
2 tsp crushed black peppercorns

Combine the salt with one cup of hot water (in a non-reactive bowl or dish large enough to hold the brine as well as the salmon) and stir until the salt has dissolved. Add the sucanat and stir until that has dissolved. Stir in the crushed peppercorns. Set aside until the mixture has cooled down.

Add the remaining two cups of cold water to the brine.

3 1/2 lbs fresh wild caught sockeye salmon fillets, skin left on

Rinse the salmon in cold water and cut into large pieces. I had two large fillets. I cut each into 3 pieces, each piece about 5-6 inches in length.


Place the salmon into the brine skin side down making sure it's submerged in the liquid. (Skin side down makes it easier to remove the pieces the next day). Cover with plastic wrap and refrigerate. Use a small plate to weigh down the fish if necessary.

Allow the fish to soak for about 15 - 24 hours. The longer the fish is in the brine, the saltier it will become. I soaked mine for about 17 1/2 hours which seemed just about right for me.

coarsely cracked black pepper (optional)

Remove the fish and pat dry. Sprinkle with freshly cracked black pepper, if desired. Arrange on a rack, skin side down (I used the rack from the smoker) and let it dry for about 3-4  hours in a cool place. Ideally this should happen underneath a fan or in a breezy location. My mum's back deck was perfect for this; cool and windy. The surface of the salmon will become smooth and shiny. This is called the pellicle. Once the pellicle has formed, you can store your salmon in the refrigerator for a few hours if you plan on delaying the smoking for a bit.


alder wood chips soaked in water for about 30-45 minutes (amount of chips determined by the smoker you are using)

Remove the fish from the rack. Clean the rack and lightly oil it. Place the salmon on the oiled rack, skin side down, not touching.


Prepare your smoker.

The smoker I'm using has a thermostat which I set to roughly about **100°F. I smoked the fish for about 1 hour at this temperature before brushing it with the glaze I made, below.

glaze
honey
fresh lime juice
fresh lime zest

Combine the honey with the lime juice until you have a glaze thin enough to brush. The amount of juice will depend on how thick/stiff your honey is. Stir in the zest and brush some of this mixture over the salmon. (Brush the salmon with the glaze every hour or so). After the glaze was applied I smoked the fish for another 1 1/2 hours at around 100°F.

Then I increased the temperature to about 150°F and smoked the salmon for about 3 hours (for half this time I left the vent on the hood of the smoker open and then closed it for the remaining time). All together the salmon was in the smoker for about ***5-6 hours. The internal temperature of the fish should reach about 130°F to 140°F when it's done.

The thicker pieces turned out perfect and the thinner pieces were a bit on the dry side, although they weren't any dryer than the hot smoked salmon I've picked up at the market. I didn't have an instant read thermometer which might have helped determine how much time the salmon needed to remain in the smoker.

** Several people mentioned it's best to begin with a low temperature and increase that slightly over time. The reason for this is that if the temperature is too high, especially at the beginning, the salmon will "bleed" a large amount of a white substance which means the fish will likely be dryer than it should be. A small amount of this stuff is normal.

***This time will vary depending on the thickness of your salmon and the temperature and type of smoker.

I'm told the smoked salmon will keep for about a week or so, well wrapped in the refrigerator. I also froze several pieces.

Sunday, May 11, 2014

Almost 3 Ingredient Tuna Salad


I lost my job on Valentine’s Day.  After mulling things over for a week or so, a plan of sorts fell into place. I sold my old house. The movers will be here in a couple of days and by the end of this week I'll be living with friends. But, it really isn’t as dire as it sounds!

Next month I will head out on an extended road trip. It’s been over 5 years since my last vacation and I can’t wait to hit the road. I have no idea at all how long I will be gone. I'll be heading west (via Amarillo) to Santa Fe and Taos. From there I’m thinking of Mesa Verde, Four Corners, Bryce Canyon, Zion National Park, The Grand Canyon, Flagstaff, Petrified Forest and Phoenix before landing in San Diego. There’s so much to see in this country!

Once I’m in California, I’ll explore the southern coast and spend a bit of time in L.A. where I have family. Then I will head north to Santa Cruz and Capitola, two places I visited and loved years ago. I’m planning on exploring the entire coast right up to Canada.

I doubt I will be cooking much unless I rent something with a kitchenette for a week or so here and there. I do plan to continue blogging because I imagine I will come across some pretty amazing meals.

In any case, my cupboards are almost bare. For lunch today I managed to scrape together a really simple tuna salad. I used 3 ingredients, well 4 if you count the black pepper, lol.

I bound the salad together with mayonnaise because that’s all I had. You can lighten this up by replacing half or all of the mayo with plain yogurt or light sour cream, if you prefer.

2-3  tbsp dill pickles, finely diced
1-2 tbsp mayonnaise
5oz chunk light tuna packed in water and drained

a few grinds of black pepper, to taste

Place everything into a small bowl and combine until thoroughly mixed.


Serve.

Sunday, March 2, 2014

Fish Coconut Curry

(4 servings)


Don't let the variety of spices discourage you from trying this delicious curry. If you are fortunate enough to live near a Whole Foods, Sprouts or Central Market, they might very well have a spice section in their bulk foods department. In Dallas, it's possible to purchase spices by the spoonful for mere pennies.

Central Market will sometimes even take that extra step and order specific bulk spices for you. I needed lavender for a Coca Cola syrup I was experimenting with last summer. Central Market ordered it and then called me when they had it in stock two weeks later. I was thrilled they were willing to do this when all I needed was two tablespoons of the stuff!

2 tsp coconut oil
1 large onion, chopped
2 cloves garlic, inced
1 tbsp fresh ginger, minced
1 tsp garam masala
1 tsp ground coriander
1 tsp ground cumin
1/2 tsp turmeric
1/8 tsp cayenne, or to taste
14.5oz can diced tomatoes
13.5oz can coconut milk
1/2 - 2 jalapeno peppers, sliced and to taste
salt, if needed
1 lb firm white fish
2 tbsp fresh cilantro, chopped

Heat the coconut oil in a heavy pot with a tight fitting lid. Add the onion and cook until it's translucent. Adjust the flame as needed to keep the onion from burning.


Stir in the garlic, ginger, garam masala, coriander, cumin, turmeric and cayenne. Cook for a minute or two (until the spices are very fragrant), then stir in the tomatoes, coconut milk and jalapeno pepper. Bring the mixture to a simmer, then reduce the flame to low, cover the pot and cook for about an hour. Taste and add salt, if needed.

Cut the fish into bite sized pieces and add to the curry. Cook for another 3-6 minutes or until the fish is cooked through.  If you cook it too long the fish might begin to flake and fall apart. Remove from heat and sprinkle with the cilantro.

Serve.

Saturday, January 18, 2014

Blackened Tilapia with Artichoke Hearts

(2 servings)


When I first considered this combination I thought it was a great idea; spiced fish served with wine braised artichokes. However, when everything was on the table, I wasn't as sure. I loved the fish on its own as well as the artichokes, but was the fish too strongly flavored? The friend I served this to last night thought the two together were perfect! He went on and on about how fish was never his first choice, yet he would love to eat this again, any time!

I thought the fish might have been a bit too overwhelming for the wine braised artichokes; perhaps coating just one side of each fillet would make me happier. I might give this another try at some point.

1 1/2 tsp sweet paprika
1/2 tsp cumin
1/2 tsp salt
1/2 tsp freshly ground black pepper
4 pinches cayenne, or to taste
1 tbsp butter, melted
2 (6oz) tilapia fillets
1 cup dry white wine
2-3 large cloves garlic, minced or pressed
1-2 tsp anchovy paste, to taste
2 cups frozen artichoke hearts, defrosted
1/4 cup heavy cream
1 tbsp fresh parsley, chopped

Combine the paprika, cumin, salt, pepper and cayenne on a plate. Set aside.

Brush the butter on the tilapia, coating both sides. *Dredge the fish through the spice mixture, shaking off the excess. *I dredged both sides of the fish in the spices, but in retrospect I think it might have been better to only coat one side of the fish in order to tone it down a bit, (but still butter both sides if you try this instead).


Heat a non-stick skillet over a medium high flame. When the skillet is hot, add the fish. If you have a microwave, then fry the fish about 3 minutes per side or until the fish is slightly underdone; set aside. If you don't have a microwave, then fry the fish about 4 minutes per side or until the fish flakes easily, cover (to keep warm) and set aside.

Pour the wine into a saucepan and stir in the garlic and anchovy paste. Bring to a simmer and cook until the sauce has reduced by half.


Add the artichokes and simmer for about 3-5 minutes. Stir in the cream, lower the heat and leave until ready to serve.

If you partially cooked the fish, place each piece on a dinner plate. Cover loosely with paper towels and microwave on high for about 1 minute (I used a 700 watt oven, you'll probably need less time for a higher wattage oven).

Spoon the artichokes and sauce over each plate, sprinkle with parsley and serve.

Sunday, August 11, 2013

Heirloom Tomato Salad with Anchovy Dressing

(4 servings)


Another tomato salad! I love tomatoes. I can eat them everyday, especially when they are at their peak. This time I left them out on the counter to marinate in rather robust anchovy and caper dressing. Life is good!

6-8 anchovy fillets, chopped
1/4 red onion, diced fine
3 tbsp olive oil
2-3 tbsp freshly squeezed lemon juice, to taste
1 heaping tbsp capers
1 small clove garlic, minced
1 tsp lemon zest, minced
a generous amount of freshly cracked pepper (or to taste)
salt, to taste (the anchovies are salty, so be careful)
1 lb heirloom tomatoes
1 tbsp fresh basil or parsley, sliced or chopped

Place the anchovies, onion, olive oil, half the lemon juice, capers, garlic, lemon zest, and pepper into a small bowl. Mix until well combined. Add more lemon juice, if needed and also salt. I usually don't add additional salt, but today I found myself adding a small amount. Set the dressing aside.


Wash the tomatoes and cut into 1/4 inch thick slices. Divide and arrange them onto four salad plates. Sprinkle each with some fresh basil or parsley. I usually use parsley for this, but I didn't have any on hand. So I added the basil instead, which I quite enjoyed in this salad. Use whichever you prefer.

Spoon the dressing evening over the tomatoes. Leave out on the counter for at least 20 minutes to give the flavors a chance to meld.

Sunday, July 21, 2013

Cod & Shrimp Fish Cakes (Gluten Free)

(4 servings)


Making these fish and shrimp cakes reminded me of making salad; I kept tossing and tasting as I went along. The shrimp were an afterthought. I had a small amount of shrimp in the freezer and thought they would be great in these tasty cakes.

cod & shrimp cakes
1 large russet potato (about 1 lb)
1 tbsp olive oil
1-2 cloves garlic, minced or pressed
10 oz cod fillets, both sides sprinkled with salt and freshly cracked pepper
1/4 lb raw shrimp cleaned and deveined
1-2 tbsp freshly squeezed lemon juice or use a splash of white wine
1 tsp lemon zest, minced
salt and freshly cracked pepper
2 green onions, sliced
3 tbsp parsley, chopped
2 tbsp mayonnaise
1 tsp Dijon mustard
1 egg
3 tbsp cornmeal
oil for frying
lemon wedges for serving

sauce
1/4 cup sour cream
1 tbsp mayonnaise
1-3 medium dill pickles, chopped (depending how sour you like your sauce)
1 tbsp capers
1-2 tsp fresh dill, chopped
a few tsp pickle juice

Wash and peel the potato. Cut into chunks. Bring a small pot of lightly salted water to a simmer and drop in the potato pieces. Cook until they can easily be pierced with a fork or knife; about 15-20 minutes. Rinse the potatoes under cold water when they are done. Drain and set aside.

While the potatoes are cooking, heat the olive oil in a large skillet. Stir in the garlic.


Add the fish and fry for a few minutes on each side until the fish is done and flakes easily. Remove the fish to a plate and add the shrimp the the skillet.

Cook the shrimp until they are cooked through; the time will depend on their size, but they cook quickly regardless. Remove the shrimp from the skillet.


Deglaze the pan with the lemon juice or wine, scraping up the browned bits. Pour over the fish and shrimp and allow to cool.

Place the zest into a large bowl. Add the potatoes; it's OK if they are still warm and mash them (you can leave them somewhat lumpy). Season with salt and pepper. Flake the fish and cut up the shrimp if they are large. Add these to the potato mixture as well as the green onions and parsley.


Gently toss the mixture and make any necessary adjustments to the seasonings; salt, pepper, lemon juice or wine.

In a small bowl, whisk together the mayonnaise, mustard and egg until the mixture is smooth. Pour over the fish and potato mixture and toss gently until evenly combined. Cover the bowl with wrap and place into the refrigerator for about an hour or two to chill.


Sprinkle the cornmeal over a plate. Form 8 fish cakes and dredge both sides through the cornmeal.

Combine the mayonnaise, pickles, capers and dill (for the sauce) in a small bowl. Stir in a bit of pickle juice if the sauce seems too thick. Set aside.

Heat the oil in the skillet and fry the fishcakes for 4-5 minutes on each side or until  they are golden brown. Serve with lemon wedges and sauce.


Saturday, March 23, 2013

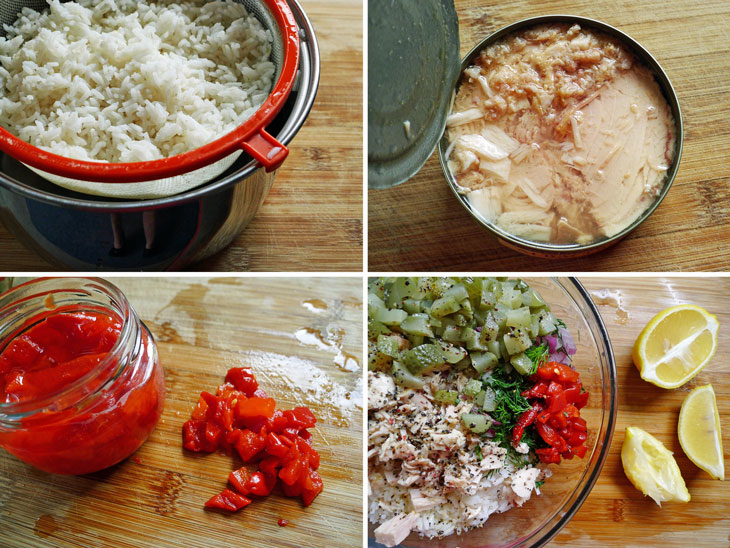
Tuna Rice Salad


(4 servings)


If you are looking for alternatives to potato and pasta salads, consider making a rice salad. In addition to being a nice change, they are relatively easy to make and will keep refrigerated for a couple of days.

5-6 cups lightly salted water
1 cup white long grain rice
1 5oz tin tuna packed in water, drained and flaked
3-4 small dill pickles, diced
1/4 large red onion, diced
2 tbsp fresh dill, chopped
2 tbsp pimentos, chopped
2 tbsp olive oil
1 lemon
freshly ground black pepper, to taste
salt, if needed

Bring about 5 -6 cups of lightly salted water to a boil. Stir in the rice and simmer for about 10-15 minutes or until the rice is tender.

Rinse the rice under cold water and drain. Place into a salad bowl.


Add the tuna, pickles, red onion, dill and pimentos. Drizzle the olive oil over the mixture and squeeze the juice from half a lemon to start. Grind pepper over everything and toss.

Check and adjust the seasoning as you toss the salad, adding more lemon juice, ground pepper or chopped dill, as needed.  I usually don't add more salt because the rice was simmered in salted water and pickles are usually salty as well, but check just in case.

This salad will keep refrigerated for a few days, just bring to room temperature and fluff up with a fork.

Saturday, December 29, 2012

Smoked Sardine Spread

(about 1/2 cup)


It's been years since I've eaten sardines. They were too much of a good thing while I was in college, I suppose. Back then they were incredibly cheap and very convenient to have around for snacking.

The last time I encountered them was almost two decades ago on a trip to Portugal to visit my mum. She had rented an apartment for the winter in Albufeira, I think it was. It had a tiny white kitchenette where my mum had filled one huge drawer with fresh oranges and another with sardines. It looked to me like she had at least 50 or 60 tins of the stuff. I couldn't help but chuckle as she excitedly explained how she had an orange or two for breakfast, then sardines for lunch and dinner with perhaps another orange, and how healthy it all was!

Recently I found myself in an isle at the grocery store checking out various tins of seafood and fish. I was surprised by how many varieties of canned sardines were available. Skinless and boneless, smoked, packed in water, in tomato sauce, in mustard, olive oil, or Mediterranean style with black olives. The selection had grown considerably since I was a student. Curious, I brought home several tins. A couple of lightly smoked sardines packed in olive oil, as well as a tin of skinless and boneless sardines.

This recipe is adapted from Dorie Greenspan's Sardine Rillettes, from Around My French Table: More Than 300 Recipes from My Home to Yours (Houghton Mifflin Harcourt Publishers, 2010). This relatively inexpensive and delicious sardine spread is great as an appetizer or a snack!

The following can be easily doubled or tripled, if desired.

1x  3 3/4oz tin of lightly smoked sardines packed in olive oil
2 oz Neufchatel or cream cheese, at room temperature
1 tbsp chopped fresh dill
1-2 tbsp fresh lemon juice, to taste
1 pinch of cayenne pepper
salt and freshly ground pepper, to taste
1 green onion, finely sliced
1 tsp drained capers

Remove the sardines from the tin and drain. Carefully remove any bones, if desired. They are quite soft and will break up easily when mashed.  Set aside.


In a small bowl or the bowl of a food processor combine the Neufchatel cheese with the dill, half of the lemon juice, cayenne and a bit of salt and pepper. When the mixture is smooth, add the sardines, onions and capers. Mix them in until they are well combined with the cheese mixture, or pulse a few times if using a food processor. Add more lemon juice if needed. Season with more salt and pepper, if needed.

Serve with crackers or cut up vegetables.

Monday, December 3, 2012

Lemon Dill Tuna Salad


One small can of tuna can easily be transformed into this delicious lunch for one.

5oz canned tuna, packed in water
1/2 stalk celery, finely diced
1 tbsp fresh dill, chopped
1 tbsp chives, sliced
1 tbsp sour cream
1 1/2 tsp mayonnaise
1/4 wedge of a medium lemon
salt and freshly ground pepper, to taste

Drain the tuna (it doesn't need to be squeezed dry) and place into a small bowl. Using a fork, break up any large chunks.

Add the celery, dill, chives, sour cream and mayonnaise. Remove the *zest from the lemon wedge and add this to the bowl as well. *I get the best results using a microplaner, however if you don't have one of those, then make sure to mince the zest as finely as you can before adding. Toss with a fork until evenly mixed.


I prefer my salad lemony, so I'm inclined to squeeze out the entire 1/4 wedge of lemon over the salad at once. Start with a squeeze or two and taste as you go along. Keep mixing the salad as you add the lemon, as well as the salt and pepper to taste.

Serve.


Saturday, October 6, 2012

Cod, Shrimp & Fennel Chowder


(4-6 servings)


I've wanted to make a fish or seafood chowder with fennel ever since Sue, from The view from Great Island, posted her Springtime Salmon and Fennel Chowder. I've mostly had fennel raw in salads, although years ago I used to pull the bulbs apart, stuff them with a mixture of herbs and bread, then bake them with tomato sauce and cheese. Fennel has a delicate anise-like flavour which people seem to either love or hate. I thought it was really quite tasty in this chowder.

Sue mentioned her chowder was best made ahead of time and reheated after the flavours had a chance to mingle. I followed her suggestion and prepared mine in two steps. This is one of the most delicious chowders I've ever made.

I didn't have any on hand, but I think a small splash of Pernod right before serving would have been pretty amazing in this!

3/4 lb raw shrimp (in their shells)
a few ice cubes
1  fennel bulb with stalks (about 1 lb)
2 cups clam juice
1/2 cup white wine
2 tsp fennel seeds
1 small bay leaf
4-5 whole peppercorns
1 tbsp butter or olive oil
1 large yellow onion, chopped
2 stalks celery, chopped or sliced
2 medium carrots, diced or sliced
1 cob corn, shucked
3/4 lb baby potatoes, cut into bite sized pieces (I used purple for their colour)
2 cups milk (replace part of the milk with half and half or cream, if you prefer a richer soup)
1 tsp sweet paprika
a few pinches cayenne
3/4 lb cod fillet, cut into bite sized pieces
salt

Clean the shrimp by removing their shells and tails and heads if you have those (reserve), then running a knife along the backside to remove the black veins. Place the cleaned shrimp on ice and return them to the refrigerator.

Wash the fennel and cut off the stalks about 1 1/2 inches above the bulb. Set the bulb aside. Pull off the ferny fronds from the stalks and reserve those for garnish. Slice the stalks and place them into a small pot with a lid.


Add the shrimp shells, clam juice, wine, fennel seeds, bay leaf and peppercorns to the pot. Bring the mixture to a light simmer, lower the heat, cover and cook for about an hour.

Slice the fennel bulb into thin slices. Set aside.

Heat the butter or olive oil in a soup pot and add the onion. Cook the onion until it's translucent. Stir in the celery. Cook for a minute or two.

Strain the clam broth into the soup pot with the sauteed onions and celery. Add the sliced fennel bulb, carrots, corn, potatoes, milk, paprika and cayenne. Bring the mixture to a simmer, set the heat to the lowest setting (you don't want it to boil at this point), cover (leaving the lid slightly ajar) and cook for  about 45 minutes or until the vegetables are tender.


Add the cod and stir, then turn off the heat, cover the pot and allow the chowder to cool for several hours or overnight. This gives the flavours a chance to blend.

When you are ready to serve, gently reheat the chowder taking care it doesn't come to a boil. When the chowder has heated up, add the shrimp and cook for 3-5 minutes or until the shrimp are cooked through. Check and adjust the seasoning with salt and pepper, if needed.

Serve. Garnish with the reserved fennel fronds.


Saturday, July 14, 2012

Cold Spiced & Marinated Basa


(2-3 servings)


A couple of weeks ago I made blackened catfish which I loved so much, I wanted to have it again. This time I spotted some farmed basa which the fishmonger explained was a milder Asian variety of catfish. The fillets had a pearly white flesh with a lovely pink hue. I grabbed a pound to try out.

For this wonderful make ahead dish, I prepared the basa the same way I prepared the blackened catfish, but when the fish was cooked, I took it one step further. I deglazed the skillet with a mixture of white wine and white wine vinegar which I poured over the blackened basa, then set aside. The spicy fillets in the sour marinade were amazing! I will be making this again with either catfish or basa!

1 large clove garlic
1 1/2 tbsp butter
1 1/2 tsp sweet paprika
1 tsp cumin
1/2 tsp freshly ground black pepper
1/2 tsp salt
1/2 tsp dried thyme
1/4-1/2 tsp cayenne, to taste
1 lb  basa (or catfish) fillets, about 4 small fillets
1/2-1 tsp olive oil

2/3 cup dry white wine
1/3 cup white wine vinegar

Press the garlic clove through a garlic press, catching any juices into a small microwave safe bowl.

Add the butter and microwave until the butter has melted. Set aside.

Combine the paprika, cumin, pepper, salt, thyme and cayenne. Set aside.

Heat a large cast iron skillet (this is the preferred utensil, but I used a large non-stick skillet instead) over high heat. Coat the pan evenly with the olive oil. I do this with a paper towel, using only the tiniest amount.

Brush the garlic butter evenly over the tops of the basa fillets. Use all of it, dividing it evenly between the top sides of all the fillets. Dredge the buttered sides through the spice mixture. 


Fry the fish, placing the fillets (buttered and seasoned side down) into the hot skillet. Cook for about 2-3 minutes until the edges become opaque. Turn the fillets over and cook for another minute or until the fish flakes easily and is done. Place the basa into a non reactive dish about 8 inches square with sides at least 1 inch high.

Lower the heat and pour the wine and vinegar into the skillet. Deglaze the pan by gently scraping the browned bits into the liquid. Allow the mixture to come to a boil, then pour it over the blackened basa fillets.

When the basa reaches room temperature, cover the fish with plastic wrap, smoothing it down directly over the surface so that the liquid reaches the top. Refrigerate for several hours, up to overnight.

Serve it cold or at room temperature.

I served it with sliced mango and cooked rice I cooled to room temperature and fluffed up with a fork. Yum!

Sunday, June 24, 2012

Blackened Catfish with Cantaloupe Salsa


(2-3 servings)


Catfish was on sale this week! I haven't had any in what seems like forever, and it's a fish I have always loved. I have no idea why some people frown at the mention of them. In my opinion, a catfish is much nicer looking than say, a monkfish. Mind you both are very tasty! :P

I still had a decent amount of cantaloupe leftover from yesterday. Sue, from The View from Great Island, recently made a delicious looking cantaloupe salsa which inspired me to give that a try. It went really well with the blackened catfish. I loved it's slight sweetness in contrast to the spicy catfish.

Often when fish is blackened, both sides are dipped in melted butter and dredged in the spice mixture. I prefer to brush garlic butter onto one side and season only that side. There's usually plenty of butter and spice mixture in the skillet for the other side. You can always double the amount of spices and butter if you prefer the more traditional method.

cantaloupe salsa
1 1/2 cups cantaloupe, small dice
1 green onion, sliced
1/2-1 jalapeno pepper (washed, seeded and finely chopped), to taste
small handful fresh cilantro, washed and chopped
salt and freshly ground pepper
juice from 1/2-1 small lime, to taste

I made this a few hours ahead of time to give the flavours a chance to mingle. Combine the cantaloupe, green onion, jalapeno (these vary in size, so use an amount you are comfortable with) and cilantro in a small non-reactive bowl.


Sprinkle with salt and pepper. Squeeze the juice from half a lime over the salsa and toss. Check and adjust the seasoning and lime juice, if needed.

Set aside for a few hours.

blackened catfish
1 large clove garlic
1 1/2 tbsp butter
1 1/2 tsp sweet paprika
1 tsp cumin
3/4 tsp freshly ground black pepper
1/2 tsp salt
1/4-1/2 tsp cayenne, to taste
1 lb catfish fillets, about 4 fillets
2 tsp fresh lemon thyme, minced
1/2 tsp olive oil


1 lime, sliced for garnish

Press the garlic clove through a garlic press, catching any juices into a small microwave safe bowl.

Add the butter and microwave until the butter has melted. Set aside.

Combine the paprika, cumin, pepper, salt and cayenne. Set aside.

Heat a large cast iron skillet (this is the preferred utensil, but I used a large non-stick skillet instead) over high heat. Coat the pan evenly with the olive oil. I do this with a paper towel, using only the tiniest amount.


Brush the garlic butter evenly over the tops of the catfish fillets. Use all of it, dividing it evenly between the top sides of all the fillets. Press the lemon thyme evenly over the fillets, then dredge them in the spice mixture.

Fry the fish, placing the fillets (buttered and seasoned side down) into the hot skillet. Cook for about 2-3 minutes until the edges become opaque. Turn the fillets over and cook for another minute or until the fish flakes easily and is done.

Serve immediately with the salsa and lime wedges.


Sunday, October 9, 2011

Chopped Fish Salad with Roquefort Dressing

(2 servings)


A while ago I had lunch with a friend who ordered a chopped salad of iceberg lettuce, tomatoes and crispy deep fried catfish smothered in blue cheese dressing. He let me have a bite and it was delicious, but way too rich.

I decided to try to reconstruct a similar salad with less fat. I pan fried the fish and lightened up the dressing; the resulting salad was delicious!

Thursday, September 1, 2011

Fish in Beer Batter with Tartar Sauce


(about 2 - 3 servings)


While shopping for fish, the heavily tattooed fellow standing next to me struck up a conversation.. I think he noticed I couldn't keep my eyes off his arms, lol.

He told me his English aunt's trick to a good beer batter was the addition of a bit of yeast. What he described was simple; combine flour and beer until you have a consistency between regular pancake batter and crepes, and to that add the yeast. He mentioned he likes to add salt and pepper to his batter (I added a bit of salt), but mostly I seasoned the fish itself  before dredging it in the flour. I was intrigued after this little discussion and although I had planned on broiling fish with tamarind, I decided to fry some instead. Cod and haddock were expensive, so I used sole.

The batter puffed up almost immediately when the fish hit the hot oil. It was on the light side and not at all heavy. I'm not sure what difference the yeast made because I rarely deep fry anything, but I liked the puffed and crispy coating I ended up with. I served the fish with lemon wedges and tartar sauce which I prefer to malt vinegar.


1 tbsp warm water
1/2 tsp dry yeast (I used the type for bread machines)
2/3 cup unbleached flour
1/8 tsp salt
2/3 cup beer, or a bit more

12 oz sole fillets
salt and freshly ground pepper
1/4 cup unbleached flour (for dredging)

oil, for deep frying

lemon wedges, for garnish

Combine the water and yeast and set aside for a few minutes until the yeast has dissolved.
Combine the salt and flour in a bowl. Pour in the yeast mixture and beer. Stir the batter until everything is mixed. If the batter seems too thick, then add a bit more beer. It should resemble a runny pancake batter.  Set aside for about 30 minutes or until the batter begins to look frothy.

Heat the oil to 350° F.

Sprinkle salt and pepper on both sides of the fish, then dredge both sides in flour. Quickly dredge each side of the fish in the batter and carefully slide into the hot oil.


Fry the fish in small amounts so they have enough room around them, about 2-3 minutes on each side or until the batter is puffed and golden brown.

Drain the fish on a warmed platter covered with paper towels to absorb any excess oil, while you finish up with the rest of the fish.

Garnish with lemon slices and serve with the tartar sauce.

tartar sauce
2 medium dill pickles, chopped
2 tsp fresh dill, chopped
2 tsp fresh parsley, chopped
2 tsp shallot, finely chopped 
2 tsp capers, chopped
1 tsp Worcestershire sauce
2-3 tbsp mayonnaise ( just enough to bind everything)


Combine everything in a small bowl. You may add more mayonnaise if you like.. I add just enough until everything binds.