Showing posts with label vegan. Show all posts

Saturday, October 24, 2015

Vegan Apple and Asian Pear Crisp


I've just returned from Canada. I was there for the Canadian Thanksgiving, and made several vegan dishes for that feast. One of these was a huge apple crisp with the apples tossed in a caramel sauce. The kids loved it, although I thought it turned out a tad too sweet. This version contains less sugar and vegan buttery spread (no caramel sauce). I also tossed in some juicy organic Asian pears grown here in Sequim.

A small 1.5 liter casserole dish (7x7x3) is ideal for this crisp. It has a smaller surface, so the ratio of apples to crisp topping is greater. A good thing for those watching their waistlines. No worries if you don't have this particular dish (turns out it's vintage), use an 8x8x2 inch pan instead.

apples and pears
about 2 lbs of apples and Asian pears combined
1 tbsp whole wheat pastry flour
1 tbsp brown sugar
1/2 tsp cinnamon
1 tbsp apple or orange juice

Preheat oven to 375°F.

Core then, cut the apples and Asian pears into large chunks; about 1 1/2 inches. You don't need to peel them first. Place the fruit into a bowl and sprinkle with the flour, brown sugar, cinnamon and juice. Toss.


Place the mixture into a small 7x7x3 or 8x8x2 baking dish. Set aside.

crisp topping
1/4 cup regular rolled oats
1/4 cup whole wheat pastry flour
1/4 cup brown sugar
2 tbsp "buttery" vegan spread
1/4 tsp cinnamon

Place the rolled oats, whole wheat pastry flour, brown sugar, vegan spread and cinnamon into the bowl of a food processor. Pulse until the mixture is crumbly.

Sprinkle the crisp topping evenly over the apple and pear mixture.

Bake for about an hour or until the top has browned nicely and the apple mixture has begun to bubble.

This crisp is best served warm or at room temperature.

Sunday, March 22, 2015

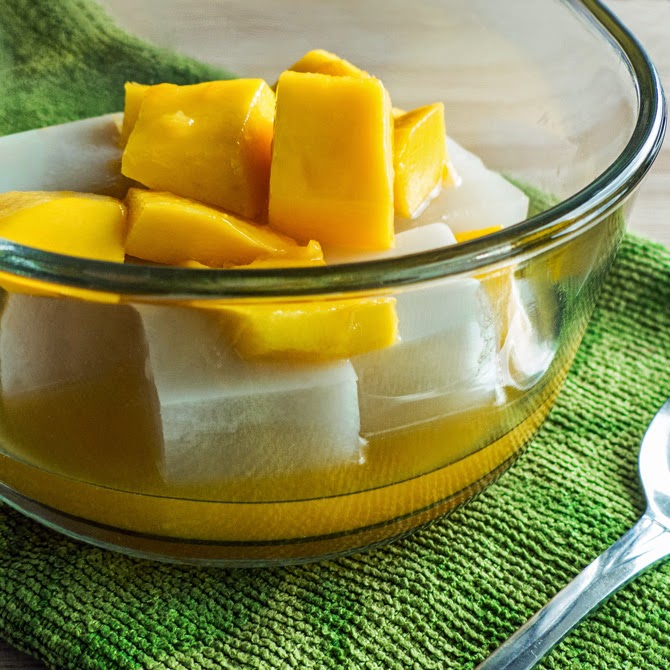
Refreshing Agar Agar Dessert with Fruit

(6 servings)


Agar agar, a jelling agent which is derived from seaweed is ideal for vegan or vegetarian diets. It has a texture similar to gelatin, yet different; not as "rubbery". it sets without the need for refrigeration and unlike gelatin, it holds its shape in warmer weather.

In recent years whenever I have encountered the powdered form, it has contained sugar, so I having been using the bar form instead.

1 bar/stick agar agar, (about 7 gm/.25 oz)
2 1/4 cups water
1/4 cup evaporated cane juice or granulated sugar, (3-4 tbsp honey, if paleo)
2/3 cup light or regular coconut milk
1/4 tsp pure almond extract, or to taste
1 orange
2 medium mangoes

Break/rip the agar agar into small pieces and place them into a pot. Add the water and soak for about 30 minutes.


Bring the mixture to a gentle simmer and cook, stirring until the agar agar has dissolved; about 10-12 minutes.

Add the cane sugar and stir until dissolved. Stir in the coconut milk. If you see small bits of agar agar in the mixture, cook for a few more minutes until they have dissolved. Remove from heat and add the almond extract. Taste and add more almond extract if desired.

Pour the mixture through a sieve into an 8 or 9 inch  square pan. It will be set by the time it's cooled to room temperature.

When you are ready to serve. Squeeze the juice from the orange and pour into a small bowl. Peel the mangoes and cut the flesh into dice. Add the diced fruit to the juice.


Cut the set coconut milk mixture into cubes and divide between bowls. Spoon the mango cubes and orange juice mixture over each serving.

Sunday, February 15, 2015

Mediterranean Green Beans Braised in Tomatoes

( 4 servings)


There's something very satisfying about braised green beans. For me in some respects they are close to the ultimate comfort food. Served with a bit of rice, is all I need.

Cooking the beans in an aromatic sauce of tomatoes and onions creates a dish that tastes rich and flavorful. The richest element here is the olive oil which you could easily reduce by half if using a non-stick pot.

Braised green beans are delicious served hot or at room temperature. I usually make this dish with dill and mint, however this time I swapped those out for fennel seeds, cardamom and coriander. Those flavors did not disappoint; they were an interesting and pleasing change.

1 tbsp olive oil
2-3 cloves garlic, minced
1 tsp crushed fennel seeds
1/2 tsp ground cardamom
1/4 tsp ground coriander
1 medium onion, chopped
14oz can diced tomatoes
1 lb green beans, trimmed (if using frozen, defrost first)
salt and freshly ground black pepper, to taste

Heat the olive oil over medium heat in a pot fitted with a lid.

Stir in the garlic, fennel seeds, cardamom and coriander. When the mixture becomes fragrant after 30 seconds or so, quickly stir in the onions. Cook until the onions become soft and translucent; about 5 minutes.

Stir in the diced tomatoes and their liquid. Cook for a minute or two, then stir in the green beans.


Cover the pot with a lid and reduce the heat to low. Cook for about 25-40 minutes, depending on how soft you like your green beans. Check halfway through and add a small amount of water if the beans appear too dry.

Taste and add salt and pepper, if needed.

Serve hot or at room temperature. These beans reheat really well, in case you decide to double the recipe.

Sunday, December 21, 2014

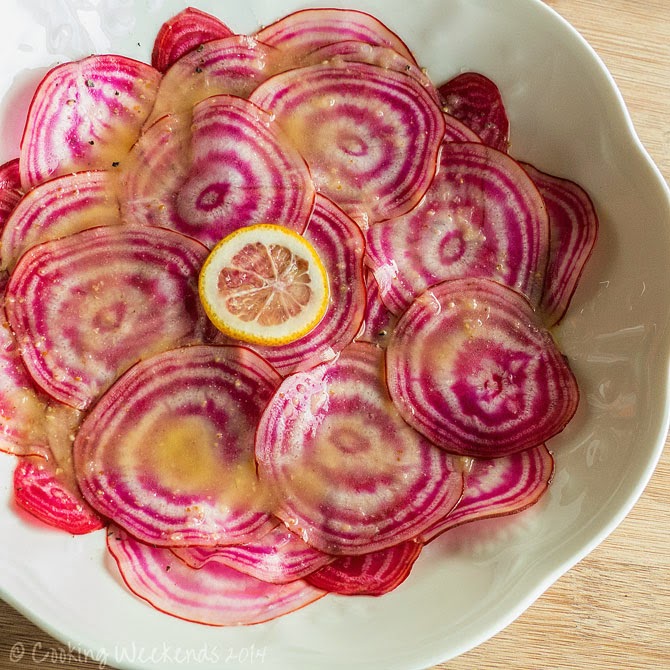
Raw Chioggia Beet Salad with Meyer Lemon


This festive looking salad is made with Chioggia beets. They are an Italian heirloom variety, known for their beautiful rings or stripes depending on which direction you cut them. A few years ago I tried growing these little beauties in my garden, but they didn't do very well in the heat.

Chioggia beets are a little sweeter than the regular fuchsia colored ones. They don't appear to stain your hands, at least not when prepared raw. I haven't tried cooking them yet as I was told they tend to lose their lovely stripes when heated.


for every 2 servings:
2-3 Chioggia beets, depending on their size
salt and freshly cracked pepper
juice from 1 small Meyer lemon, about 2-3 tbsp
2 tsp olive oil
1/4 tsp mustard

Scrub the beets really well. Slice off the tops and trim the roots.


Slice the beets as thin as possible. This is easiest if you use a mandoline. Arrange the slices into a serving bowl, lightly seasoning them with salt and pepper as you go along.

Combine the lemon juice, oil and mustard in a small jar with lid and shake well. Drizzle over the beet slices and serve.

Sunday, September 28, 2014

String Beans Braised in Apple Cider

(3-4 servings as a side)


This is a terrific way to prepare string beans, especially if there are a lot of larger and tougher beans mixed in. The longer the beans braise in the cider the more tender and flavorful they become.

1 tbsp olive oil
1/2 medium onion, chopped
1 large clove garlic, chopped
1 lb string beans, trimmed and sliced  diagonally if they are large
1/2 - 3/4 cup apple cider
salt and freshly ground pepper, to taste

Heat the olive oil in a pot (with a lid) over medium heat. Stir in the onion and garlic and cook, stirring from time to time until the onion is translucent.


Add the string beans and 1/2 cup apple cider. Place the lid over the pot, reduce the heat to low and cook the beans for about 60-90 minutes. Check the beans every 20 minutes or so and add more cider if the beans look dry. I had used slightly more than half a cup of cider by the time the beans were tender and to my liking. There was a small amount of liquid remaining in the pot (one or two tablespoons) when the beans were ready.

Check, and adjust the seasoning with a bit of salt and pepper. Serve hot or at room temperature.


Saturday, March 29, 2014

Roasted Red Bell Pepper Salad

(4-6 servings)


Freshly roasted bell pepper salads are wonderful! I've always had a fondness for red peppers, but if you prefer a colorful salad you could use two red, two yellow and two green bell peppers instead.

I've kept the seasoning for this salad simple, but if you are inclined, you could add a bit of fresh minced garlic, parsley or mint!

6 red bell peppers
1-2 tbsp balsamic vinegar
salt and freshly cracked pepper, to taste

Preheat *oven to 450°F.

Wash, then cut the bell peppers in half, lengthwise. Remove the seeds and place them cut side down in a single layer on a lined (foil or parchment paper will work) baking sheet. You can use an unlined sheet in a pinch, however you might end up with a bit of a cleaning chore.


Place the peppers into the middle of the oven and roast for about 15-20 minutes. When the skins have begun to blacken and puff up somewhat, remove the peppers from the oven. Allow them to cool. *I roast these in a small counter top convection oven, you might have to adjust the heat and/or roasting time a bit if using a larger conventional oven.

Slip the skins off the peppers. Slice the peppers into bite sized strips and place them into a bowl.


Sprinkle with a bit of salt and pepper and drizzle one tablespoon of balsamic vinegar to start. Toss the salad and taste and adjust the seasonings if needed. I will often add a touch more vinegar later because the peppers will release a bit of liquid if they have sat a while.

Saturday, February 1, 2014

Raw Turnip, Apple and Carrot Slaw

(4-6 servings)


Recently I tried turnips for the first time. They hadn't been at all what I expected, and their taste and textures were quite different raw or baked. I love them raw; somewhat peppery and nice and crispy.

Raw turnips are delicious in this fresh salad!

1 large honey tangerine
2 tbsp apple cider or rice vinegar
1 tbsp olive oil
1/4 clove garlic, minced
2 turnips
1 crisp apple
3 medium carrots
salt and pepper, to taste

Cut the tangerine in half and squeeze out the juice; you should have about 1/2 cup, give or take. Combine that with the vinegar, olive oil and garlic. Set aside.

Slice the tops off the turnips (where the leaves came out) as well as the bottoms. Peel them and then shred them into a large bowl.


Wash the apple, cut it into quarters (you can leave the peel on if you like) and remove the core. Shred the apple into the bowl.

Wash and scrub the carrots and shred those into the bowl as well.

Pour the dressing over the shredded vegetables and toss until everything is evenly combined. Taste and season with salt and pepper, as needed.

Serve.

Saturday, January 25, 2014

Garlic Roasted Turnips

(4 servings)

Turnips, they are foreign to me. To my knowledge my mother never served them to us. I'm not sure if she wasn't familiar with them or if she just didn't care for them. Whenever I saw turnips at the market I just walked past them and headed toward more familiar veggies, like carrots and asparagus.

Well this month turnips are in season in Texas and I thought it was time I gave them a try. They weren't at all what I expected. I was told to peel them and as I did, I was struck by how much their aroma reminded me of radishes and kohlrabi. They also had a wonderful crisp texture.

A friend mentioned they were delicious roasted, and I thought that would be easy enough to try. Well, I'm sold! Turnips are delicious! I will definitely have them again soon.

2 lbs turnips
1 (generous) tbsp olive oil
2 cloves garlic, minced or pressed
salt and freshly ground pepper, to taste

Remove a thin slice of turnip from the top where the leaves were and the very bottom where the root is. Remove the remaining skin with a knife or potato peeler. I was tempted to leave the skin on, but everyone I asked gave me an emphatic, "no!"

Preheat oven to 400°F.

Cut the turnips into sticks that are about 1/3 of an inch thick. Place into a large bowl.

Drizzle the olive oil over the cut up turnips. Add the garlic, salt and pepper. You might want to ease up on the pepper a tad because the baked turnips appear to accentuate the peppery taste more than usual. Toss until the turnips are evenly coated.


Place the turnips onto a baking sheet (I lined mine with parchment paper). I bake everything in a small counter top convection oven and my 13x9 inch baking sheet wasn't large enough for the turnips to lay flat in one even layer. This was fine. Halfway through baking I gave them a good toss.

Bake the turnips for about 40-50 minutes or until they have browned nicely. Give them a good toss about halfway through baking.

Saturday, December 14, 2013

Grated Carrot & Apple Salad

(4 servings)


I'm mostly eating salads at home trying to balance the holiday dinners and goodies that keep appearing my way. Any crisp apple will work in this dish. I used organic Cameo apples and they were lovely with the carrots.

1/3 cup freshly squeezed orange juice
1 tbsp apple cider vinegar
2 tsp olive oil
1/2 tsp Dijon mustard
2 apples, cored and shredded
2 large carrots, shredded
salt and freshly cracked pepper
2 tbsp raisins or currants

Combine the orange juice, vinegar, olive oil and mustard in a salad bowl.


Add the apples and toss quickly in the dressing to stop them from becoming discolored. Add the carrots and toss. Taste, and add salt and pepper as needed. Add the raisins or currants, toss again.

Serve.

Sunday, November 17, 2013

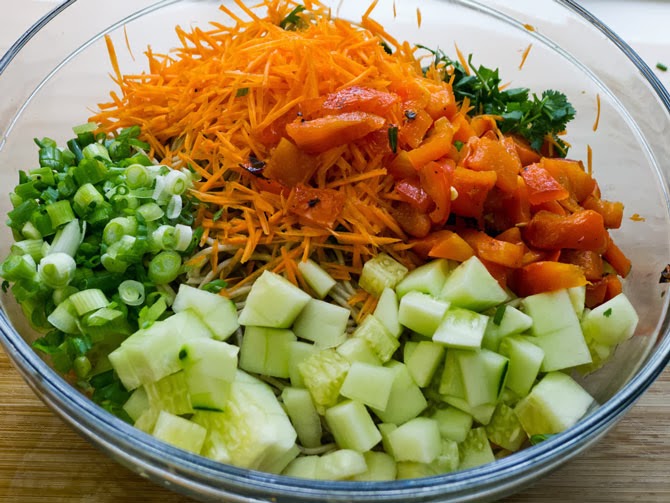
Soba Noodle Salad

(6-8 servings)


I have been eating a ton of green salads of late and decided to change things up a bit this weekend with this delicious Asian style soba noodle salad. This dish is somewhat versatile in that you can add almost any bits of vegetables you have on hand. In the past I've used broccoli, asparagus, corn, peas, beans, even celery.

dressing
1 small clove garlic, minced
small piece of fresh ginger, grated (about 2 tsp)
1/2 cup soy or tamari sauce
1/4 cup mirin or rice wine
3 tbsp rice vinegar
1 tbsp hot sesame oil
2 tsp honey

salad
12oz soba noodles cooked as directed, drained and cooled
3 green onions, sliced
1 roasted red bell pepper, diced
1/2 cucumber, diced
1 medium carrot, shredded
1/2 small  bunch cilantro, chopped
1/4 cup dry roasted peanuts, chopped or lightly toasted sesame seeds (optional)

In a small bowl combine the garlic, ginger, soy sauce, mirin, rice vinegar, sesame oil and honey. Set aside.


Place the soba noodles, green onions, bell pepper, cucumber, carrot and cilantro into a large bowl. Pour over the dressing and toss.


Garnish with the chopped peanuts or toasted sesame seeds, if using.

Sunday, October 20, 2013

Susan Feniger's Street Food's Romanian Sweet and Sour Eggplant

(4-6 servings)


For the past few months I have been posting a recipe or two every week at Carole's Chatter. She hosts "Food on Friday", and this week the theme was "Eggplant". One of the recipes that caught my eye was, Romanian Sweet and Sour Eggplant.

I couldn't wait to give it a try and I wasn't disappointed! This flavorful dish might not appeal to the faint of heart. It's quite robust; the garlic very prominent in the tangy and slightly hot, sweet and sour sauce.

As is often the case, I made a few changes here and there. I measured out the salt beforehand and sprinkled it over the slices. When all of them were evenly covered, I still had about a tablespoon left over. I didn't bother to add another 1/2 teaspoonful to the "pesto", thinking if this dish needed any more salt, I could add that at the very end. It didn't need any. I also reduced the amount of oil. A friend used to say you could have too much of a good thing sometimes, and that definitely is the case here. Olive oil might be a "good" oil, yet it still contains a lot of calories. I used a large non-stick skillet, to which I added tiny amounts of oil from time to time as needed; never more than one quarter of a teaspoonful each time. This dish was fine without the extra oil when it was finished. I didn't have any brown sugar in the house, so I used sucanat and honey instead.

I also left out the parsley because the recipe posted at Farmersgirl Kitchen accidentally omitted that from the ingredient list. By the time I realized that, it was too late. Oh, and I happened to have some olives on hand, which I tossed in as an afterthought. You can always follow another link for this recipe which does contain the parsley and appears to be the original one from the book, Susan Feniger's Street Food.
.

Adapted from the recipe posted at Farmersgirl Kitchen
2 large eggplants, about 2 lb
2-3 tbsp kosher salt
1/3 cup extra virgin olive oil
8-10 cloves of garlic, about 1 small head
2 bunches of green onions, white and green parts, roughly chopped
(1/2 bunch parsley; this is missing from the recipe at Farmersgirl Kitchen, but the original recipe includes it)
1/2 tsp cayenne pepper
olive oil for frying
1 14oz can whole peeled tomatoes, drained and roughly chopped
10 pitted green olives, sliced (optional)
3/4 cup cider vinegar
1/3 cup  sucanat or brown sugar
1 tbsp honey

Cut off and discard the ends from each eggplant. Cut them lengthwise into 1/4-inch-thick slices. Lay the slices out on a platter, and sprinkle both sides with salt. Set aside for 20 minutes so that the salt will draw out some of the water from the eggplant. Then pat the eggplant dry with a dish towel.

Put the olive oil, garlic, green onions, (parsley) and cayenne in a food processor, and puree until a smooth paste forms (it will resemble pesto). Spread liberally all over both sides of the eggplant slices.

In a large non- stick skillet set over a medium flame, heat a tiny amount of olive oil. Add enough eggplant slices to cover the bottom of the pan, and cook until they are browned on both sides and cooked through; 2 - 3 minutes per side. Transfer the eggplant to a platter or plate. Repeat this process with the remaining eggplant slices, adding  small amounts of oil as needed for each batch. Cut the cooked eggplant into 1-inch-wide strips.

In a pot (large enough to hold everything) set over a medium flame, combine the tomatoes, olives (if using), vinegar, sucanat and honey. Cook for 12 minutes. Add the eggplant strips and stir together. Reduce the heat to low and simmer for 8 to 10 minutes, until most of the liquid has been cooked off. 

Remove from the heat and serve, or chill. This dish may be served warm or cold.

Saturday, October 19, 2013

Roasted Garlic Mushrooms

(2-3 servings)

At the moment mushrooms are in season in Texas. This delicious dish is very easy to make and is among my favorite ways to prepare them.

1 lb mushrooms
2-3 tbsp olive oil
1 tbsp balsamic vinegar
3-5 cloves garlic, minced or pressed
3 pinches dried thyme
1-2 pinches cayenne pepper
1/4 tsp salt, or to taste
1/4 tsp freshly cracked pepper, or to taste

1-2 tbsp chopped fresh parsley

Preheat oven to 400°F.

Clean the mushrooms by wiping them. If they are still dirty, try a damp cloth. Leave them whole if they are small or cut them in half if they are on the large side. Set aside.


Combine the olive oil, balsamic vinegar, garlic, thyme, cayenne, salt and pepper in a bowl and mix with a fork. Toss the mushrooms in this mixture until they are evenly coated. Place them into a large enough baking dish that can snugly hold them in a single layer.

Roast the mushrooms for about 20-30 minutes. Remove from oven and sprinkle with the parsley. Serve.


Friday, August 16, 2013

Corn Salsa

(about 4 1/2 cups)


I used raw corn for this salsa. It was sweet and had a nice crunch to itCooked corn works too.

4 cups corn
1 large jalapeno pepper, diced fine (leave the seeds for more heat)
1/2 large red onion, chopped
1/4 cup cilantro, chopped
salt and freshly ground pepper, to taste
freshly squeezed lime juice from 1-2 limes

Combine the corn, jalapeno pepper, onion, cilantro and a small amount of salt and pepper in a bowl. Toss the mixture until well combined.


Sprinkle the juice from one lime over the salsa and toss again. Taste. Add more salt, pepper and lime juice as needed.

Saturday, June 22, 2013

Roasted Garlic Hummus

(about 1 1/4 cups)


Hummus is one of those dishes I really ought to make more often. It's relatively inexpensive, nutritious and comes together quickly if you happen to have a food processor.

I came across a recipe recently where the author suggested the secret to a smooth and creamy hummus was the order in which you added your ingredients to the food processor. She began with the tahini and lemon juice and ended with the chickpeas and water. I decided to give this a try and I have to agree, my hummus was indeed smoother than usual.

2 heads garlic
1/4 cup tahini
2 tbsp freshly squeezed lemon juice
1 tbsp olive oil
1/2 tsp cumin
1/2 tsp salt, or to taste
15oz can chickpeas, drained and rinsed
2-3 tbsp water
olive oil for serving
a few pinches of cumin, paprika or sesame seeds for garnish (optional)

Roast the garlic following these instructions. Set aside to cool.

Place the tahini and lemon juice into the bowl of a food processor. Let the motor run for a minute or two until the mixture is light and creamy.

Scrape down the sides and add the olive oil, cumin and salt. Process for about 30 seconds.

Add half of the chickpeas and process for another minute.


Scrape down the sides and add the remaining chickpeas. Squeeze out all of the roasted garlic from both heads and add to the bowl of the food processor. Run the motor for about 2 minutes or until smooth and creamy.

The hummus will probably be quite thick (mine was). Slowly add the water a tablespoon at a time and process in between until you have the desired consistency.

Place the hummus on a plate. Drizzle a small amount of olive oil over the surface.  Sprinkle with cumin, paprika or sesame seeds if desired.

Saturday, May 25, 2013

Brown Rice Pudding with Dates, Almonds & Blueberries

(3-4 servings)


Last night after work I dropped by the market to pick up a few things.  A huge barrel of short grain brown rice caught my eye in the bulk food section. Rice pudding came to mind immediately. I hadn't made it in months and suddenly I was craving it.

I sweetened this rice pudding with dates. Start off with the lesser amount and add a bit more later if it isn't sweet enough.

1/2 cup sliced almonds
1 cup water
a pinch of salt
3/4 cup raw short grain brown rice
1/3 - 1/2 cup chopped dates
1 1/2 - 1 3/4 cups milk or almond milk
1/4 tsp ground cinnamon
2 tbsp whole flaxseed, optional
1/2 tsp finely grated fresh lemon zest

fresh blueberries for serving

Lightly toast the almonds. Set aside and cool.


Bring the water and salt to a boil in a saucepan with a lid. Stir in the rice and simmer gently uncovered for about 10 minutes. Stir in 1/3 cup chopped dates. Continue to simmer uncovered for another 4-5 minutes.

Pour in 1 1/2 cups milk and add the cinnamon. Return the mixture to a light simmer. Taste the liquid and add the extra dates at this point if you prefer your rice pudding sweeter. Cover the saucepan and lower the flame to the lowest setting. Cook for about 20-25 minutes or until the rice is tender with a small bite to it.


Remove the lid. Stir in the remaining milk, flaxseed and lemon zest. Turn off the heat and cover the pot. Allow to sit for about 15 - 20 minutes. Most of the remaining liquid will have absorbed into the rice. Stir in the toasted almonds, reserving some for garnish. If the pudding seems too thick, stir in additional milk or water.


Serve warm or at room temperature with the blueberries.

Sunday, April 21, 2013

A Simple Frozen Banana Dessert


(2 servings)


A year or so ago I came across a posting about a single ingredient banana ice cream. I had forgotten about it until this weekend when I had a couple of very ripe bananas on my hands.

This is really simple if you have a food processor. It might work in a blender, but I haven't tried that. I made a chocolate coating for the ice cream and topped it with roughly chopped dry roasted cashews. Boy, was I amazed by how good this was! These bananas turned into the smoothest and creamiest ice cream ever. It was sweet enough and dairy free, and it really came down to just eating a banana or so.

If fat is an issue then don't bother with the chocolate coating or nuts. Bananas do contain a tiny amount of fat naturally. I looked it up, 1 g of fat in a 225 g serving.

banana ice cream
2-3 large very ripe bananas


chocolate coating
2 tbsp bittersweet or semisweet chocolate chips
1 tbsp virgin coconut oil (the kind for medium heat and solid in the jar)


4-5 dry roasted cashews, coarsely chopped

Peel the bananas and cut into slices. Place them inside a freezer bag and try to keep them in a single layer. Freeze overnight or until they are frozen solid.


Right before you remove the bananas from the freezer, make the chocolate coating.

Place the chocolate chips and coconut oil into a bowl. Set this over hot water or place it into the microwave and heat 10 seconds at a time until they begin to melt.


With either method, once most of the chocolate has melted about halfway or a bit more, remove it from the heat and continue to stir until the chocolate has completely melted. Set aside.


Remove the frozen bananas from the freezer and place the slices into the bowl of a food processor. Pulse until they break up and then continue to pulse until they form a ball.

Remove the top and scrape down the sides. Break up the ball and distribute it evenly around the bottom of the bowl. Replace the top and continue to pulse until the mixture is smooth and creamy.


Divide the ice cream between 2 bowls. Drizzle each with the chocolate coating (there's probably enough coating for 3 or 4 desserts; it hardens to a super thin shell the moment it hits the cold ice cream) and sprinkle each with the chopped nuts.

Enjoy.

Fast and Easy Paleo Recipes

Sunday, December 9, 2012

Marinated Mushrooms

(about 1 1/2 pints)


These delicious mushrooms are very addictive, and thankfully they don't contain a lot of oil. This recipe can easily be doubled if you prefer making a larger quantity.

1 1/4 cups vegetable broth
1/4 cup dry white wine
1/2 bay leaf
1 1/2 tsp fresh oregano, chopped or 1/2 tsp dried oregano
1 1/2 tsp fresh thyme, chopped or 1/2 tsp dried thyme
1/4 tsp red pepper flakes
1/2 tsp lemon zest
1 lb small button or cremini mushrooms
1/2 red bell pepper, seeded and diced
1 green onion, sliced thin
1 small clove garlic, finely chopped
3 tbsp balsamic vinegar
1 tbsp cider vinegar
1 tbsp olive oil
salt and freshly cracked pepper

Place the broth, wine, bay leaf, oregano, thyme, pepper flakes and lemon zest into a pot large enough to hold the mushrooms. Bring the mixture to a simmer over moderate heat.

While the broth is heating up, clean the mushrooms and trim the stems. Add the mushrooms to the broth and simmer for about 5-6 minutes. The liquid will not cover the mushrooms, so you'll need to stir the mixture to ensure the mushrooms get rotated in the hot broth.

Remove the mushrooms with a slotted spoon and place into a non-reactive bowl or large jar.

Add the bell pepper, green onion, and garlic to the broth, increase the heat and cook until the liquid has reduced down to about one quarter of the original amount. Remove from heat.


Stir in the vinegar and olive oil. Add salt and pepper to taste.

Pour the mixture over the mushrooms. Toss until the mushrooms are evenly coated.

You can serve the mushrooms after an hour or so, but they are best after a day or two. They will keep refrigerated for about a week.

Saturday, November 3, 2012

Fennel, Orange and Pomegranate Salad

(4 servings)


Sadly this was the last of my pomegranates from the garden this year. It was wonderful in this delicious salad, its seeds providing vibrant colour and a pleasing juicy crunch.

I will admit I'm not the biggest fan of raw garlic, however I do like it in the dressing for this particular salad. I'll add a very small amount initially, stir the dressing with a fork, wait a few minutes and then check to see if it needs more. The garlic shouldn't be too intense, just enough to be noticeable without overwhelming the rest of the ingredients.

2 medium fennel bulbs
2 navel oranges
1 pomegranate
1/4 cup orange juice, *give or take from the oranges
1/4 cup balsamic vinegar
2 tbsp olive oil
1 **small clove garlic, pressed (optional)
1/2 tsp prepared horseradish
salt and freshly cracked pepper, to taste


Wash, then slice the fennel bulbs as thin as you can. Place them into a large bowl.

Section the oranges, catching the juice on a plate as you do so. Add the orange segments to the fennel. *Squeeze out the remaining core as best as you can; I'm usually able to get about 2-3 tablespoons of juice from each orange that way.


Remove the seeds from the pomegranate and add them to the fennel and orange segments.

Combine the orange juice, vinegar, olive oil, garlic and horseradish in a small bowl. **I add just a touch of garlic initially, then more if needed so it doesn't overwhelm the rest of the ingredients. Add enough salt and pepper, to taste. Drizzle over the salad and toss lightly.

Serve immediately.

Saturday, October 13, 2012

Squash Roasted in Spiced Coconut Milk

(4-6 servings)


There was something very enticing about this recipe when I came across it online and I couldn't wait to give it a try. I made a few changes because I didn't have everything on hand. The squash and spices were very fragrant as they roasted in the oven and the finished dish was just amazing. I could have eaten all of it! lol.

I have never left a squash unpeeled when cutting it into smaller pieces, so I was a bit worried about that. The tough skin became very tender to my delight and was quite edible. Cutting the squash pieces slightly smaller and baking the dish in a counter top convection oven was probably responsible for the shorter roasting times which I have indicated in the adapted recipe below.

adapted from Food & Wine
2 lb unpeeled butternut squash, washed, halved, seeded and cut into 1 1/2 inch pieces
13.5 oz can coconut milk4 garlic cloves, coarsely chopped
1 tbsp minced fresh ginger

1-2 tbsp honey, to taste
1/2 tsp harissa
1 tsp cinnamon

1 tsp ground cardamom1/4 tsp freshly grated nutmeg

Salt


Preheat the oven to 350°F.

Place the squash into a roasting pan, arranging it in an even layer. I used a non-stick pan which worked rather well.

Stir together the coconut milk, garlic, ginger, honey, harissa, cinnamon, cardamom and nutmeg. Pour this mixture evenly over the squash, turning a few pieces here and there to ensure all of them are coated. Cover the pan with foil and bake for about 25-30 minutes, or until the squash is not quite tender.


Increase the oven temperature to 425°F. Remove the foil  and turn the squash pieces over and season with salt. Roast on the top shelf for 10 minutes uncovered. 

Turn the squash again and increase the oven temperature to 450F°. Roast for about 15 minutes longer or until the squash is richly glazed.

Transfer the squash to a platter with a slotted spoon. Season the sauce with salt, spoon it over the squash and serve.