Showing posts with label vegetarian. Show all posts

Thursday, March 24, 2016

Cabbage and Apple Coleslaw

(about 4 servings)


Not too long ago I came across a post that suggested salting and draining cabbage beforehand would produce a nice crunchy coleslaw. Well, I happen to be one of those people who loves coleslaw especially after it's begun to wilt a bit. I usually slice my cabbage paper thin and prepare the coleslaw a few days ahead of time just to make sure I get the "right" texture.

If you slice your cabbage a bit thicker and consume it within a day or so, you can probably save yourself the time for salting, draining and squeezing the stuff if you enjoy yours on the crunchy side.

1/2 small cabbage, about 1 pound
1 carrot
1 apple
1/4 cup mayonnaise
3 tbsp apple juice
2 tsp apple cider vinegar
1/2 tsp mustard
1/4 tsp salt
1/4 tsp freshly cracked pepper
2 tsp poppy seeds (optional)

Slice the cabbage either in a food processor, with a mandolin or by hand. Place into a large mixing bowl.

Shred both the carrot and apple and add them to the cabbage.


Combine the mayonnaise, apple juice, apple cider vinegar, mustard, salt and pepper. Pour this over the cabbage mixture and toss until everything is well combined. Taste and adjust the seasoning as needed. Sprinkle the poppy seeds over the salad, if using. Give everything a final toss.

Allow the salad to sit at least an hour before serving.

Monday, February 22, 2016

Oven Roasted Zucchini Salad


I used to make this as a topping for bruschetta or as a side for grilled chicken. These days I just serve it as a salad. Terrific flavors!

2 tbsp olive oil
2 - 3 cloves garlic, finely chopped
1/2 tsp salt free Italian seasoning (marjoram, thyme, rosemary, savory, sage, oregano, basil)
3/4 tsp salt
3/4 tsp freshly cracked black pepper
2 lb zucchini
1 large red bell pepper
3 green onions, sliced
3 tbsp Pecorino Romano cut into very small dice
1 tbsp parsley, chopped
1 tbsp dried currants
pinch red pepper flakes
2 tbsp white balsamic vinegar

Preheat oven to 375°F.

Combine the olive oil, garlic, Italian seasoning, salt and pepper in a large bowl. Set aside.

Wash and dry the zucchini. Cut into small dice; about 1/2 an inch or slightly smaller. Add to the olive oil mixture and toss until coated.

Spread evenly over a parchment lined cookie sheet. Bake for about 45 minutes.

Remove from oven, cool and add to mixing bowl.

Wash and seed the red bell pepper. Cut into 1/4 inch dice and add to bowl. Add the sliced green onions, Pecorino Romanoparsley, currants and red pepper flakes.

Drizzle the white balsamic vinegar over everything and toss. Taste and adjust the seasonings with salt, pepper and red pepper flakes as needed. Serve


Friday, February 12, 2016

Spaghetti with Pecorino Romano and Black Pepper; Cacio e Pepe

(2 servings)


When I think about something indulgent for Valentine's Day, chocolate is not the first thing that comes to mind. I think of cheese, a nice sharp, salty cheese with pasta.

This simple spaghetti dish will transform into something absolutely superb if you use the best possible ingredients available to you. The pepper needs to be freshly cracked, and the Pecorino Romano should be grated right before it's combined, otherwise this dish will fall short of its potential.

I've given up trying to create a thin cheesy sauce with butter, cream or pasta water for this dish. I usually fail and end up with huge clumps of sticky pasty spaghetti. I suspect at some point I probably become impatient. Simply tossing the drained spaghetti with the grated cheese and black pepper couldn't be easier and the resulting dish is nice looking and clump free.

6 oz dried spaghetti
1 tbsp olive oil
1 cup finely grated Pecorino Romano (about 2 oz)
3/4 tsp freshly cracked black pepper

Bring a large pot of lightly salted water to a boil. Stir in the olive oil, then add the pasta and cook until al dente. Check the package for cooking times.

While the spaghetti is cooking, toss together the Pecorino Romano and cracked pepper until the mixture is evenly combined. Set aside.


Drain the spaghetti thoroughly, but don't rinse. Lightly toss with tongs or a large fork for about 30 seconds to shake off excess water.

Place about a quarter of the spaghetti into a serving dish and sprinkle with a quarter cup of the cheese and pepper mixture. Toss. Repeat until everything is well combined.

Divide between bowls and serve immediately.


Sunday, March 22, 2015

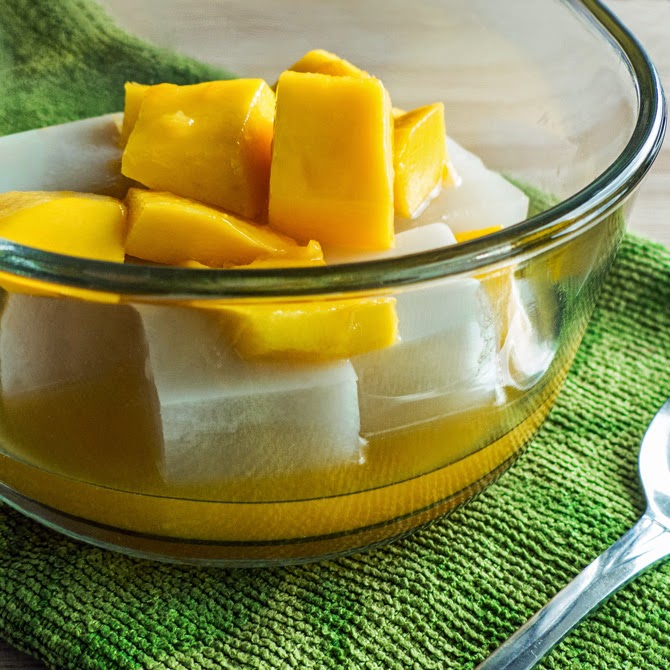
Refreshing Agar Agar Dessert with Fruit

(6 servings)


Agar agar, a jelling agent which is derived from seaweed is ideal for vegan or vegetarian diets. It has a texture similar to gelatin, yet different; not as "rubbery". it sets without the need for refrigeration and unlike gelatin, it holds its shape in warmer weather.

In recent years whenever I have encountered the powdered form, it has contained sugar, so I having been using the bar form instead.

1 bar/stick agar agar, (about 7 gm/.25 oz)
2 1/4 cups water
1/4 cup evaporated cane juice or granulated sugar, (3-4 tbsp honey, if paleo)
2/3 cup light or regular coconut milk
1/4 tsp pure almond extract, or to taste
1 orange
2 medium mangoes

Break/rip the agar agar into small pieces and place them into a pot. Add the water and soak for about 30 minutes.


Bring the mixture to a gentle simmer and cook, stirring until the agar agar has dissolved; about 10-12 minutes.

Add the cane sugar and stir until dissolved. Stir in the coconut milk. If you see small bits of agar agar in the mixture, cook for a few more minutes until they have dissolved. Remove from heat and add the almond extract. Taste and add more almond extract if desired.

Pour the mixture through a sieve into an 8 or 9 inch  square pan. It will be set by the time it's cooled to room temperature.

When you are ready to serve. Squeeze the juice from the orange and pour into a small bowl. Peel the mangoes and cut the flesh into dice. Add the diced fruit to the juice.


Cut the set coconut milk mixture into cubes and divide between bowls. Spoon the mango cubes and orange juice mixture over each serving.

Sunday, February 15, 2015

Mediterranean Green Beans Braised in Tomatoes

( 4 servings)


There's something very satisfying about braised green beans. For me in some respects they are close to the ultimate comfort food. Served with a bit of rice, is all I need.

Cooking the beans in an aromatic sauce of tomatoes and onions creates a dish that tastes rich and flavorful. The richest element here is the olive oil which you could easily reduce by half if using a non-stick pot.

Braised green beans are delicious served hot or at room temperature. I usually make this dish with dill and mint, however this time I swapped those out for fennel seeds, cardamom and coriander. Those flavors did not disappoint; they were an interesting and pleasing change.

1 tbsp olive oil
2-3 cloves garlic, minced
1 tsp crushed fennel seeds
1/2 tsp ground cardamom
1/4 tsp ground coriander
1 medium onion, chopped
14oz can diced tomatoes
1 lb green beans, trimmed (if using frozen, defrost first)
salt and freshly ground black pepper, to taste

Heat the olive oil over medium heat in a pot fitted with a lid.

Stir in the garlic, fennel seeds, cardamom and coriander. When the mixture becomes fragrant after 30 seconds or so, quickly stir in the onions. Cook until the onions become soft and translucent; about 5 minutes.

Stir in the diced tomatoes and their liquid. Cook for a minute or two, then stir in the green beans.


Cover the pot with a lid and reduce the heat to low. Cook for about 25-40 minutes, depending on how soft you like your green beans. Check halfway through and add a small amount of water if the beans appear too dry.

Taste and add salt and pepper, if needed.

Serve hot or at room temperature. These beans reheat really well, in case you decide to double the recipe.

Sunday, December 21, 2014

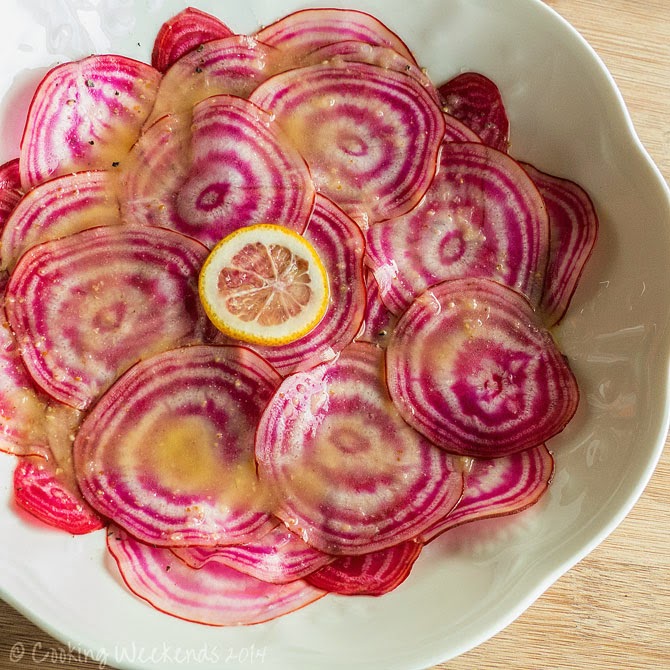
Raw Chioggia Beet Salad with Meyer Lemon


This festive looking salad is made with Chioggia beets. They are an Italian heirloom variety, known for their beautiful rings or stripes depending on which direction you cut them. A few years ago I tried growing these little beauties in my garden, but they didn't do very well in the heat.

Chioggia beets are a little sweeter than the regular fuchsia colored ones. They don't appear to stain your hands, at least not when prepared raw. I haven't tried cooking them yet as I was told they tend to lose their lovely stripes when heated.


for every 2 servings:
2-3 Chioggia beets, depending on their size
salt and freshly cracked pepper
juice from 1 small Meyer lemon, about 2-3 tbsp
2 tsp olive oil
1/4 tsp mustard

Scrub the beets really well. Slice off the tops and trim the roots.


Slice the beets as thin as possible. This is easiest if you use a mandoline. Arrange the slices into a serving bowl, lightly seasoning them with salt and pepper as you go along.

Combine the lemon juice, oil and mustard in a small jar with lid and shake well. Drizzle over the beet slices and serve.

Sunday, November 30, 2014

Salad with Pear, Walnuts & Blue Cheese

(2-4 servings)


This delicious salad comes together in about 15 minutes. I often make a light meal out of it.

1 large Bartlett pear
2 tsp butter
2 tsp honey
2 tbsp cider vinegar
3 tbsp juice
1/2 tsp mustard
salt, to taste
1 tbsp olive oil
6 cups mixed greens such as baby spinach, baby chard and baby kale
1/4 cup chopped walnuts, lightly toasted
3-4 oz blue cheese crumbled
freshly cracked pepper, to taste

Wash the pear and cut into 1/2 inch dice.

Heat the butter in a non stick skillet over medium heat and gently saute the diced pear for a few minutes. Drizzle the honey over the pear and remove from heat. Set aside.


Combine the vinegar, juice (apple might be nice, I only had black currant juice on hand) and mustard. Add salt to taste and stir well, then stir in the olive oil. Set aside.

Divide the greens, walnuts, blue cheese and pear between four salad plates. Drizzle with the vinaigrette, dust with freshly cracked pepper and serve.

Sunday, November 16, 2014

Duxelles

(about 2 cups)


Duxelles, an intensely flavored mushroom paste is one of the components of Beef Wellington, however it has many other uses. It can be used to flavor eggs, soups, sauces or gravies. It can fill the cavities of meat, fish or poultry. It can be combined with stuffings or fillings for pastries or pasta, or simply spread onto little toasts.  It freezes really well.

1/2 oz dried porcini
2 lbs white or crimini mushrooms
1/2 tsp salt
1/4 tsp freshly ground pepper
2 tbsp butter
2-3 large cloves garlic, finely chopped
3/4 cup finely chopped shallots
1/2 cup dry port, Madeira or red wine

Using a small coffee grinder or mini food processor, grind the porcini into a fine powder. Empty into a medium sized bowl.


Clean the mushrooms, finely chop them and add them to the porcini. Stir in the salt and pepper. Set aside.

Melt the butter in a non stick skillet or saucepan (with a lid) over medium low heat. Stir in the garlic and saute for 30 seconds or so then stir in the shallots. Cook the mixture until the shallots are translucent and soft.


Add the porcini mushroom mixture to the garlic and shallots, then stir in the port, or whatever you are using. Reduce the heat to low, cover the skillet or saucepan and leave for about 30-40 minutes. The mushrooms will sweat a great deal. About halfway through the cooking time, give everything a good stir.

Remove the lid and increase the heat to medium. Cook the mushrooms, stirring, until most of the liquid has evaporated and the Duxelles are on the dry side. Check and adjust for seasoning, if needed. Remove from heat.

Sunday, September 28, 2014

String Beans Braised in Apple Cider

(3-4 servings as a side)


This is a terrific way to prepare string beans, especially if there are a lot of larger and tougher beans mixed in. The longer the beans braise in the cider the more tender and flavorful they become.

1 tbsp olive oil
1/2 medium onion, chopped
1 large clove garlic, chopped
1 lb string beans, trimmed and sliced  diagonally if they are large
1/2 - 3/4 cup apple cider
salt and freshly ground pepper, to taste

Heat the olive oil in a pot (with a lid) over medium heat. Stir in the onion and garlic and cook, stirring from time to time until the onion is translucent.


Add the string beans and 1/2 cup apple cider. Place the lid over the pot, reduce the heat to low and cook the beans for about 60-90 minutes. Check the beans every 20 minutes or so and add more cider if the beans look dry. I had used slightly more than half a cup of cider by the time the beans were tender and to my liking. There was a small amount of liquid remaining in the pot (one or two tablespoons) when the beans were ready.

Check, and adjust the seasoning with a bit of salt and pepper. Serve hot or at room temperature.


Saturday, August 23, 2014

Microwaved Corn on the Cob


Yesterday while I was out for my walk, I stopped by the U-pick farm. A neighbor mentioned they were selling freshly picked corn for 25¢ an ear, which is a bargain in this neck of the woods. I grabbed a few for snacking.

Corn is quick and easy to prepare in the microwave if you are just cooking one or two ears. It beats bringing a pot of water to a boil.

per serving
1 ear corn, leave the husk on, 
but trim the ends (see photo below)

serve with butter and/or salt

The fresher the corn, the less time to microwave is required. I have been giving these freshly picked ears (cooking one at a time) about 3 minutes at the high setting, using a 1000 watt oven (adjust accordingly). You might have to add an extra minute or so if the corn is a few days older. To cook two or three cobs at once, increase the time by 1-3 minutes. You might have to experiment a bit with your oven until you get a feel for it.


Remove the corn from the oven and allow to sit for about 2 minutes. It will be hot.

Carefully peel back the husks and enjoy.

*If you remove the husk and the corn is not cooked enough to your liking, then wrap the cob in a moist paper towel and microwave it a bit longer.

Sunday, August 17, 2014

Red Chard with Currants & Feta

(4 servings)


Almost everywhere I go here on the Olympic Peninsula, I come across bunches of beets and chard. Both crops appear to be abundant here. The chard especially always looks very colorful and inviting; bunches of rainbow and reds.

I wanted to try something a bit different with the chard (other than braising it with lemon and garlic). I found an interesting recipe on Epicurious which added currants and feta cheese. The finished dish was delicious! I will definitely make this again.

adapted from Epicurious
1 bunch chard, about 1 lb
1 tbsp olive oil
1 large clove garlic, pressed or finely minced
1/4 tsp salt, or to taste
a few grinds of black pepper
2- 3 pinches red pepper flakes
2 tbsp water
3 tbsp dried currants
1/3 cup crumbled feta

Wash the chard and shake off the excess water. It's not necessary to dry. Trim off the very ends of the chard, then cut the stems into one inch pieces. Set aside. Cut the leaves into one inch ribbons. Set aside.

Heat the olive oil in a heavy pot over a medium flame. Add the garlic and saute until it begins to brown. Quickly add the reserved stems and cook for about 4 minutes, stirring from time to time.


Add the sliced leaves. Sprinkle the salt, pepper and red pepper flakes evenly over the chard and add the water and currants. Cook about 3-5 minutes. (I cooked mine for 5 minutes. That was too much for me personally. I would have preferred it crispier. So, watch the chard carefully until you like the texture.)

Remove from heat and stir in the feta.

Saturday, May 31, 2014

Roasted Beets with Blue Cheese & Walnuts

(4-6 servings)


My move left me sore and exhausted, but I'm thrilled that's behind me. I have spent the better part of two weeks taking it easy and recuperating at a friend's house. My friend has the most amazing kitchen. Thing is, she doesn't cook and I have been so tired, I haven't felt much like cooking either. Instead, I have been happily consuming frozen dinners and small containers of yogurt, lol.

This beet salad will probably be the last thing I prepare for a while. (In a few days I'll be on my way to Santa Fe, MN.) I haven't cooked beets nearly as often as I did a few years ago. Back then I was consuming about two pounds of them a week. Too much of a good thing has its disadvantages.

This salad of roasted beets, blue cheese and toasted nuts is delicious. It makes me wish I'd made more use of this fabulous kitchen.

2 lbs small beets
3-4 tbsp balsamic vinegar
3-4 tbsp freshly squeezed orange juice
1/2 tsp very fine orange zest
1/3 cup walnuts, lightly toasted
1/4 cup blue cheese, crumbled
2 tbsp parsley, chopped
salt and freshly cracked black pepper, as needed

Preheat oven to 450°F.

Wash the beets and trim off the leaves if they have any. Reserve those for another use. Place 2-3 beets onto squares of foil and enclose the foil around them until you have a small packet. You will have two to four of them depending on the size of your beets.

Place the packets onto a baking sheet and bake for about 50-70 minutes or until the beets have softened and can easily be pierced with a knife. Remove from oven. Open up the tops of the packets to prevent them from cooking further and cool until they can be handled.

Slip the peels off the beets, cut them into small wedges and place them into a large bowl.


Combine 3 tablespoons each of the vinegar and orange juice and stir in the orange zest. Taste, and add more vinegar or juice to your liking. Pour this mixture over the warm beets and toss until they are evenly coated. Cool the beets to room temperature.

To serve, top the beets with toasted walnuts, blue cheese and parsley. Add a pinch of salt and cracked pepper, if desired.


Sunday, February 2, 2014

Casarecce with Gorgonzola and Walnuts

(3-4 servings)


I don't make this delicious pasta dish as often as I would like because it's very rich, but the other day while I was at the cheese counter my cravings got the better of me.

This is a very quick and easy meal to prepare.

1/2 lb dry casarecce
1 tbsp butter
2 large cloves garlic, minced or pressed
1 -2 tbsp fresh sage, finely sliced
1 pinch cayenne
1/2 cup milk
2 tbsp heavy cream
5 - 6 oz Dolce Gorgonzola, cut into small chunks
salt, to taste
1/4 cup chopped walnuts, toasted

Bring a pot of lightly salted water to a boil. Add the casareccia and cook the pasta (al dente) according to the instructions on the package.

Meanwhile, melt the butter in a saucepan (large enough to hold the pasta) over a medium-low flame. Add the garlic and saute for about one minute or until it becomes a golden brown. Take care it doesn't burn. Stir in the sage and cayenne and cook another minute or so.


Stir in the milk and bring to a light simmer for about 4-5 minutes or until it has reduced by about one half. Stir in the cream. Bring the sauce back up to a simmer and stir in the Gorgonzola. Remove from heat and continue stirring until the cheese has completely melted. Taste and add salt, if needed. (Keep warm if the pasta isn't ready yet.)

Add the hot drained pasta to the sauce and toss until it's evenly coated. Divide between three or four plates. Sprinkle the toasted walnuts over each serving.

Enjoy!


Saturday, February 1, 2014

Raw Turnip, Apple and Carrot Slaw

(4-6 servings)


Recently I tried turnips for the first time. They hadn't been at all what I expected, and their taste and textures were quite different raw or baked. I love them raw; somewhat peppery and nice and crispy.

Raw turnips are delicious in this fresh salad!

1 large honey tangerine
2 tbsp apple cider or rice vinegar
1 tbsp olive oil
1/4 clove garlic, minced
2 turnips
1 crisp apple
3 medium carrots
salt and pepper, to taste

Cut the tangerine in half and squeeze out the juice; you should have about 1/2 cup, give or take. Combine that with the vinegar, olive oil and garlic. Set aside.

Slice the tops off the turnips (where the leaves came out) as well as the bottoms. Peel them and then shred them into a large bowl.


Wash the apple, cut it into quarters (you can leave the peel on if you like) and remove the core. Shred the apple into the bowl.

Wash and scrub the carrots and shred those into the bowl as well.

Pour the dressing over the shredded vegetables and toss until everything is evenly combined. Taste and season with salt and pepper, as needed.

Serve.

Saturday, January 25, 2014

Garlic Roasted Turnips

(4 servings)

Turnips, they are foreign to me. To my knowledge my mother never served them to us. I'm not sure if she wasn't familiar with them or if she just didn't care for them. Whenever I saw turnips at the market I just walked past them and headed toward more familiar veggies, like carrots and asparagus.

Well this month turnips are in season in Texas and I thought it was time I gave them a try. They weren't at all what I expected. I was told to peel them and as I did, I was struck by how much their aroma reminded me of radishes and kohlrabi. They also had a wonderful crisp texture.

A friend mentioned they were delicious roasted, and I thought that would be easy enough to try. Well, I'm sold! Turnips are delicious! I will definitely have them again soon.

2 lbs turnips
1 (generous) tbsp olive oil
2 cloves garlic, minced or pressed
salt and freshly ground pepper, to taste

Remove a thin slice of turnip from the top where the leaves were and the very bottom where the root is. Remove the remaining skin with a knife or potato peeler. I was tempted to leave the skin on, but everyone I asked gave me an emphatic, "no!"

Preheat oven to 400°F.

Cut the turnips into sticks that are about 1/3 of an inch thick. Place into a large bowl.

Drizzle the olive oil over the cut up turnips. Add the garlic, salt and pepper. You might want to ease up on the pepper a tad because the baked turnips appear to accentuate the peppery taste more than usual. Toss until the turnips are evenly coated.


Place the turnips onto a baking sheet (I lined mine with parchment paper). I bake everything in a small counter top convection oven and my 13x9 inch baking sheet wasn't large enough for the turnips to lay flat in one even layer. This was fine. Halfway through baking I gave them a good toss.

Bake the turnips for about 40-50 minutes or until they have browned nicely. Give them a good toss about halfway through baking.

Sunday, January 19, 2014

Corn Spaghetti with Wine Braised Veggies

(4 servings)


For this simple gluten free dish I used the vegetables straight out of the freezer; the total prep and cooking time worked out to less than 30 minutes!

2 cups dry white wine
3-5 cloves garlic, minced or pressed
1/4 tsp salt, or to taste
1-3 pinches red pepper flakes, or to taste
1/2 lb (gluten free) corn spaghetti
1 cup frozen loose chopped spinach leaves
2/3 cup frozen corn
2/3 cup frozen green peas
1/4 cup heavy cream
1/4 cup roasted red pepper, sliced (from a jar)
1-2 tbsp fresh parsley, chopped
1/4 cup grated Romano cheese, for serving

Pour the wine into a saucepan (large enough to hold the cooked spaghetti) and set over a medium flame. Add the garlic, salt and red pepper flakes. Simmer the mixture until the wine has reduced by half.

While the wine is simmering, bring a pot of lightly salted water to a boil and cook the spaghetti according to the directions on the package until al dente. The water will look cloudy. Drain the spaghetti and rinse it in cold water. Set aside.


You will probably be able to stir the frozen spinach, corn and peas into the reduced wine mixture before the spaghetti is done. Cook for about 5 minutes, then stir in the cream. Reduce the flame and cook gently for another minute or two. Stir in the sliced red pepper and parsley. Keep warm until the spaghetti is ready.

Add the drained spaghetti to the vegetable sauce and stir well. When the pasta has heated through, remove from the stove. Divide between 4 plates. Sprinkle with cheese and serve.

Friday, January 10, 2014

Red Cabbage Coleslaw

(about 4 servings)


Cabbage and carrots are in season in Texas at the moment. Both these vegetables found their way into this delicious coleslaw.

1 tbsp onion, grated
2 tbsp mayonnaise
2 tbsp sour cream
2 tbsp milk
1 tbsp apple cider vinegar
2 tsp honey
1/2 head red cabbage, finely shredded
1 carrot, grated
salt and freshly grated pepper, to taste

Combine the onion, mayonnaise, sour cream, milk, vinegar and honey in a large bowl.


Add the red cabbage and carrots. Toss. Add salt and pepper, to taste. Toss again and serve.

Saturday, December 28, 2013

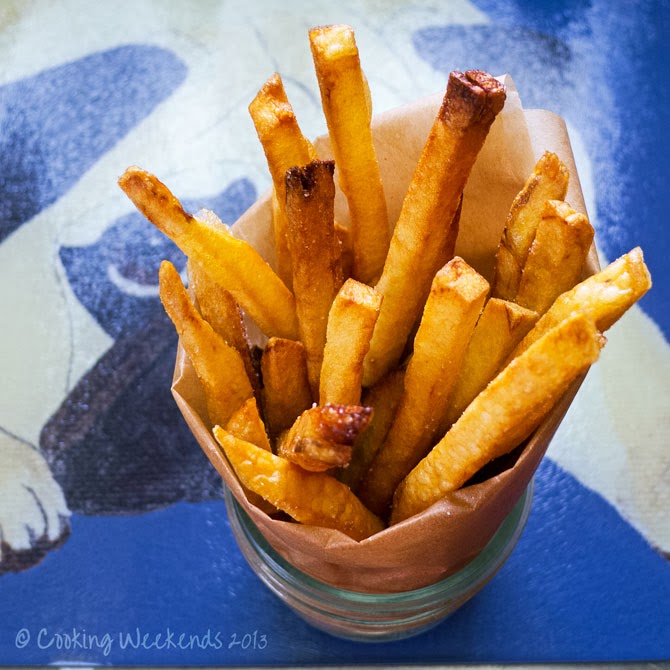
Crispy French Fries


I have never made proper french fries. The closest I have come are the oven baked sweet potato fries which I love and make frequently. This year at our company white elephant gift exchange I received a lovely cutting board with a picture of a dog on it (it looks like a pug), a five pound bag of russet potatoes and a french fry cutting tool. To both my surprise and relief, not one person tried to "steal" my gift!

The french fry cutter turned out to be an amazing tool. It cut the potatoes into perfect pieces; not too thin, not too thick. A couple of recipes were included and they all suggested frying the potatoes twice for extra crispiness.

water
cider vinegar
about 1  russet potato per serving
peanut oil
salt

Combine about 1 tbsp of vinegar per quart of cold water and set aside.

Wash and peel the potatoes, then cut them into the desired thickness for french fries (see photo). Drop the potatoes into the vinegar water and leave for a minute or two. Give them a good stir then drain the potatoes.

Fill up a heavy pot with oil leaving at least 3 inches free on the sides (in case the hot oil bubbles up). Heat the oil to 350°F.


Using a towel dry the potatoes, then carefully drop them into the hot oil. Fry them for a minute or two, just until they begin to lightly brown. Remove them from the oil and place them onto a plate lined with paper towels to drain. At this point you can leave them until you are ready to serve them or wait about 5 minutes, then fry them again.

Fry them a second time at 350°F. until they are nicely browned. Remove them and place onto a plate lined with a paper towel to drain. Sprinkle with a bit of salt and serve immediately.


Saturday, December 14, 2013

Grated Carrot & Apple Salad

(4 servings)


I'm mostly eating salads at home trying to balance the holiday dinners and goodies that keep appearing my way. Any crisp apple will work in this dish. I used organic Cameo apples and they were lovely with the carrots.

1/3 cup freshly squeezed orange juice
1 tbsp apple cider vinegar
2 tsp olive oil
1/2 tsp Dijon mustard
2 apples, cored and shredded
2 large carrots, shredded
salt and freshly cracked pepper
2 tbsp raisins or currants

Combine the orange juice, vinegar, olive oil and mustard in a salad bowl.


Add the apples and toss quickly in the dressing to stop them from becoming discolored. Add the carrots and toss. Taste, and add salt and pepper as needed. Add the raisins or currants, toss again.

Serve.

Sunday, December 8, 2013

Brussels Sprouts with Almonds & Browned Butter

(4 servings)


Although there are still a lot of great looking vegetables at the market, a few of them have seen better days and I suspect this just might not be the right time of year for them anymore. The last couple of weeks I have seen some very sad looking green beans and brussels sprouts. This week I hit the freezer section instead and grabbed several bags of frozen vegetables. I'm pleased I did.

These frozen brussels sprouts were delicious, and dare I say as good as had they been fresh!

1/4 cup water
1 lb frozen brussels sprouts (do not defrost)
2 tbsp butter
1 large clove garlic, pressed
1/4 cup sliced almonds
salt and freshly cracked pepper, to taste
1 tbsp freshly squeezed lemon juice.

Bring the water to a simmer in a saucepan with a tight fitting lid. Add the frozen brussels sprouts, cover the pot and cook for 4-7 minutes (depending on their size) until they are just tender.

Drain and set aside.

Heat the butter in a skillet over a medium flame and add the garlic. Stir a few times until the butter begins to change colour, then quickly stir in the almonds. The thin slices will brown very fast, so keep a close eye on them and stir them frequently.


Add the drained brussels sprouts and stir until they are heated through. Season with salt and pepper, then quickly sprinkle the lemon juice over the vegetables and toss.

Place everything into a dish and serve immediately.