Showing posts with label asian. Show all posts

Sunday, September 6, 2015

Make Ahead Wontons


With the beginning September, the weather has begun to cool in this part of the country. Cooler weather always has me thinking of soup.

Preparing wontons ahead of time and then freezing them is great for those busy weekday evenings when you crave a hot bowl of soup. All you need is chicken or fish broth, sliced green onions and other greens if you have those handy. Add a few frozen wontons and you are good to go in less than 10 minutes.

wontons
1 lb raw shrimp, cleaned and roughly chopped
10-12oz ground pork
3 green onions, sliced
2-3 tsp low sodium tamari or soy sauce
2-3 tsp chili or plain sesame oil
2-3 tsp finely minced fresh ginger
3/4 tsp salt, or to taste
1-2 (12oz) pkgs wonton wrappers, depending on how large you make them.

Bring a small pot of water to a simmer.

Meanwhile combine the shrimp, pork, green onions, the lesser amounts of tamari or soy sauce, sesame oil, ginger and salt in a large bowl. Place a small amount of filling onto the center of a wonton wrapper. Wet the edges and fold together like a triangle and press to seal the edges.

Drop the wonton into the simmering water for about 5 minutes. Taste and adjust the seasoning with the tamari or soy sauce, sesame oil. ginger and salt until the filling is to your liking.

There are several ways you can fold the wonton. I'll illustrate two ways, one using less filling and one with more.


To make wontons with less filling. Place a small amount (about 1 tsp) onto the center of the wonton. Wet the edges and fold together to form a triangle. Press and seal the edges. Wet the two narrower edges and bring those together. Pinch and place onto a large cookie sheet covered with parchment paper or a silicon mat. This will make it easier to remove the frozen wontons later. Take care the wontons don't touch each other.


If you prefer more filling and less wrapper, then place a larger amount of filling (start with about 1 1/2 tsp) onto the center of the wrapper. Wet the edges and bring two opposite corners together and pinch together. Then bring the other two corners toward the two that are already pinched together. Wet any loose flaps and pinch those together as well. Place onto a large cookie sheet covered with parchment paper or a silicon mat. This will make it easier to remove the frozen wontons later. Take care the wontons don't touch each other.

When all of your wontons are finished. Place the cookie sheet(s) into the freezer. They will be frozen in about 3-4 hours. Peel them off the parchment paper or silicon mat and place them into freezer bags to return to the freezer.

to prepare per serving
1 1/2 cups chicken or fish broth
1/2 green onion, sliced
1/4 cup thinly sliced spinach, watercress or beet greens (optional)
a drop or two, chili or plain sesame oil
3-5 frozen wontons, depending on size

Heat the broth in a pot with a lid. Add the green onion, spinach, watercress or beet greens if using, and the sesame oil. Simmer for a minute, then drop in the wontons.


Cover the pot and simmer 5-8 minutes more. Serve.

Sunday, August 23, 2015

Honey Miso Glazed Salmon

(4 servings)


One of the nice things about living in the Pacific Northwest is the availability of fresh wild salmon. It's frequently on sale and I'll often pick up a few pounds to portion and freeze.

Earlier this summer I came across some wild coho salmon steaks which I defrosted this weekend and marinated in a tasty Asian inspired honey miso dressing. The result is pretty amazing when you consider how easy this dish is to prepare.

2 tbsp honey
2 tbsp red miso 
1 tbsp rice vinegar
1 tbsp water
1 tsp reduced sodium tamari or soy sauce
1 tsp sesame chili oil
1/2 tsp grated fresh ginger
4 x 6oz salmon steaks, about 1 inch thick
1 green onion, sliced, for garnish

The night before you plan on serving this, whisk together the honey, miso, rice vinegar, water, tamari or soy sauce, sesame chili oil and ginger in a small bowl.

Liberally brush the honey miso mixture onto both sides of the salmon steaks, (reserve about 2 tablespoons for later). Place these onto a plate and cover with plastic wrap, smoothing the wrap across the surface to remove as many air bubbles as possible. Refrigerate overnight or up to one day.


When you are ready to serve, position the rack in the middle of the oven and turn on the broiler. If you have a Hi/Lo function, set it to Hi.

Place the steaks onto a foil lined cookie sheet. Brush the tops with the reserved honey miso mixture.

Broil the steaks for about 8-9 minutes and then watch closely. They will be done when the center of the steaks have just begun to turn opaque; about 10-12 minutes total. Take care not to overcook, otherwise they might be on the dry side.

Sprinkle with the sliced green onion and serve.

If you have any left over, it's great cold and flaked over a green salad with a citrusy sesame type dressing.

Sunday, March 22, 2015

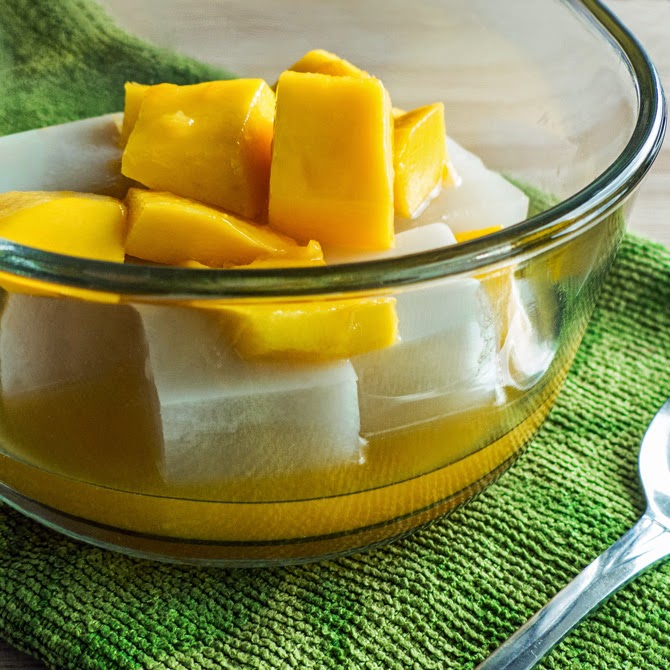
Refreshing Agar Agar Dessert with Fruit

(6 servings)


Agar agar, a jelling agent which is derived from seaweed is ideal for vegan or vegetarian diets. It has a texture similar to gelatin, yet different; not as "rubbery". it sets without the need for refrigeration and unlike gelatin, it holds its shape in warmer weather.

In recent years whenever I have encountered the powdered form, it has contained sugar, so I having been using the bar form instead.

1 bar/stick agar agar, (about 7 gm/.25 oz)
2 1/4 cups water
1/4 cup evaporated cane juice or granulated sugar, (3-4 tbsp honey, if paleo)
2/3 cup light or regular coconut milk
1/4 tsp pure almond extract, or to taste
1 orange
2 medium mangoes

Break/rip the agar agar into small pieces and place them into a pot. Add the water and soak for about 30 minutes.


Bring the mixture to a gentle simmer and cook, stirring until the agar agar has dissolved; about 10-12 minutes.

Add the cane sugar and stir until dissolved. Stir in the coconut milk. If you see small bits of agar agar in the mixture, cook for a few more minutes until they have dissolved. Remove from heat and add the almond extract. Taste and add more almond extract if desired.

Pour the mixture through a sieve into an 8 or 9 inch  square pan. It will be set by the time it's cooled to room temperature.

When you are ready to serve. Squeeze the juice from the orange and pour into a small bowl. Peel the mangoes and cut the flesh into dice. Add the diced fruit to the juice.


Cut the set coconut milk mixture into cubes and divide between bowls. Spoon the mango cubes and orange juice mixture over each serving.

Saturday, March 15, 2014

Braised 5 Spice Pork Tenderloin

(4 servings)


I added the rum on a whim after I opened the packet of 5 spice and noticed the wonderful citrusy undertones to this very fragrant mixture.

This braised pork tenderloin dish was easy to make and really delicious. I served it with steamed broccoli and a bit of rice.

1/4 cup low sodium tamari or soy sauce
2 tbsp rum, rice wine or water
2 tbsp water
1 tsp fresh ginger, minced
1 tsp honey
1 pinch red pepper flakes
2 tsp sesame oil
1 large clove garlic, minced or pressed
1 1/2 tsp 5 spice mix
1 1/2 lbs pork tenderloin

Combine the soy sauce, rum, water, ginger, honey and red pepper flakes in a small bowl or measuring cup. Set aside.

Combine the sesame oil with garlic and brush the entire piece of pork with it. Sprinkle the 5 spice powder evenly over the tenderloin and let it rest for about 30 minutes.

Heat a non-stick skillet with a tight fitting lid over a high flame. Add a small amount of sesame oil to the skillet and add the meat. Fry the pork tenderloin, turning it once, for about 1-2 minutes each side. Reduce the flame to medium-low.


Pour the sauce mixture into the skillet and cover with lid. Braise the meat for about 10-12 minutes, then turn the tenderloin over. Cover and braise for another 8-10 minutes, then begin checking the temperature. (Add a small amount of water if the liquid evaporates too quickly [The final sauce should be syrupy.]) Insert an instant read thermometer into the thickest part of the tenderloin. The internal temperature should read about 144°F-145°F when ready. Don't allow the temperature to climb higher than that as it will increase a degree or two while it rests.

Remove the tenderloin and place onto a cutting board. Let it rest for about 5 minutes, then cut into slices. Arrange the pork onto a serving platter. Spoon the braising sauce over the meat.

Serve.

Sunday, March 9, 2014

Chicken Potstickers

(about 60 potstickers)


I have to admit I'm pretty inept when it comes to forming potstickers. I can't seem to get the folds right and trying to put them together correctly takes me way too long. I usually give up after a few tries and end up folding them into simple half moon shapes similar to pierogies. It's much faster that way and they still taste the same, so ultimately it doesn't matter. I'm still in awe of my dim sum teacher in Toronto, who could fold dumplings into various shapes in mere seconds while holding a conversation with you and maintaining eye contact!

These delicious dumplings freeze really well, so if you are inclined, double this recipe to enjoy more of them at a later date.

potstickers
4-5 dried shitaki mushroom caps
1 cup hot water
1 lb napa cabbage
3/4 lb ground chicken
2 green onions, sliced
2 tbsp fresh cilantro, chopped
2-3 tsp fresh ginger, minced
1 tbsp tamari or soy sauce
2 tsp toasted sesame oil
2-3 cloves garlic, minced or pressed
1/2 tsp salt
1-2 pinches red pepper flakes
60 potsticker wrappers
sesame oil for frying
water

Soak the mushrooms in hot water for about 15-20 minutes. Set aside.

Meanwhile shred the cabbage into a microwave-proof bowl. Cover with wrap and microwave at one minute intervals until the cabbage has softened. Remove and cool.

Remove the mushrooms from the water and gently squeeze. Discard any hard stems and slice the caps into thin strips. Place them into a large mixing bowl.


Gently squeeze the cooled cabbage to release some of its excess moisture. You do not need to squeeze it completely dry. Add the cabbage, chicken, green onions, cilantro, ginger, tamari, sesame oil, garlic, salt and red pepper flakes to the mushrooms.

Mix thoroughly until everything is well combined. The filling will be on the wet side. At this point you can fry a small amount to adjust the seasoning, if you like.

To form the potstickers, place a generous teaspoonful into the center of each wrapper; make sure to leave the edges clear otherwise the dumplings will be difficult to seal. Lightly moisten the edges with water and then fold them together in half, pressing the edges together firmly. If you wish to pleat them, then have a look here. Smooth half moon shapes are fine if you find the pleating process as difficult as I do.

To freeze your finished potstickers, place them onto a cookie sheet lined with parchment paper in a single layer and not touching each other. Place the sheet into your freezer for about one hour, then remove and place the frozen potstickers into freezer bags for further freezing.

To cook the potstickers, heat a small amount of sesame oil in a heavy non-stick skillet with a tight fitting lid over a medium-high flame.


Place the potstickers into the skillet in a single layer, then add about 3-4 tbsp of water. Cover the skillet and reduce the flame to about medium or a touch lower. Steam the dumplings for about  5-7 minutes if they are fresh; 8-11 minutes if they are frozen (do not thaw them out first). Adjust the flame as needed to keep the bottoms from burning; the bottoms should just be nicely browned and slightly crispy.

If there's still a bit of water in the skillet when you remove the lid, then just cook another minute or two until the liquid has evaporated.

Serve with the dipping sauce, (see below).

potsticker dipping sauce
1/3 cup tamari or soy sauce
1/4 cup mirin or rice wine
3-4 tbsp rice vinegar
1 green onion, sliced
2 tsp toasted sesame oil
1/2 tsp chili paste, or to taste

Combine all of the sauce ingredients in a small bowl.

Serve with the potstickers.

Sunday, March 2, 2014

Fish Coconut Curry

(4 servings)


Don't let the variety of spices discourage you from trying this delicious curry. If you are fortunate enough to live near a Whole Foods, Sprouts or Central Market, they might very well have a spice section in their bulk foods department. In Dallas, it's possible to purchase spices by the spoonful for mere pennies.

Central Market will sometimes even take that extra step and order specific bulk spices for you. I needed lavender for a Coca Cola syrup I was experimenting with last summer. Central Market ordered it and then called me when they had it in stock two weeks later. I was thrilled they were willing to do this when all I needed was two tablespoons of the stuff!

2 tsp coconut oil
1 large onion, chopped
2 cloves garlic, inced
1 tbsp fresh ginger, minced
1 tsp garam masala
1 tsp ground coriander
1 tsp ground cumin
1/2 tsp turmeric
1/8 tsp cayenne, or to taste
14.5oz can diced tomatoes
13.5oz can coconut milk
1/2 - 2 jalapeno peppers, sliced and to taste
salt, if needed
1 lb firm white fish
2 tbsp fresh cilantro, chopped

Heat the coconut oil in a heavy pot with a tight fitting lid. Add the onion and cook until it's translucent. Adjust the flame as needed to keep the onion from burning.


Stir in the garlic, ginger, garam masala, coriander, cumin, turmeric and cayenne. Cook for a minute or two (until the spices are very fragrant), then stir in the tomatoes, coconut milk and jalapeno pepper. Bring the mixture to a simmer, then reduce the flame to low, cover the pot and cook for about an hour. Taste and add salt, if needed.

Cut the fish into bite sized pieces and add to the curry. Cook for another 3-6 minutes or until the fish is cooked through.  If you cook it too long the fish might begin to flake and fall apart. Remove from heat and sprinkle with the cilantro.

Serve.

Sunday, February 16, 2014

Egg Drop Soup

(4 servings)


This delicious soup can be on the table in minutes. The prep time is less than five minutes and all you really need to do is bring it up to a simmer, twice.

4 cups chicken broth, (1 qt)
2 - 3 tsp minced fresh ginger, to taste
2 - 3 green onions, sliced
1 - 2 pinches red pepper flakes
2 large eggs
2 tsp soy sauce
1  tsp sesame oil
1 tbsp corn starch
salt and pepper, to taste

Reserve about a 1/2 cup of the chicken broth. Set aside.

Combine the remaining broth with the ginger, green onions and red pepper flakes in a pot. Bring the mixture to a simmer over a medium flame.

While the soup is heating up, whisk together the eggs, soy sauce and sesame oil. Set aside.


When the soup reaches a simmer, pour the egg mixture slowly into the hot soup in a thin stream. Give everything a good stir.

Combine the cornstarch with the reserved chicken broth and stir the mixture into the soup. Allow everything to return to a simmer again. Taste and adjust the seasoning, if needed.

Remove from heat and serve.

Monday, December 23, 2013

Tamari Beef

(2-3 servings)


In the midst of this holiday season I haven't been craving turkey or ham, but rather this delicious Asian inspired beef dish. It's very easy to make and great with plain hot rice.

Happy Holidays Everyone!


1 tbsp coconut oil or another high temperature oil
3/4 lb beef top round or sirloin steak, cut into small strips across the grain
1 tsp sesame oil
3-4 cloves garlic, minced
2 tsp fresh ginger, minced
1/2 tsp chili oil or more to taste
1/2 cup water
1/4 cup reduced sodium tamari or soy sauce
1/4 cup rice vinegar
1/4 cup mirin (plain not seasoned) or rice wine
2 tbsp honey
1 bell pepper, seeded and cut into small julienne
2 tbsp water
1 tbsp cornstarch
2 green onions, thinly sliced at an angle

cooked rice for serving

Heat the oil in a wok over a high flame and fry the beef until it's browned. I had to do this in batches as my wok is small.

When the beef is browned, remove any extra fat and reduce the flame. Stir in the sesame oil, garlic, ginger and chili oil and cook for a minute or two.

Combine the water, tamari, vinegar, mirin and honey, then pour over the meat. When the liquid comes to a simmer, cover the wok and reduce the flame to the lowest setting. Cook for about 1 - 1 1/2 hours or until the meat is tender.


Add the bell pepper and cook another 10-15 minutes.

Combine the water and cornstarch and stir until it's smooth, then stir this mixture into the meat and peppers. Bring to a simmer and cook until the sauce has thickened; about 1-2 minutes.

Remove from heat and stir in the green onions. Serve with the cooked rice.

Sunday, November 17, 2013

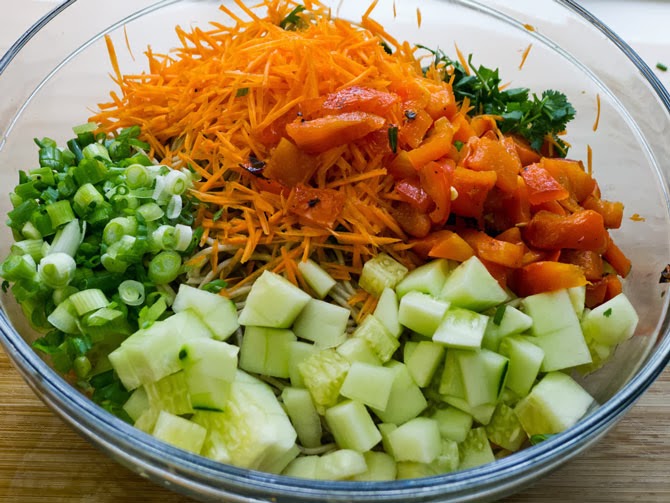
Soba Noodle Salad

(6-8 servings)


I have been eating a ton of green salads of late and decided to change things up a bit this weekend with this delicious Asian style soba noodle salad. This dish is somewhat versatile in that you can add almost any bits of vegetables you have on hand. In the past I've used broccoli, asparagus, corn, peas, beans, even celery.

dressing
1 small clove garlic, minced
small piece of fresh ginger, grated (about 2 tsp)
1/2 cup soy or tamari sauce
1/4 cup mirin or rice wine
3 tbsp rice vinegar
1 tbsp hot sesame oil
2 tsp honey

salad
12oz soba noodles cooked as directed, drained and cooled
3 green onions, sliced
1 roasted red bell pepper, diced
1/2 cucumber, diced
1 medium carrot, shredded
1/2 small  bunch cilantro, chopped
1/4 cup dry roasted peanuts, chopped or lightly toasted sesame seeds (optional)

In a small bowl combine the garlic, ginger, soy sauce, mirin, rice vinegar, sesame oil and honey. Set aside.


Place the soba noodles, green onions, bell pepper, cucumber, carrot and cilantro into a large bowl. Pour over the dressing and toss.


Garnish with the chopped peanuts or toasted sesame seeds, if using.

Sunday, September 1, 2013

Chicken Fried Rice

(3-4 servings)


Here's another fried rice recipe. I can't seem to get enough of them lately. This one contains tasty strips of browned chicken breast and a slightly higher proportion of veggies to rice. Yum!

Although it appears this recipe contains a ton of steps, this meal only took me about 25-30 minutes to prepare from start to finish!

chicken
1 egg white, reserve the yolk
2 tsp soy sauce
2 tsp rice wine
1 small chicken breast, about 3/4 lb.

fried rice
about 2 tbsp oil (split) for frying, such as coconut oil
2 carrots
1 red bell pepper
3-4 cloves garlic, minced
1 tbsp fresh ginger, minced
1 small broccoli crown
2 1/2 cups cooked rice
1 tsp hot chili sauce, give or take (to taste, optional)
1 egg plus the reserved egg yolk, beaten
1-2 tbsp soy sauce

2 green onions, sliced
2 tbsp fresh cilantro, chopped

Whisk together the egg white, soy sauce and rice wine in a bowl large enough to hold the chicken. Set aside.


Slice the chicken breast (across the grain) into thin slices and add to the egg white mixture. Toss until the chicken is evenly coated. Set aside while you prepare the vegetables.

Wash, scrape, then slice the carrots into thin rounds. Set aside.

Wash, and remove the stem and seeds from the bell pepper. Cut into small dice. Set Aside

Wash and cut the broccoli into small florets. Set aside.


Heat 2-3 teaspoons of oil in a large non-stick skillet or wok. When the oil is nice and hot, drop in the chicken pieces. Fry them until they are golden brown. When they are done, place them onto a plate and cover loosely.

Lower the heat and add another teaspoon of oil to the skillet. Add the carrots and fry them for about a minute. Stir in the red bell pepper, garlic and ginger. Saute for another minute then add the broccoli. Saute the mixture until the broccoli heats up. Place them into a large bowl and wipe out the skillet or wok. At this point the vegetables will be under-cooked and crunchy.  They will continue to cook in the bowl as they steam, and later on you will return them to the skillet or wok with the rice mixture where they will continue to cook further. At this point you just want to heat them up and get them started.


Add about 2 teaspoons of oil to the skillet or wok. Set the flame to medium and when the oil is hot add the rice. Fry the rice until it begins to dry out a bit. This will happen quickly if the rice is a day or two old. If you cooked the rice the same day it will be moister. You might have to lower the flame somewhat to keep it from burning. Cook and stir the rice until it stops steaming and most of the moisture has evaporated (the vegetables will moisten things up again).

If you are using a hot sauce, stir it into the rice now. When it's evenly combined, make a well in the center and pour the beaten eggs there. Using a wooden spoon scramble them and mix them evenly into the fried rice. Stir in the reserved vegetables. Sprinkle the soy sauce over the vegetables and rice. Increase the flame and continue to cook while stirring, until the mixture is hot and the vegetables are done to your liking. I like mine with a bit of crunch.

Stir in the chicken you have set aside and cook just long enough for it to heat through. Remove from heat and stir in the green onions and cilantro. Serve.

Saturday, August 24, 2013

Vegetable Fried Rice

(4 servings)


The last time I spoke with my sister, she mentioned she likes to make fried rice. What she described sounded delicious and I realized I couldn't remember the last time I made any. Fried rice is terrific when you think about it. It's economical, easy to make and a great way to use up leftovers for a really tasty meal.

There are a few things which come to mind when making fried rice. Vegetables are best cut into similar sizes for even cooking. Leftover rice from a day or two ago is ideal because it's drier, however you can use rice made on the same day. Just fry it a bit longer until most of the extra moisture has evaporated.

2 tbsp oil (I used coconut oil)
1 tbsp fresh ginger, finely minced
3-4 cloves garlic, pressed or finely minced
1 red bell pepper, cut into small dice
1/2 cup frozen corn
1/2 cup frozen peas
2 cups bean sprouts
2 - 2 1/2 cups cooked (and cooled) rice
1 tsp or more, hot chili sauce (optional)
2 eggs, beaten
2 tbsp soy sauce, or to taste
2-3 green onions, sliced

Heat half of the oil in a large non-stick skillet or wok over medium-low heat. Stir in the ginger and garlic and fry for 30 seconds or so. Stir in the red pepper and saute for about 30 seconds. Stir in the corn and peas and cook for about 1 minute. Stir in the bean sprouts.

When the sprouts just begin to wilt, remove from heat and place the vegetables into a large bowl. The vegetables will be under-cooked and crunchy.  They will continue to cook in the bowl as they steam and when the rice is fried you will return them to the skillet or wok where they will cook further. At this point you just want to heat them up.


Wipe out the skillet and add the remaining tablespoon of oil. Set the flame to medium and when the oil is hot add the rice. Saute the rice until it begins to dry out a bit. This will happen quickly of the rice is a day or two old. If you cooked the rice earlier in the day it will be moister. You might have to lower the flame somewhat to keep it from burning. Cook and stir the rice until it stops steaming and most of the moisture has evaporated.

If you are using a hot sauce, stir it into the rice now. When it's evenly combined, make a well in the center and pour the beaten eggs there. Using a wooden spoon scramble them and mix them evenly into the fried rice. Stir in the reserved vegetables. Sprinkle the soy sauce over the vegetables and rice. Increase the flame and continue to cook while stirring, until the mixture is hot and the vegetables are done to your liking.

Remove from heat and fold in the green onions. Serve.

Sunday, August 18, 2013

Spiced Cantaloupe Salad

(4 servings)


A week or so ago I came across this interesting recipe for a cantaloupe salad seasoned with a dressing containing fish sauce. I was pretty intrigued. A teaspoonful of fish sauce on its own can be unpleasant tasting, but add some to a dish and it can provide a wonderful complexity and depth of flavor that would be difficult to mimic otherwise.

I used cilantro for this Thai inspired salad because I only had regular basil on hand. Thai basil has an anise-like flavor which would have been really nice for this. The cilantro was better than using the regular basil, in my opinion. I also added a jalapeno pepper because those little red ones are just too darn hot for me. I suspect regardless of how you tweak this salad, it will still be really tasty. I've already made two batches of it!

adapted from morestomach
1 large cantaloupe, cut into bite-sized pieces
1 jalapeno pepper, dice (or use a hotter red pepper)
2 green onions, sliced
small handful cilantro or Thai basil, chopped or thinly sliced
freshly ground pepper, to taste
2-3 tbsp freshly squeezed lime juice
2 tsp fish sauce
1/2 tsp honey


Place the cantaloupe, jalapeno pepper, onion and cilantro into a salad bowl. Add freshly cracked pepper, to taste.


Combine the lime juice, fish sauce and honey in a small bowl. Pour over the salad mixture and toss until everything is evenly combined.

Serve.

Saturday, June 29, 2013

Coconut-Mango Bubble Tea with Homemade Boba Pearls

( 4 servings)


Sometimes I feel as if I'm living in cocoon. There's been this bubble tea craze happening and I didn't even know about it! I checked and there are actually several places that serve this tasty drink right here in Dallas! Frankly I'm a bit surprised Starbucks hasn't jumped in on the bandwagon, heck in Germany and Austria, McDonalds has been serving this beverage since last summer!

This Taiwanese tea-based drink originated in the 80's. Initially it was just cold tea, sometimes infused with fruit or fruit juice. Later someone added tapioca balls to the mix. Sometimes these balls are white but more frequently they are black, made from a mixture of tapioca, sweet potato, brown sugar. This drink is often served with a special large straw so you can slurp up the tapioca balls as you enjoy your beverage.

Bubble tea is available in a variety of flavors ranging from white or green teas to milk infused dark tea combined with fruit or syrups such as durian or lavender. I tried an avocado flavored bubble tea at the Asian mall. It was smooth and creamy like a milkshake. For my first attempt at creating this tasty beverage at home I tried this version which tasted more like iced tea flavored with juice and coconut milk.

I found the big straws at the Asian supermarket, but when I looked for the boba pearls I was disappointed by all of the extra chemicals and artificial colors listed as ingredients. I ended up making the balls myself. I found a great tutorial online.

green tea boba balls
1/2 cup tapioca starch
1/2 tsp green tea powder, (optional; I added this for color)
1/2 cup boiling water, give or take

1 cup mango juice

Combine the starch and tea if using in a small bowl. Make a well in the centre and slowly add the boiling water while stirring. Stop when the mixture forms into a ball; you might not have to use all of the water. Knead the ball a few times.

Pinch off small pieces and form into small balls the size of petite peas. Err on the small side, otherwise you won't be able to suck them up with your straw. Dust with tapioca starch to keep them from sticking to each other.


Allow the balls to dry for a couple of hours.

Bring a large pot of water to a boil and drop in the balls. Stir until they begin to rise to the surface, then allow them to simmer another 5-10 minutes. The tutorial suggested 20-30 minutes, but mine were done sooner. Try one after 5 minutes; it should be soft and chewy.


Remove the pearls from the pot with a slotted spoon and place into a small bowl. Pour the *mango juice over the pearls and allow them to cool. *Traditionally a sugar syrup is used here in place of the juice.

bubble tea
2 cups strongly brewed tea, cooled (any flavor you like; I used English Breakfast)
1 cup coconut milk
12 regular ice cubes
4 big bubble tea straws (I found mine at an Asian market)
liquid honey, optional

Divide the cooled boba balls and juice between 4 tall glasses. Add 1/2 a cup of chilled tea to each glass, then add 1/4 cup of coconut milk to each. Finish with 3 ice cubes per glass.


Serve with the big straws. Pass around the honey and enjoy!

Sunday, June 23, 2013

Spicy Mango Chutney

(2 pints)


I rarely make anything the same way twice. In my case it depends on mood, what I happen to have on hand and time.

Mangoes were on sale this week and this morning I made this delicious spicy mango chutney. It has a bit more kick to it than my usual chutney. In all likelihood that's because I left the seeds in the jalapeno pepper. I have been getting braver and doing this more frequently recently.

The chutney will keep refrigerated for about a month. Just make sure to sterilize your jars and lids first.

1 tbsp coconut oil
4 cloves garlic, finely chopped
1/4 cup fresh ginger. chopped
1 tbsp mustard seeds
1/2 tsp turmeric
1/2 tsp cumin
1/2 tsp coriander
1/2 tsp curry powder
1/2 tsp cardamom
1/2 tsp salt
1/2 large sweet onion, chopped
1 jalapeno pepper, thinly sliced (seeds and all if you are feeling brave)
1/2 cup apple cider vinegar
1/2 cup sucanat or brown sugar
4 yellow slightly under-ripe mangoes, cut into 1/2 inch dice (about 3 cups)
1/2 cup currants
up to 1/2 cup water, if needed 

Heat the oil in a heavy pot with a tight fitting lid over a medium flame. Add the garlic and ginger. Saute for a minute or two. Add the mustard seeds and when they begin to make a popping sound stir in the turmeric, cumin, coriander, curry powder, cardamom and salt.


Lower the flame and stir in the onion. Saute the mixture, stirring from time to time until the onion is translucent, taking care nothing sticks to the bottom of the pot. Stir in the jalapeno slices.


Add the vinegar, sucanat, diced mango, and currants. Cover the pot with a lid and cook over a low flame for about 50 minutes. Check the chutney about every 10-15 minutes and give it a good stir. Despite the lid, the chutney might become too thick; stir in a small amount of water, if needed.

Ladle the hot chutney into sterilized jars, cover with lids, screw on the bands and cool. Will keep refrigerated for about one month.

If you plan on keeping the chutney longer than 4 weeks then ladle into hot sterilized jars, leaving about a 1/2" head space. Cover with metal lids, and screw on the bands. Process in boiling water bath 8 minutes (extend this time to 15 minutes if your jars weren't hot and sterilized beforehand). Remove from the water and leave to cool. The lids should make a popping sound as the jars cool.

Sunday, March 3, 2013

Fried Shrimp Cakes


(3-4 servings)


Several years ago I sampled something similar to these cakes in an Asian restaurant. I tried to recreate them in my kitchen and although they were never quite the same, they were really delicious.

These savory clumps of shrimp and sweet potato are bound together with rice starch and egg and then served with a tangy and spicy sauce.

shrimp cakes
1/2 lb medium raw shrimp
1 1/2 tbsp fish sauce
1 tsp garlic paste or minced garlic
1 tsp minced ginger
1 sweet potato, about 12 oz
1 Serrano pepper
2 green onions, thinly sliced
salt and freshly cracked pepper, to taste
1 egg, slightly beaten
1 cup rice starch

dipping sauce
3-4 tbsp fish sauce
1-2 tbsp tamari or soy sauce
2-3 tsp fresh lime or lemon juice
1 tsp honey or more to taste
1/2 tsp sesame oil
reserved Serrano pepper, sliced

oil for frying

Clean the shrimp by removing the shells and then the vein which runs along the backs.

Place the cleaned shrimp into a bowl. Drizzle with the fish sauce and add the garlic and ginger. Toss the mixture until everything is evenly combined and the shrimp are coated. Set aside.

Peel the sweet potato and then shred it. Place into a large bowl.

Wash the pepper and then slice about 3/4 inch off one end and set aside for the sauce. You can either remove the seeds or leave them in depending on how much heat you like. Chop the pepper fine and add to the sweet potatoes. Add the sliced green onions. Sprinkle with a bit of salt and freshly cracked pepper.

Toss the sweet potato mixture until it's well combined.

At this point you can either roughly chop the reserved shrimp or leave them intact. I prefer to leave them as they are, but that does create a bit of extra work later on.

Add the shrimp and the marinade to the sweet potato mixture as well as the egg. Stir until well combined.

Sprinkle the rice starch over the shrimp and potato mixture and stir until everything is well combined.


Heat about 1/4 inch of oil in a large skillet until it is quite hot, (you might have to adjust the heat a bit after frying the first batch).

While the oil is heating up, make the sauce.

Combine the fish sauce, tamari, lime juice, honey and sesame oil. Begin with the smaller amounts and keep adding a bit of everything until you find a balance of flavours you like. You can always lighten up the sauce a touch by adding a tablespoon or two of water.

Slice the reserved Serrano pepper and add that to the sauce. Set aside.

If you roughly chopped the shrimp, then take a tablespoon of the mixture and carefully slide it into the hot oil. Pat it down a bit with the back of the spoon to flatten it out somewhat. Form a few more cakes taking care not to crowd them too much. If you left the shrimp intact, then scoop up a tablespoon of the potato mixture and then pick out a shrimp and place that on top. Slide both into the hot oil with the shrimp on top and flatten the cake out slightly in the oil with the back of the spoon.

Fry for about 2 minutes or until the bottom is nicely browned, then carefully flip them over and fry the other side for another minute or two. Remove with a slotted spoon and set on a plate lined with paper towels to drain while you finish the rest.

Serve with the sauce.


Monday, May 7, 2012

Grilled Tandoori Chicken Salad


(1 meal sized portion)


This salad was so tasty, I will grill extra chicken the next time! It's always wonderful when leftovers are as delicious as these were. I didn't have any jalapeno peppers handy, but I imagine they would have been absolutely terrific here. This summery salad turned into an amazing lunch for me.

1 cup leftover grilled tandoori chicken, cut up
1/2 cup mango, diced
1/4 cup red or orange bell pepper, diced
2 tbsp red onion, diced
2 tbsp celery, diced
1-2 tbsp cilantro, chopped
2 tbsp plain yogurt
1 tbsp mayonnaise
1/4 tsp curry powder
1/4 tsp cardamon
freshly grated black pepper
salt, to taste

Place the chicken, mango, bell pepper, red onion, celery and cilantro into a bowl.


Combine the yogurt, mayonnaise, curry powder, cardamom and pepper in another small bowl. Pour over the chicken mixture and toss until everything is evenly combined. Add salt, if needed.


Sunday, May 6, 2012

Do Chua; Vietnamese Carrot & Daikon Pickles


(about 3 pints)


From time to time I get lunch from a Vietnamese restaurant which serves these pickles with every dish. These sweet and sour pickles are delicious, so much so I often devour them first before touching anything else on my plate. They are incredibly easy to make and will keep well refrigerated for several weeks. They are quite wonderful with grilled meats. I prepared them to go with the tandoori chicken I had yesterday.

This week the daikon were sold in bunches of three, so I made more than my usual amount. If you haven't purchased these radishes before, then look for firm ones around 1 1/2 - 2 inches in diameter. These are generally the tastiest, if they get too large they can become rather bitter.

1 lb daikon radishes
1 lb carrots
2 tsp salt
2 tsp sugar
1/2 cup sugar
1 cup distilled white vinegar
1 1/4 cups warm water

Wash and peel both the daikon and carrots. Cut both into even matchstick style pieces and place in a non reactive bowl. I used a package of snacking carrots, so I cut the diakon to match their length.

Sprinkle the salt and sugar over the cut up vegetables and toss a few times. Set aside for about 10-15 minutes, tossing once or twice.

Combine the 1/2 cup sugar, vinegar and water. Stir until the sugar has dissolved.

Squeeze as much liquid as possible from the carrots and daikon and place in a colander. Rinse with cold water, the return the vegetables to the bowl.


Add the sugar and vinegar mixture and toss to combine everything evenly. Refrigerate for at least 6 hours (even better, overnight) before serving.

These will keep up to 3 or 4 weeks refrigerated. I have heard that the daikon can become quite "smelly" over time needing to be "aired", but I have yet to experience this.


Saturday, May 5, 2012

Grilled Tandoori Chicken


(4 servings)


Traditional tandoori chicken is typically prepared from a whole chicken which has been cut up, marinated, then baked in a very hot clay oven, a tandoor.

I end up grilling mine. I have two grills. One gas and a small tabletop grill which uses charcoal. More often than not I prefer using the smaller grill, although there are times when the gas grill is just quicker and more convenient. Today I fired up the smaller grill.

This is one of those rare occasions I'll use skinless chicken breast (rather than my favourite, chicken thighs) which I cut into bite sized pieces. The breast meat turns out juicy and tender after spending close to a day in a marinade made of whole milk yogurt, lemon juice and spices.

1/2 cup whole milk yogurt
freshly squeezed juice from 1 small lemon
1 tbsp minced garlic
1 tbsp minced fresh ginger
1 tbsp sweet paprika
2 tsp garam masala
1 tsp cumin
1 tsp ground coriander
1 tsp salt
1/2 - 1 tsp cayenne; to taste
2 lbs skinless chicken breasts

bamboo skewers (soaked in water 30 minutes before grilling)

Combine everything except the chicken in a non-reactive bowl. Set aside.

Cut the chicken breasts into 1 1/4 inch cubes. Toss them in the yogurt mixture until they are evenly coated. Cover with wrap and place in the refrigerator overnight, or up to about 24 hours.

Soak the skewers in water for about 30 minutes before getting ready to grill.


Thread the chicken onto the skewers and grill, turning frequently until they are cooked through and no longer pink in the centre; about 6-10 minutes.

Zucchini was on sale today, so I grabbed a few on impulse. It's a pretty boring vegetable in my opinion, but grilled it can be rather nice.

1-2 medium zucchini, cut into 1/4 inch slices
1-2 tbsp olive oil
1/2 tsp salt
1/8 tsp freshly ground black pepper
1/4 tsp red pepper flakes

Combine the oil with salt, pepper and red pepper flakes. Brush the mixture onto one side of the cut up zucchini.


Place the oiled side down onto the grill and then brush the top side. Flip them over when the undersides begin to brown; about 2-3 minutes per side.